
Are you encountering the “Upload: Failed to write file to disk” error message when uploading files in WordPress? Whether you’re trying to add images or videos to your site, this message can be very frustrating, as it prevents you from sharing your amazing visuals with your audience.
The “Upload: Failed to write file to disk” error is a server-side error: it means the web server cannot save your uploaded file to disk. In WordPress, three common causes are incorrect file permissions, a full or unavailable temporary directory on the server, and exhausted disk space on your hosting plan.
Fortunately, you can troubleshoot this issue by following a few simple steps. In some cases, you’ll just need to contact your web host to get it fixed.
In this post, we’ll take a closer look at the “Upload: Failed to write file to disk” error and its main causes. We’ll then show you three simple ways to fix this problem. Let’s get started!
What does the “Upload: Failed to write file to disk” error mean in WordPress?
In plain terms, the “Upload: Failed to write file to disk” error means the server-side PHP process handling your upload couldn’t write the file to its destination on the server. It isn’t unique to WordPress — any PHP-based upload can fail the same way — but in WordPress it typically appears when you’re uploading media files. There are a few possible causes, the most common one being incorrect file permissions.
Every file and folder on your WordPress site comes with a set of permissions. These are controlled by the web server and determine which site users can access and edit your files and folders. The standard WordPress scheme is 755 for folders and 644 for files, per WordPress’s file permissions documentation. If your uploads directory is set more restrictively, or its ownership is wrong, the server can’t write new files there, and media uploads fail.
However, this error could also be caused by a problem with the server’s temporary directory, where PHP stages uploads. In fact, “Failed to write file to disk” is one of PHP’s own documented upload error codes (UPLOAD_ERR_CANT_WRITE), alongside “Missing a temporary folder” (UPLOAD_ERR_NO_TMP_DIR): if PHP can’t write to its temporary directory, the upload fails. It’s also possible that you’ve reached the disk space limit provided with your hosting plan.
Next, we’ll take a closer look at these possible causes. We’ll also walk you through a solution for each scenario.

Skip the Stress
Avoid troubleshooting when you sign up for DreamPress. Our friendly WordPress experts are available 24/7 to help solve website problems — big or small.
Check Out PlansHow to fix the “Upload: Failed to write file to disk” error in WordPress (3 ways)
Here are the three fixes, in the order we recommend trying them:
- Correct your file permissions (755 for folders, 644 for files).
- Empty (or relocate) the WordPress temporary folder.
- Free up disk space or upgrade your hosting plan.
As always, we recommend that you perform a backup of your site before proceeding. That way, if something goes wrong, you can restore your site to an earlier version.
1. Change the file permissions
As we mentioned earlier, the “Upload: Failed to write file to disk” error is likely caused by incorrect file permissions. Before changing anything, you can confirm the diagnosis from inside WordPress: go to Tools > Site Health, open the Info tab, and expand the Filesystem Permissions section. If your uploads directory shows “Not writable,” you’ve found your culprit. To fix the permissions, you can contact your hosting provider and ask them to do it for you. Alternatively, you can do this yourself by accessing your site’s root directory.
First, you’ll need to connect to your site via a Secure File Transfer Protocol (SFTP) client such as FileZilla. You can also access your site’s directory through the file manager in your hosting account.
If you have a DreamHost account, start by navigating to Websites > Files in the sidebar. Then locate your domain and click on the Manage Files button.
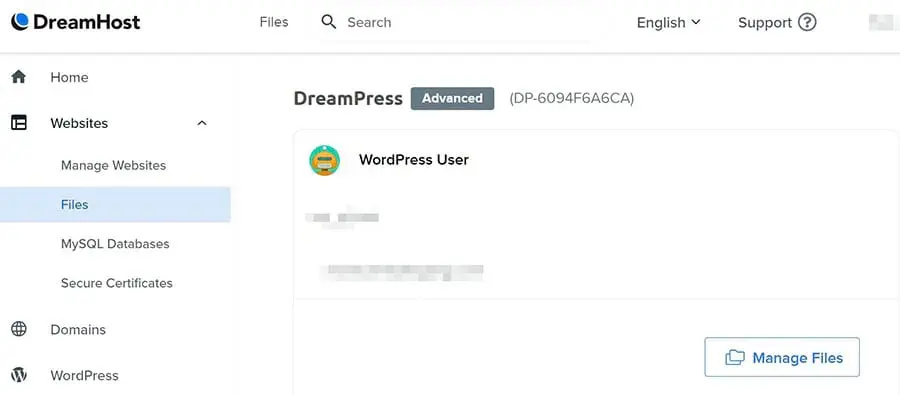
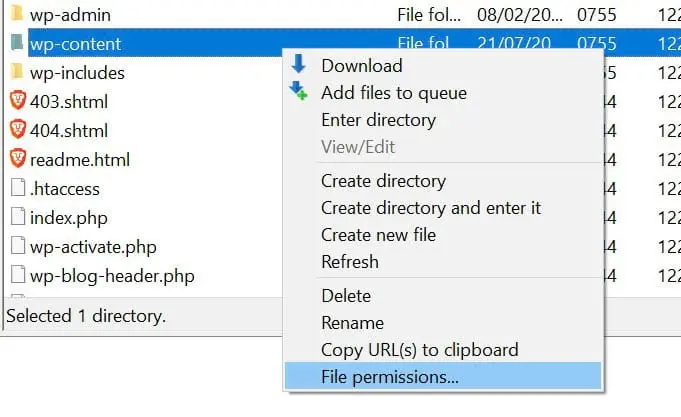
This will take you to the file manager. To access your site’s directory, you can open the folder labeled with your domain name. Inside, locate the wp-content folder and right-click on it.
Next, select File permissions.
In the pop-up window, go to the Numeric value field and enter “755” in the corresponding box. (Permission needs can vary by host and server configuration, so confirm with your hosting provider if 755 doesn’t resolve the issue.) Next, you can select the Recurse into subdirectories and Apply to directories only options and click on OK.
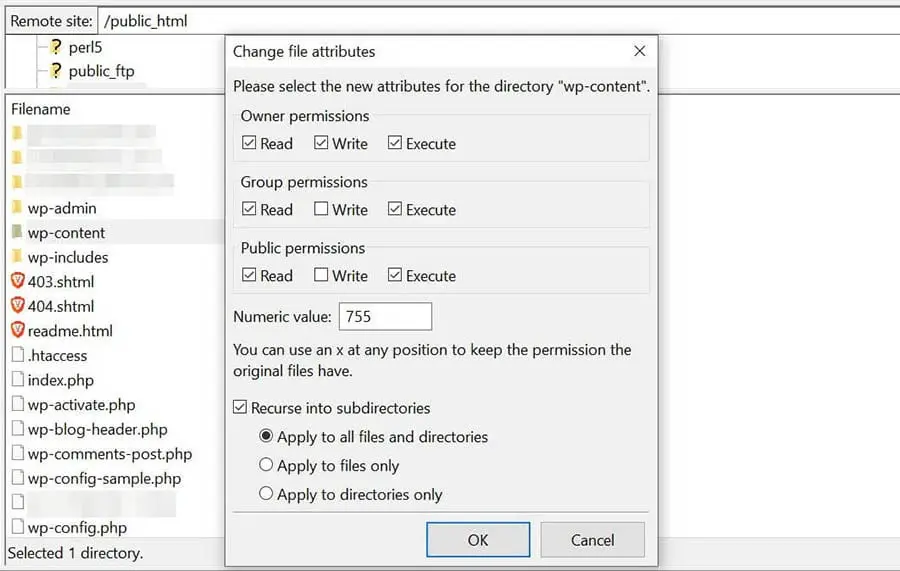
You have now set the correct file permissions for all subdirectories inside the wp-content folder. This includes the uploads folder, which is where your uploaded media files are stored.
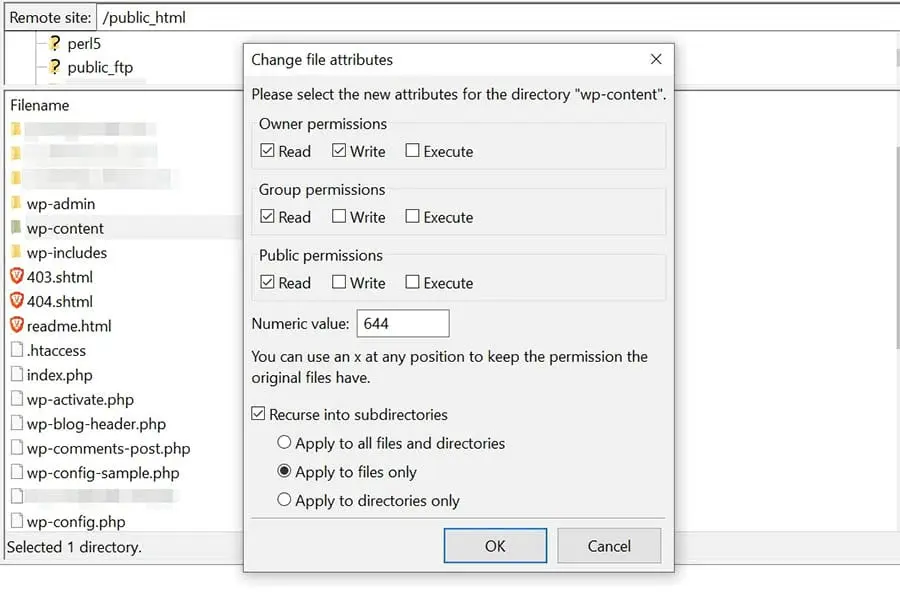
However, you’ll also need to set the correct permissions for the files within those folders. To do this, you can right-click on the wp-content folder again and select File permissions.
In the Numeric value field, type in “644”. Then select the Recurse into subdirectories and Apply to files only options, and click on OK.
Don’t worry if you’re still unable to upload files to your site after checking your file permissions. There are a couple of other things you can do to resolve the issue.
2. Empty the WordPress temporary folder
If changing the file permissions doesn’t solve the problem, you may need to empty your temporary folder. WordPress processes your media uploads in PHP. Per PHP’s documentation on POST method uploads, uploaded files are stored by default in the server’s temporary directory (the upload_tmp_dir location in php.ini) and are then moved to their final destination — in WordPress’s case, your uploads folder.
If the temporary folder is full, WordPress won’t be able to write your files to disk until you’ve emptied it. On web hosting plans, you typically can’t reach the server’s temporary directory over SFTP. However, you can simply contact your hosting provider and ask them to empty the folder for you, and then check to see if the error has been resolved. On a VPS or dedicated server, a user with sudo or shell access can clear the temporary folder directly.
Alternatively, you can try to resolve this issue by defining a new location for WordPress to store your media (instead of the temporary folder). First, you’ll need to connect to your site via an SFTP client or the file manager. Then locate the wp-config.php file, right-click on it, and select View/Edit.
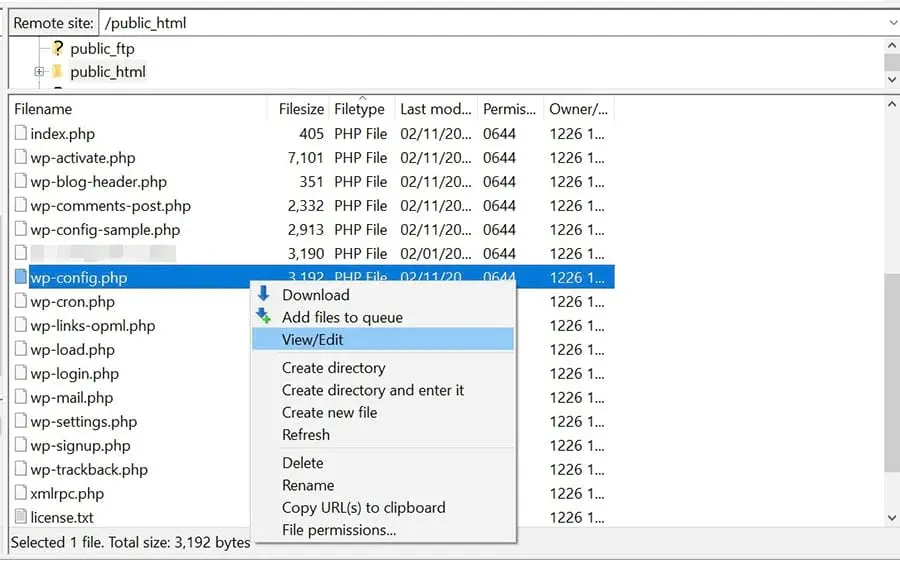
Next, you’ll need to paste in the following code right before the line that reads “That’s all, stop editing! Happy publishing”:
define(‘WP_TEMP_DIR’, dirname(__FILE__) . ‘/wp-content/temp/’);
Save your changes, then navigate to the wp-content folder, open it, and create a new folder inside it called temp.
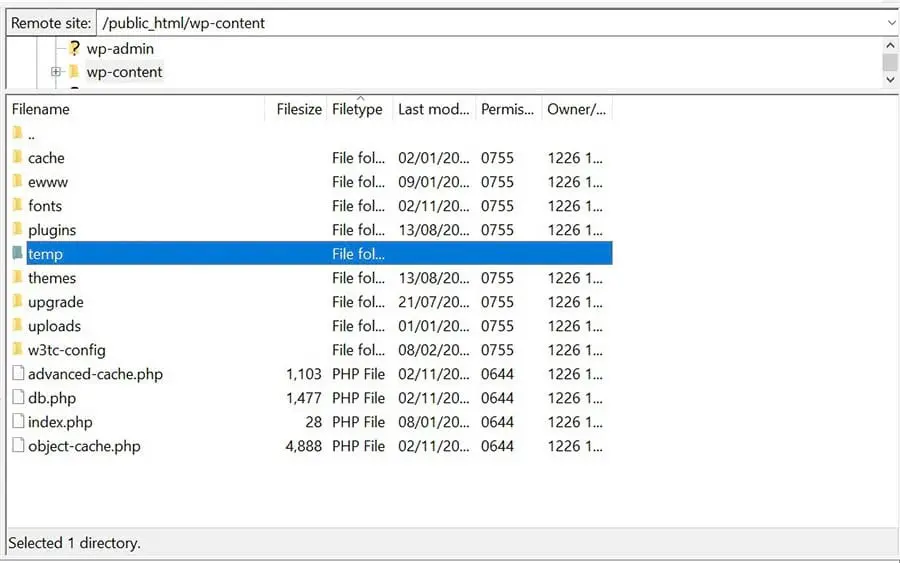
When you’re done, you can return to your website and try to upload an image. If the file disk error was caused by the temporary folder, the issue should now be resolved.
3. Free up disk space or upgrade your hosting plan
The disk error could also be a sign that you’ve outgrown your current hosting plan. For example, if you’ve been adding a lot of content to your site, including media files, new pages, and plugins, you might have used up all the disk space available in your account.
Your web host may be able to tell you how much disk space you have left. If you’re a DreamHost client, you can check your storage usage by logging into your hosting account and opening the Servers & Usage page, which displays CPU, RAM, and storage usage for your Web Hosting plan in visual graphs. You can also click the View Disk Usage link under Other Active Services on the Manage Account page.
If you’re near your limit, free up the space you already have before paying for more. Delete old backup archives that plugins have stored on the server, remove unused plugins and themes, clear built-up caches, rotate or delete old log files, and compress oversized images. DreamHost’s disk usage best practices guide walks through each of these steps.
If cleanup doesn’t get you comfortably under your limit, your site legitimately needs more ongoing storage, and it might be time to upgrade to a more advanced hosting plan. This will give your site more room to grow. Compare your current storage cap and usage against what each candidate plan lists, and choose one with meaningfully more space. For a WordPress site that also wants hands-off management, DreamPress, DreamHost’s managed WordPress hosting, is worth weighing, but choose it for the managed features rather than storage alone: DreamHost’s Web Hosting tiers reach 100 GB, more than the smaller DreamPress plans, and each plan’s storage and current pricing are listed on its page.
How to stop the error from coming back
If the error keeps returning, one of three things is usually drifting. Disk usage may be climbing again (check the Servers & Usage page), the temporary directory may be filling up (ask your host to confirm and clear it), or your file permissions may be changing (re-run the Site Health check under Tools > Site Health > Info).
Prevention is mostly housekeeping. Store backups off-server instead of in your hosting account, and make the cleanup steps from fix #3 (images, logs, caches, unused plugins and themes) a regular habit rather than a one-time rescue.
Additional WordPress error articles
Do you want to learn how to resolve other technical issues on your site? We’ve put together several tutorials to help you troubleshoot the most common WordPress errors:
- How to Troubleshoot the WordPress White Screen of Death
- How to Fix the 500 Internal Server Error in WordPress
- How to Fix Syntax Errors in WordPress
- How to Fix the WordPress Not Sending Email Issue
- How to Fix the Error Establishing a Database Connection
- How to Fix WordPress Error 404 Not Found
- How to Fix White Text and Missing Buttons in WordPress Visual Editor
- How to Fix the Sidebar Below Content Error in WordPress
- What to Do When You’re Locked Out of the WordPress Admin Area
If you’re looking for more information about running a WordPress site, make sure to check out our WordPress Tutorials. This is a collection of guides designed to help you navigate the WordPress dashboard like an expert.
“Failed to write file to disk” FAQs
Is the “failed to write file to disk” error server-side?
Yes. The error comes from the server, not your browser or computer: the server-side process handling the upload couldn’t write the file to disk. That’s why every fix (permissions, the temporary folder, disk space) happens on the server.
Does the error mean the server cannot save my file?
Exactly. WordPress received your upload, but the web server was unable to save it to its destination folder. The file won’t reach your media library until the underlying cause is fixed — most often incorrect file permissions.
What role does PHP play in this upload error?
WordPress processes uploads in PHP. Your file is first stored in the server’s temporary directory before being moved to the uploads folder, so a full temporary directory can trigger the error even when your file permissions are correct.
How do I empty the WordPress temporary folder?
On web hosting plans, you typically can’t reach the server’s temporary directory yourself, so ask your host’s support team to clear it. Alternatively, define the WP_TEMP_DIR constant in wp-config.php to move the temporary folder somewhere you can manage.
Fix the “Upload: Failed to write file to disk” error
The “Upload: Failed to write file to disk” error message prevents you from uploading files such as images and videos to your WordPress site. Incorrect file permissions on your site normally cause this error. However, you may also be seeing this message because you’ve used all the disk space offered with your hosting plan.
In this article, we looked at three simple ways to fix this common WordPress error:
- Change the file permissions of your WordPress site using an SFTP client like FileZilla.
- Empty the WordPress temporary folder through your web host, or relocate it with the WP_TEMP_DIR constant in wp-config.php.
- Free up disk space by clearing old backups, logs, and caches, or upgrade your hosting plan for more storage.
If you’d rather never troubleshoot this yourself, DreamPress plans include 24/7 support from in-house WordPress experts. DreamPress is DreamHost’s managed WordPress hosting, and it makes it easy to move up to a larger plan as your site grows.