You’ve probably put a lot of hard work into your site, and if something were to happen to it, the results could be devastating. Hackers could lock you out of your website, data files could become corrupted, or you could even accidentally delete your site — what’s worse is that the results could be permanent.
Maintaining regular backups could save you from ever finding yourself in this position. There are several different methods for backing up your WordPress website — most importantly, they can all help prevent the loss of your valuable site files and database.
The Importance of Backing Up Your WordPress Website
Let’s start with the basics. A WordPress backup is simply a copy of all your site’s files and database. Backups are used to restore sites that have been compromised through hacking or corrupted files or websites that have been purposely or accidentally deleted.
How often you should back up your website depends on your niche and size. If you have a site that is constantly updated, such as a high-traffic blog or an e-commerce site, you may want to perform backups daily. Websites with mostly static content are usually fine with less frequent backups.
It’s highly recommended that you make multiple backups and save them in different places. Just as your site can become compromised or lost, your backups could be destroyed or deleted too. Having several backups helps ensure that you’ll always have a fresh and current backup, even when another is unavailable.
How to Back Up WordPress (3 Methods)
There are a few different methods for backing up WordPress sites. Each has its advantages and disadvantages. The best approach will be up to you, but it’s wise to know about all three. Let’s take a look!
1. Back Up WordPress Manually
Backing up a WordPress site manually is the most difficult method, but it is sometimes necessary. If you’re locked out of your WordPress dashboard due to an error or security issue and need to make a backup, this may be the only way to do it.
There are two stages to this: backing up your files and backing up your database. To start, you’ll need your Secure File Transfer Protocol (SFTP) credentials. You’ll usually find them within your hosting account’s back end. If you can’t find them, just contact your host — they’ll be able to root them out for you.
Once you have your SFTP credentials, you’ll want to download and launch a suitable client, such as FileZilla. This option is excellent because it’s free, open-source, and easy to use.
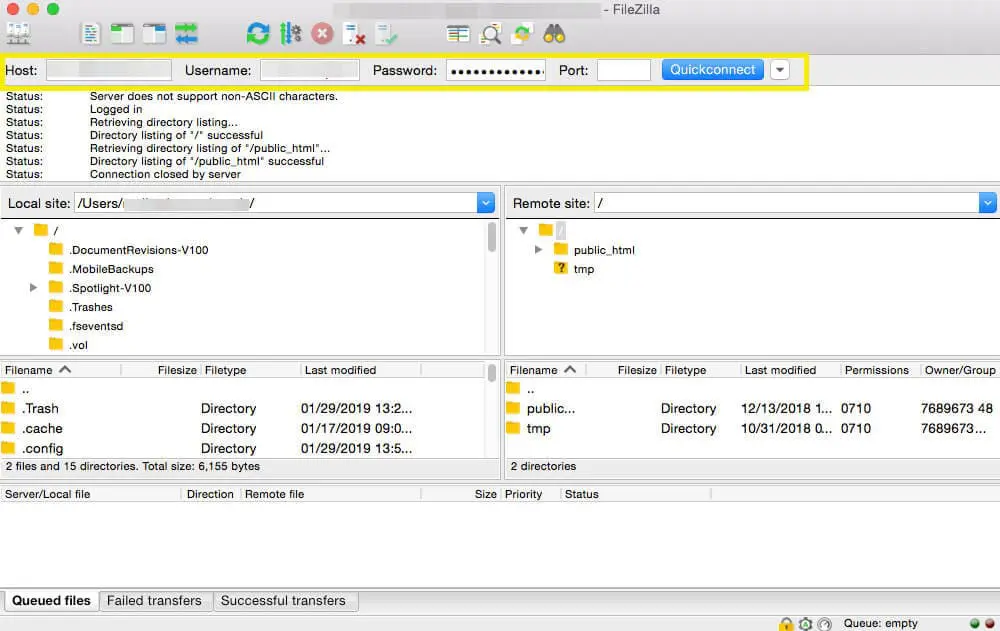
Once it’s open, enter your credentials in the specified areas:

After you’ve established a connection with your server, you’ll need a destination folder for your backup. You can create one without leaving FileZilla by right-clicking within the top-left quadrant, selecting Create Directory, and giving it a name.
Next, drag the WordPress files from your server (found in the top-right quadrant) and drop them in your destination folder. The download may take a while — coffee time! — but once it’s done, you’ll have a backup of your site’s files saved to your computer.
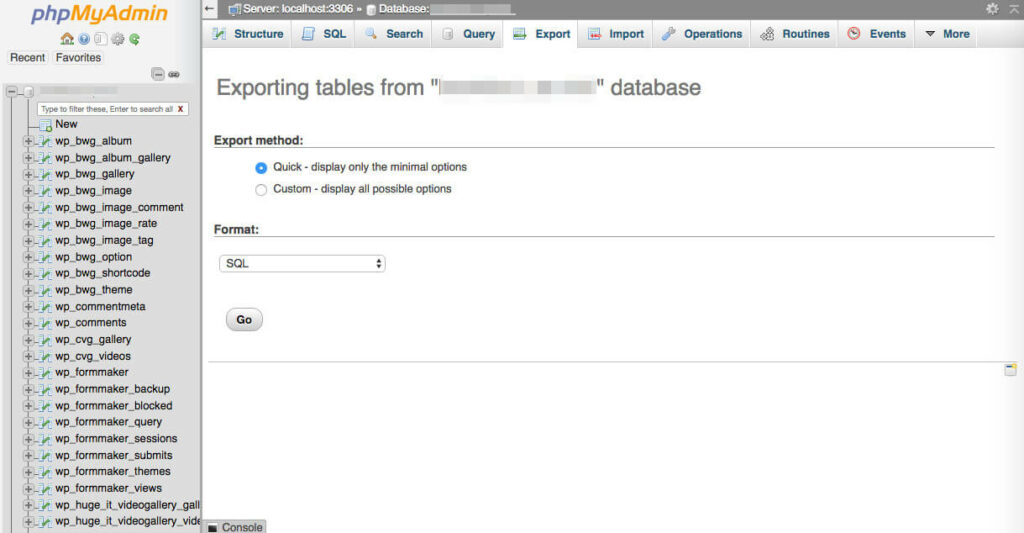
However, you’ll still need to back up your WordPress database. To do this, you’ll need to utilize the phpMyAdmin tool, which you can find within your host’s back end. Once you’re logged in, select your WordPress database from the sidebar:

Next, navigate to the top of the screen to the Export tab. Select the Quick export method, click on Go, and download the file when prompted. Again, the download may take some time and will save a backup of your database to your computer. That’s it!
2. Install a WordPress Plugin to Run Automatic Backups
Using a plugin is much easier and faster than backing up WordPress manually. Some plugins, such as UpdraftPlus, enable you to schedule automatic backups, giving you back much-needed headspace!
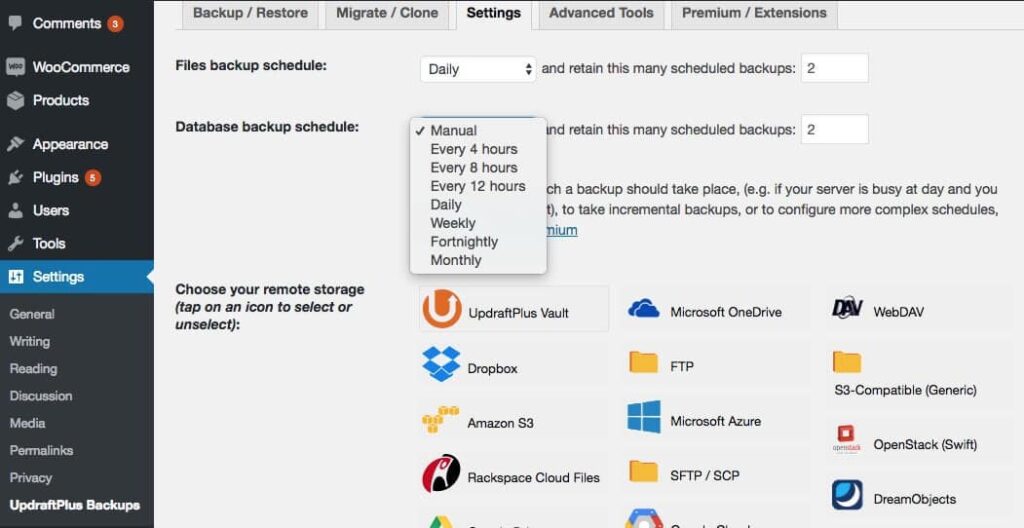
To implement this backup method, you’ll first have to install and activate your chosen plugin. From here, you’ll be able to schedule your backups, determine where the plugin should save them, and select the files you want to back up:

Many WordPress backup plugins (including UpdraftPlus) enable you to save backups locally or to the cloud. This is a great way to keep backups in multiple locations as an extra precaution.
However, one downside to using a plugin is that it’s difficult to monitor whether backups are being created. Of course, backing up your site manually can help with this since you’ll be able to easily see if the backup is completed correctly. However, there is one way that can provide the best of both worlds.
3. Manage Backups Through Your Hosting Provider
Some hosting providers, including us at DreamHost, offer a backup feature. How you access, schedule, save, and restore your backups will vary depending on your provider. We provide one-click backups to all customers and automated daily backups to customers with managed WordPress plans.
Automated backups provide the highest level of convenience possible, running in the background without you having to do a thing. You can (of course) supplement them with on-demand backups outside of your normal schedule — for example, right before pushing changes to your live site.
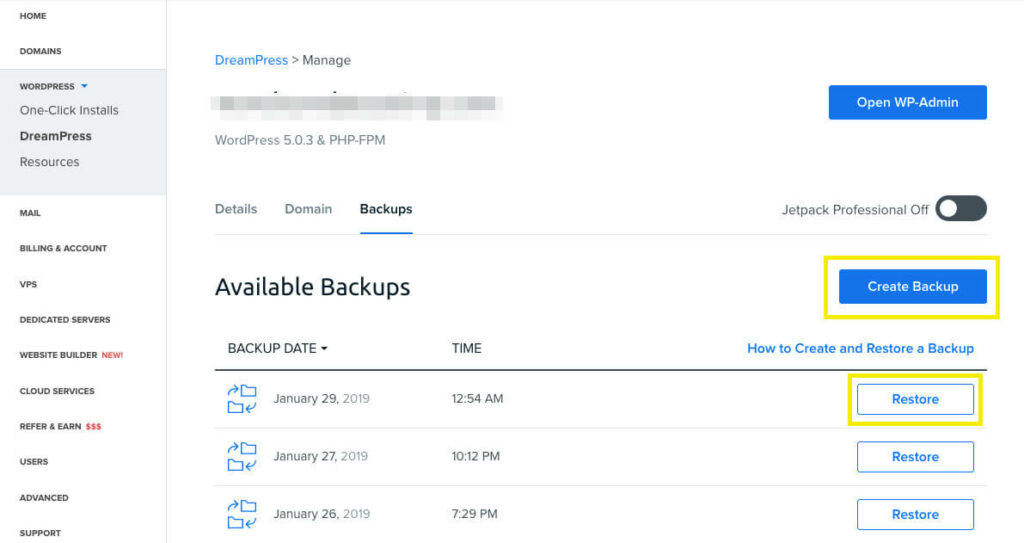
To access your backups as a DreamPress customer, log in to your account and select DreamPress from the WordPress drop-down in the sidebar. From here, find the domain you want to back up and click on the Manage button. You can then select the Backups tab, where all your backups will be listed, and also create or restore them with a single click:

Finally, letting your host automate backups on your behalf is usually a ‘set-and-forget’ setting. However, for extra security, you may still want to save multiple backups. It’s worth keeping in mind that if your site has a server issue and the backups are stored on the same server as your site (a ‘no-no’), you may run into trouble.
Back Up Your WordPress Site Today
Your website is important to you, so it’s vital to protect it from outside threats, simple human errors, or something else. Backing up your WordPress site regularly will ensure that you have a way to get your site back if the worst happens.

Do More with DreamPress
DreamPress Plus and Pro users get access to Jetpack Professional (and 200+ premium themes) at no added cost!
Check Out Plans
