Did you know, 96.55% of websites never receive a single visitor from Google? We could hardly believe it either!
That’s right– countless businesses are making this simple mistake every day — They create beautiful, content-rich sites, but forget to tell the one guest who brings the crowd: Google.
This has nothing to do with a website being “good enough.” Instead, this is entirely because Google has no idea the website exists.
Enter Google Search Console (GSC for the cool kids) — the easiest way to tell Google about your site.
In this guide, you’ll learn how to:
- Introduce your website to Google.
- Ensure all your pages are discovered.
- Monitor your site’s performance in real time…
…and much more!
Let’s jump right in.
What Is the Google Search Console?
Google Search Console, previously known as Google Webmaster Tools, is a free web service provided by Google.
It helps website owners monitor and maintain their site’s presence in Google search results. Think of it as your website’s health tracker, constantly monitoring its performance in Google’s search ecosystem.
GSC provides a wealth of information about your website’s search performance, including:
- How often does your site appear in Google search results?
- Which search queries bring users to your site?
- How many users click on your site in the search results?
- Which other sites link to yours?
- Any issues Google encounters when crawling your site?
But GSC isn’t just about providing data. It also offers tools to help you improve your site’s search performance.
You can submit new content for crawling, monitor and resolve malware or spam issues, and even see which queries are driving traffic to your site.
Crawling
Crawling is when a search engine bot looks through web pages for indexing and ranking. These bots are often called ‘crawlers’ or ‘spiders’. They closely review anything they can find on a page.
Read MoreThe best part? You don’t need to be a search engine optimization (SEO) expert to use Google Search Console. While it provides advanced features for seasoned professionals, its core functions are accessible to anyone who wants to improve their website’s performance in Google Search.
Key Differences Between Old Search Console and New Search Console
Like most of Google’s services, Search Console is constantly updated with new features and functionalities. One of the most important updates happened in 2018 when Google launched a completely new version of Google Search Console.
With this new version came more detailed performance analytics.
Here’s what you can now expect from GSC:
- Index Coverage report: Notice which of your web pages Google has indexed and whether it has encountered any indexing problems.
- Improved Performance report: Review search analytics data from the previous 16 months.
- Links report: Get information about who links to your website.
- URL inspection: View crawling, indexing, and serving information for any searched URL.
Apart from these, the 2018 update added two more features to Google Search Console:
- Core Web Vitals report: Measures user experience via loading, interactivity, and visual stability.
- Page experience report: Allows you to view what percentage of your URLs provide a good experience for visitors.
If you’re used to the older version of Google Search Console, you can use some of its same features and reports. That’s because the update retained the reports on sitemaps, Accelerated Mobile Pages (AMP), mobile usability, and security issues.
While this update brought new features (including a personal favorite, sticky filters!), it also removed some. You no longer have the HTML improvement reports, property sets, or Android apps.
How To Get Started With Google Search Console (in 2 Steps)
Now that you understand the benefits provided in the new Google Search Console, let’s sign up for this free tool.
This way, you can start improving your search rankings immediately and draw in new visitors.
Step 1: Add a New Website
To get started with Google Search Console, sign into your Google account. Then, go to the Google Search Console home page and click on Start Now.
This will allow you to add your website to GSC.
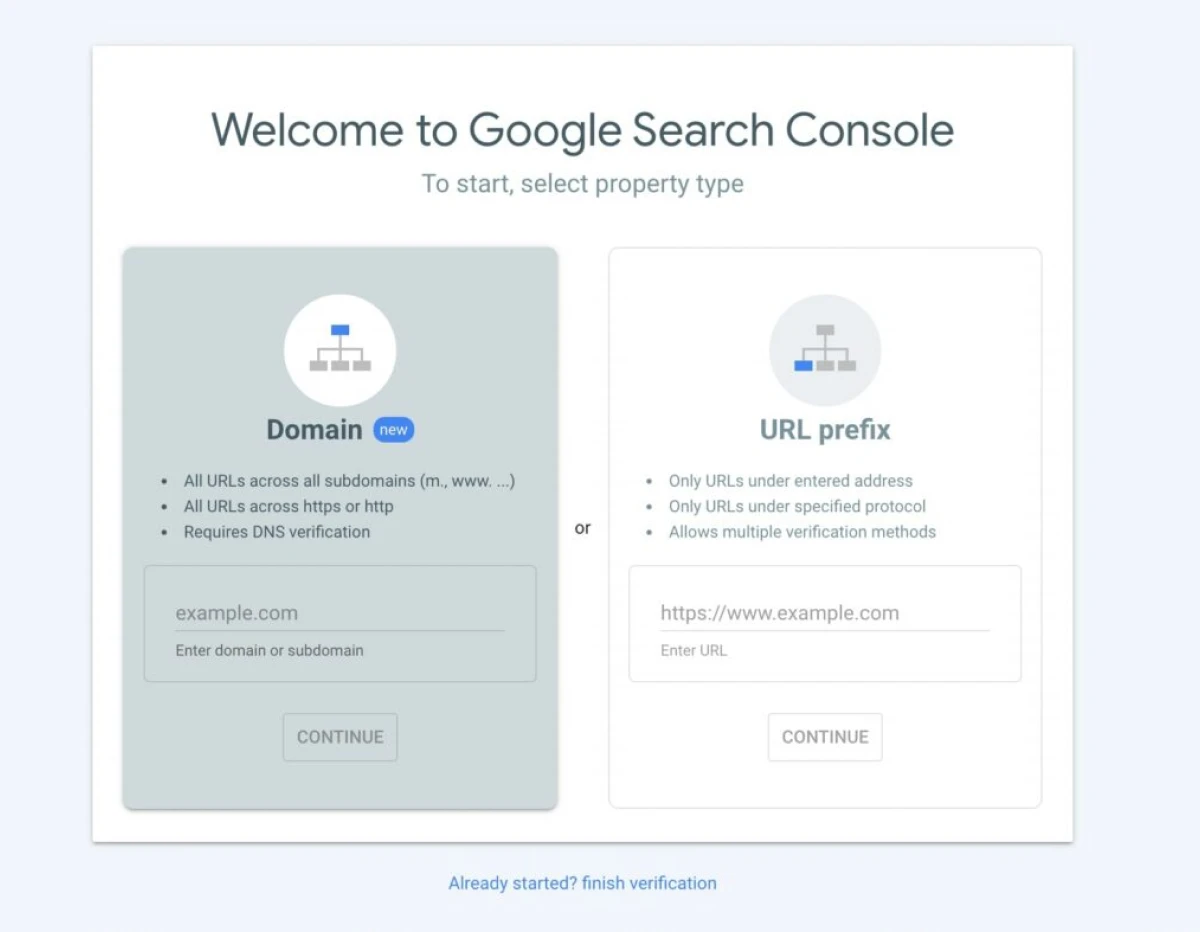
To start using this tool, you’ll need to select a property type. You can either enter your website’s domain or URL prefix. Depending on the option you choose, make sure you use the right format, as follows:
- Domain: example.com
- URL prefix: https://www.example.com
Keep in mind that if you enter a domain, you’ll need to verify your site ownership using DNS verification. However, with a URL prefix, you can use multiple forms of verification.
After you’ve entered your website, select Continue.
Step 2: Verify Your Domain
Next up, it’s time to verify that you actually own your website. To do this, you can simply download the HTML file provided to you and upload it to your website.
Remember, even after you finish the verification, you’ll need to keep this in your site files:
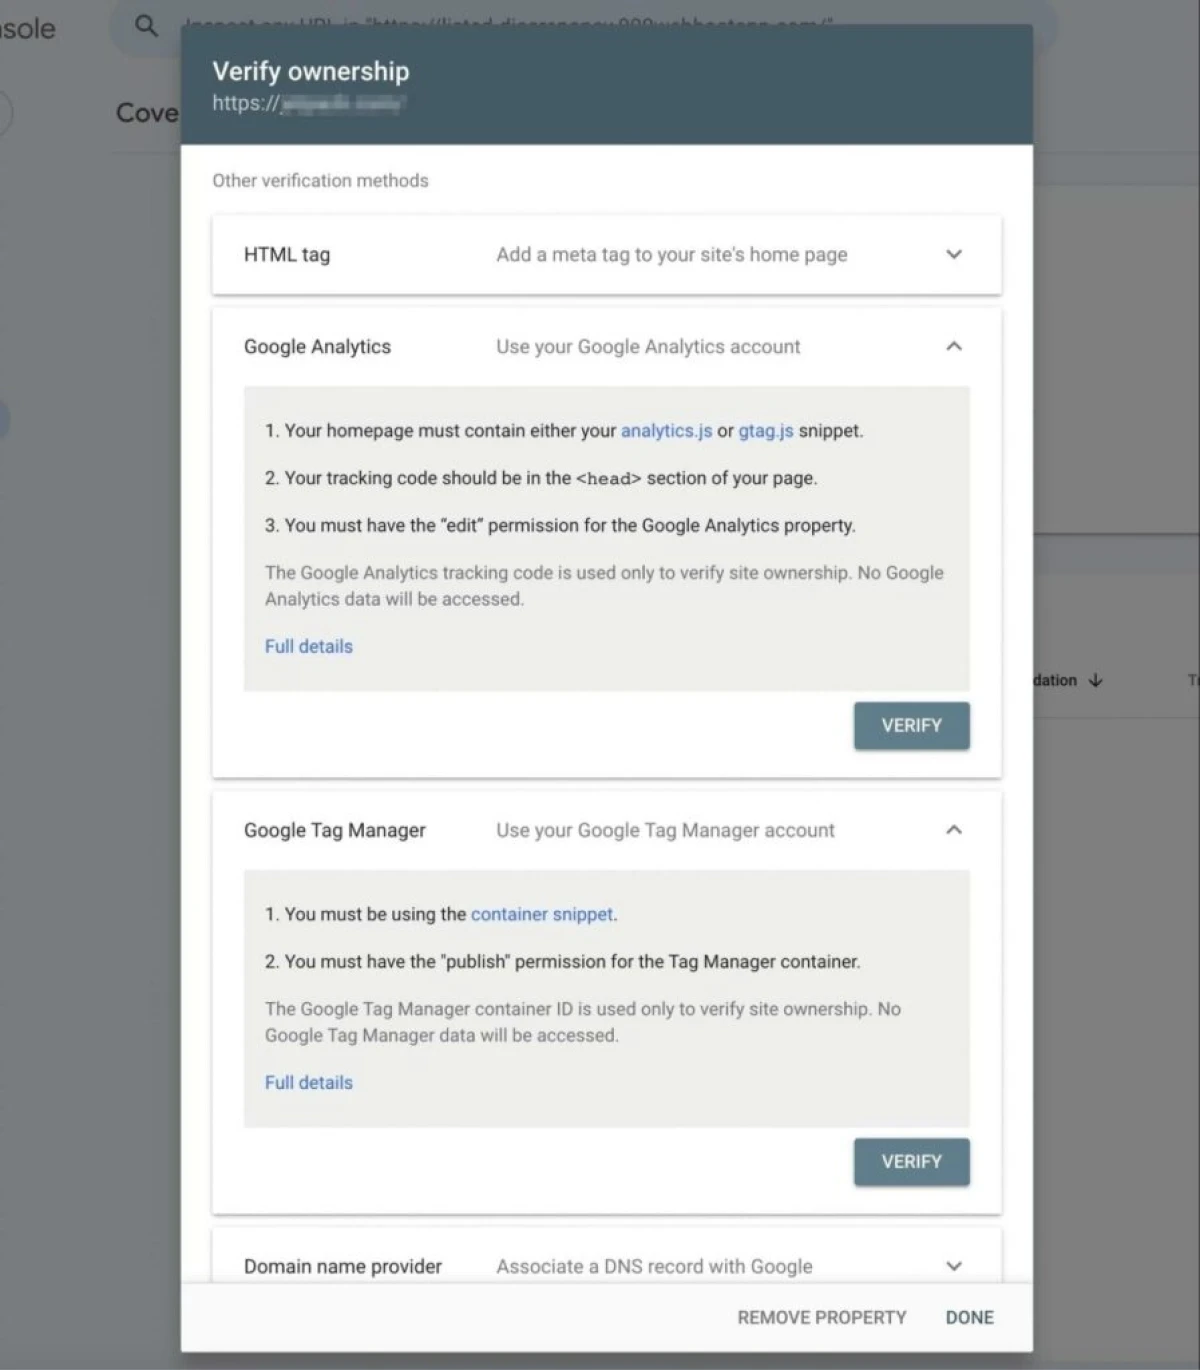
However, there are many other methods to verify site ownership. Here are some alternatives to uploading an HTML file:
- HTML tag: Copy the given meta tag and paste it into the <head> section of your home page.
- Google Analytics: Use your Google Analytics tracking code.
- Google Tag Manager: Use your Google Tag Manager container ID.
- Domain name provider: Sign in to your domain name provider and paste the given TXT record into your DNS configuration.
Once you’ve decided on a method, click on Verify. This will allow Google to check whether you own the website:
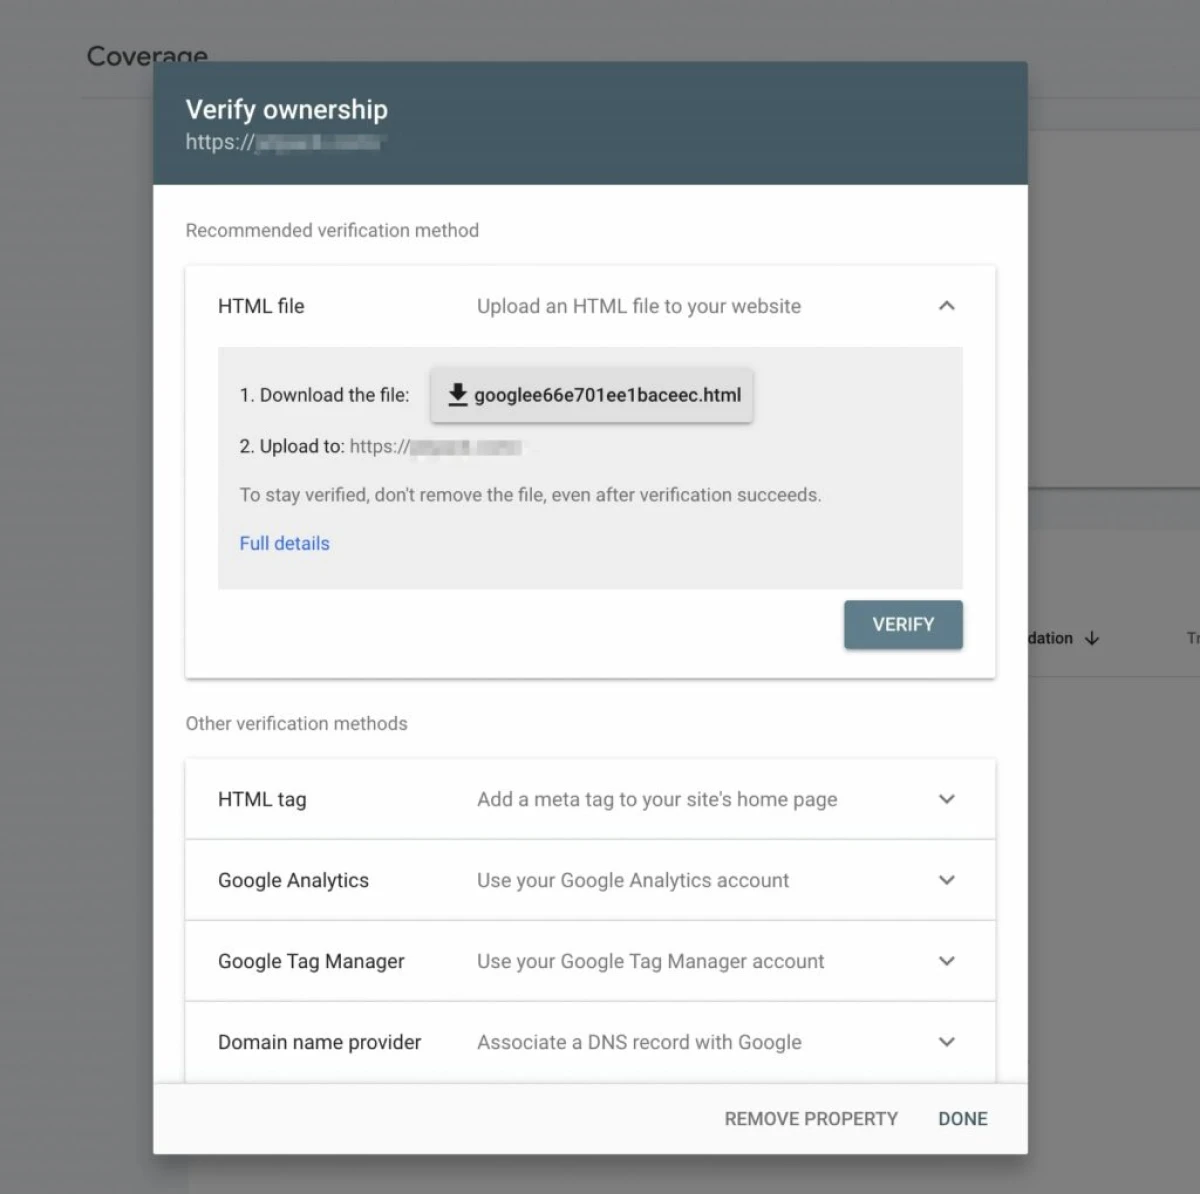
Once verified, Google will start collecting data about your site.
This can take from a few hours to a few days depending on how well-established your website already is — so, be patient.
How to Read Google Search Console Data
Alright, assuming that your data has started flowing in and you see some spikes in the graph, how do you make use of it? What do you do with all this information?
There are a few important sections on the Google Search Console that you must regularly track.
The first one is going to be your website performance.
Understand Your Site’s Performance
The “Search results” report is at the heart of Google Search Console. It provides a treasure trove of data about how your site performs in Google Search results.
Here, we have an existing website with some search volume data. Let’s break down the individual metrics shown above the chart:
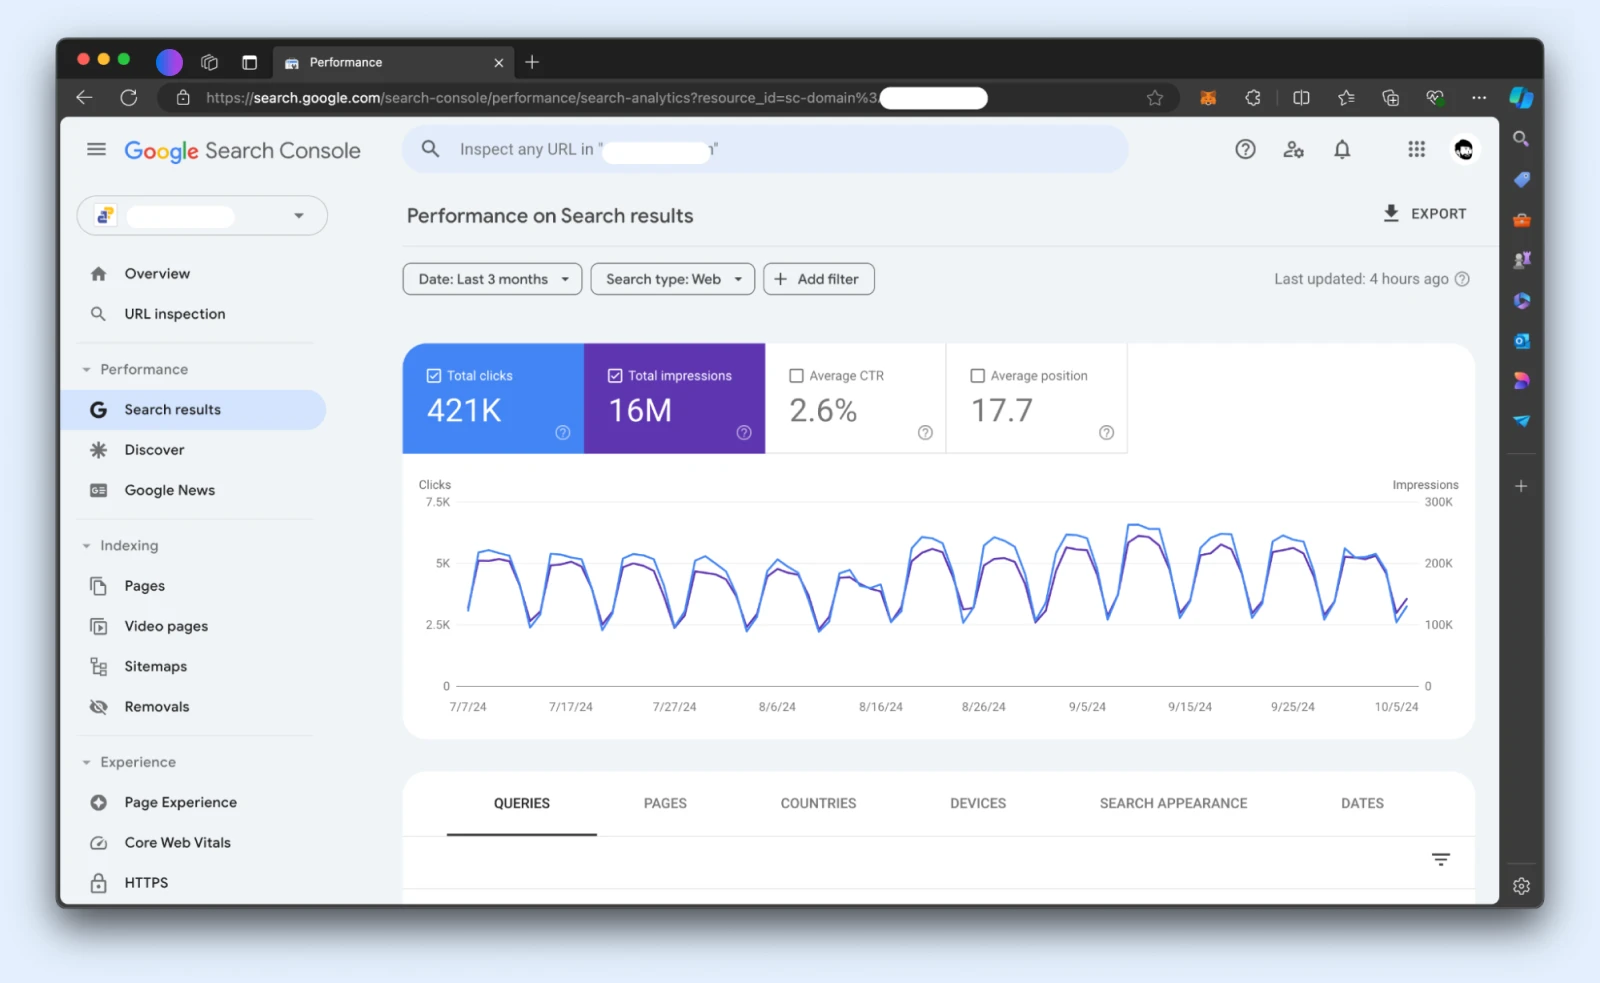
- Total impressions: How many times your site appeared in search results.
- Total clicks: How many times users clicked through to your site.
- Average click-through rate (CTR): The percentage of impressions that resulted in clicks.
- Average position: Where your site ranks in search results on average.
With these metrics, you get a bird’s-eye perspective of how your site has performed over the selected time range.
But GSC doesn’t stop there.
With the Date, Search Type, and Filters options, you can drill down into specific date ranges, traffic sources, queries, pages, countries, devices, and more. The goal? To get granular insights.
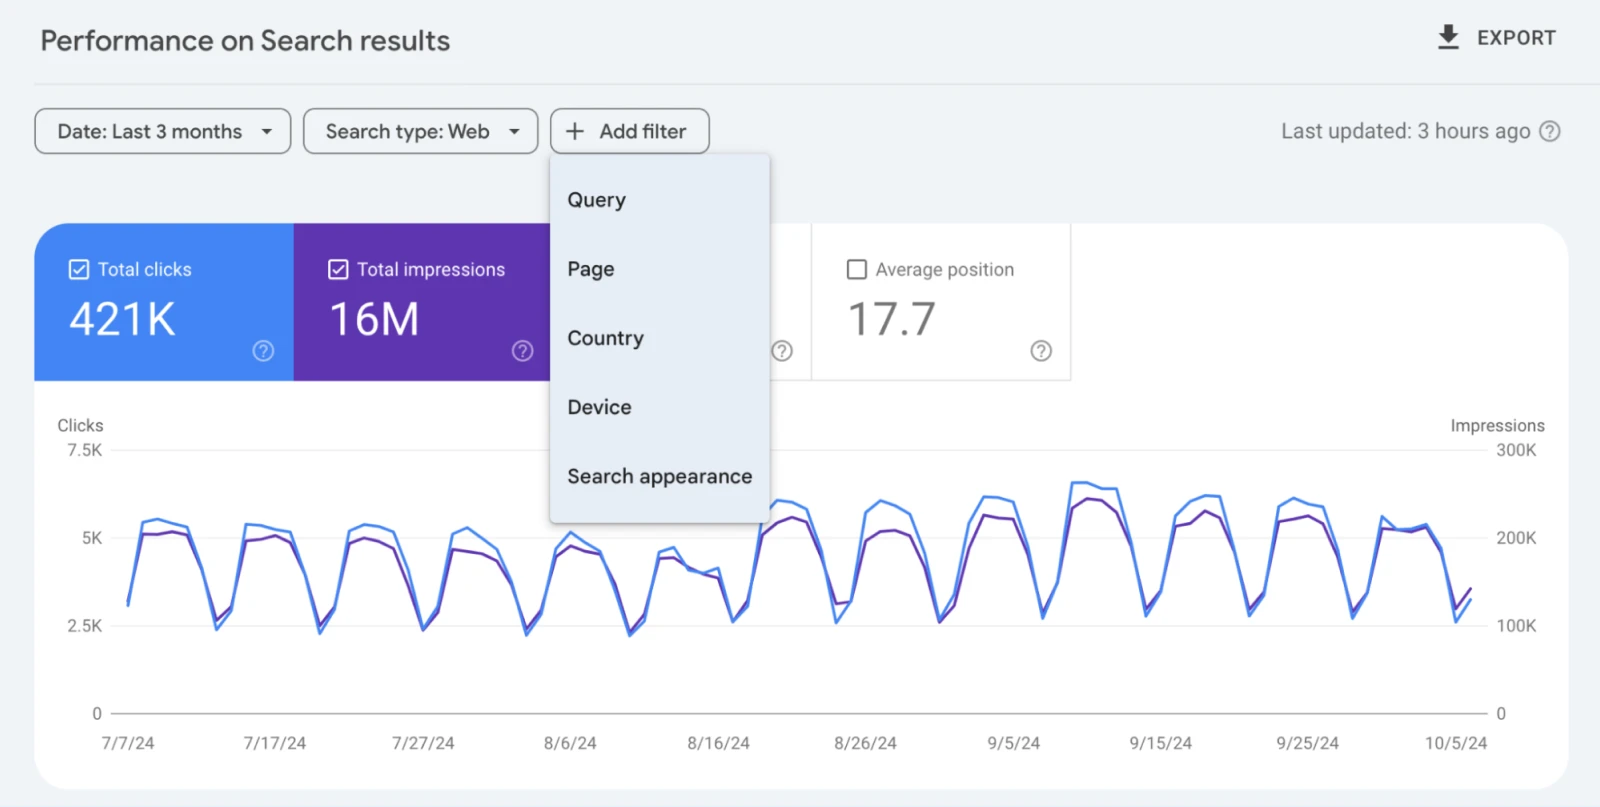
Here, you can check what keywords a particular page ranks well for — and maybe discover keywords you did not previously consider.
For instance, consider an article written for the keyword “How to create a website.”
After a couple of weeks, you notice that the same article also ranks for the keyword “How to create an e-commerce website.”
This means Google knows your article is relevant but not relevant enough for the second keyword. With this information, you can create another article for creating e-commerce websites, link out to the new article from the old one, and submit it for indexing.
Data like this can help you create more content around a topic that Google already ranks your website for and thus get more traffic.
Or you could compare how your website ranks for desktop users vs. mobile users and see if there’s anything you can do to close the gap.
For instance, in the screenshot below, you can see that on desktop, our website receives 370,000 clicks, close to 7 times more than mobile, where we only see 51,000 clicks.
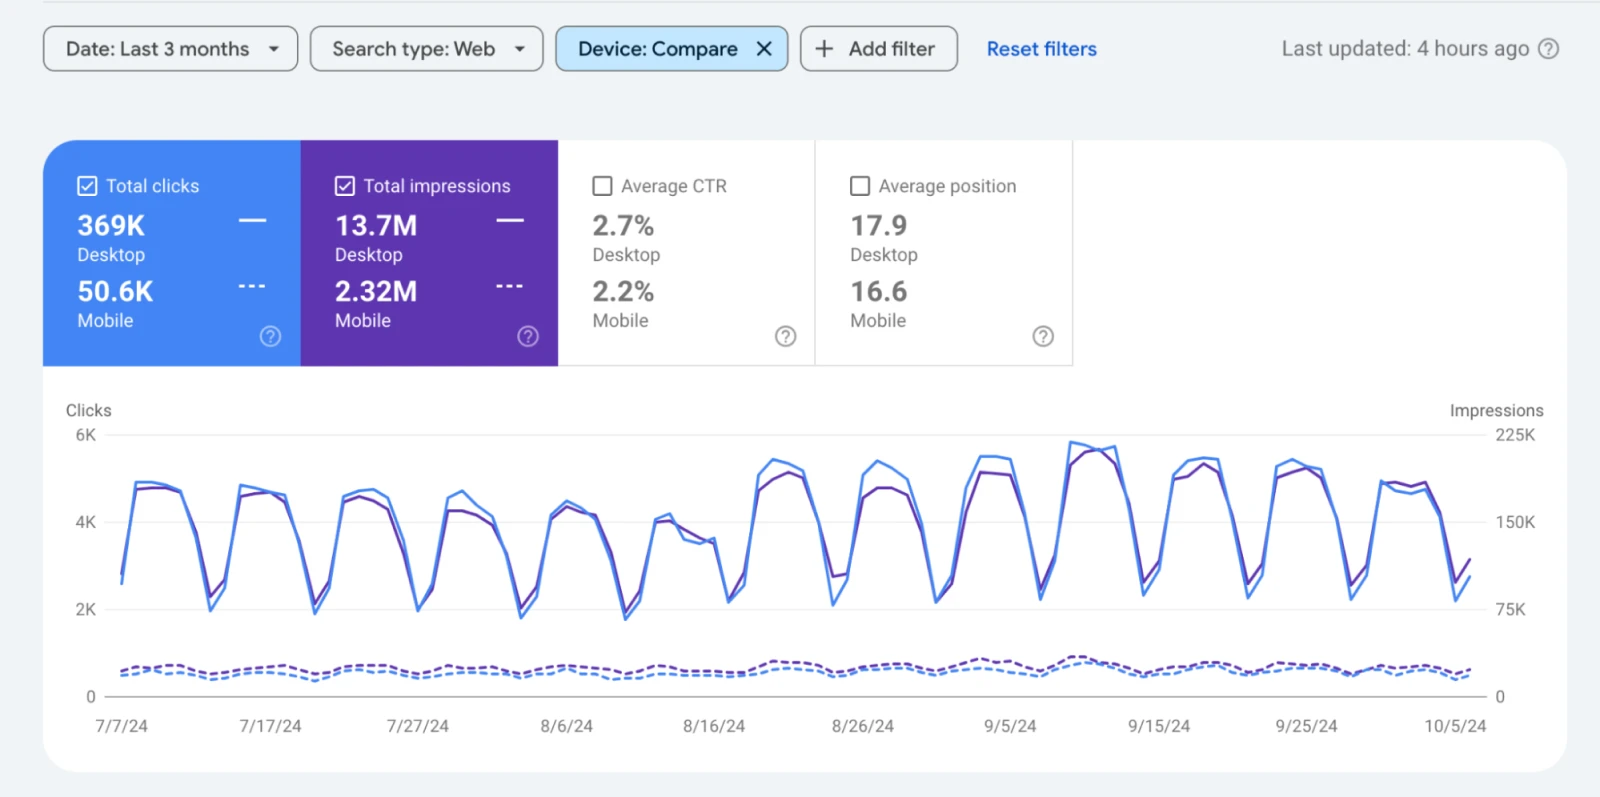
The Performance report also allows you to compare data over time — a feature that helps you see the impact of your SEO efforts or identify sudden changes in your search performance.
Indexing To Help Google Find Your Content
Not all pages get indexed on Google. If you have 1,000 pages, for instance, it’s likely that Google will either never find all of them or deem some pages irrelevant and never show them.
Can you do something to fix it? Absolutely. GSC has an Indexing section on the left side panel.
Indexing is a process that helps Google (or any other search engine) add a new webpage to their database of pages known as the index.
Index
An index is a list of all accessible pages on a website, created by web crawlers. Search engines use it to find pages when users type queries.
Read MoreThis index is then used to sort and rank pages when someone searches for different keywords on Google.
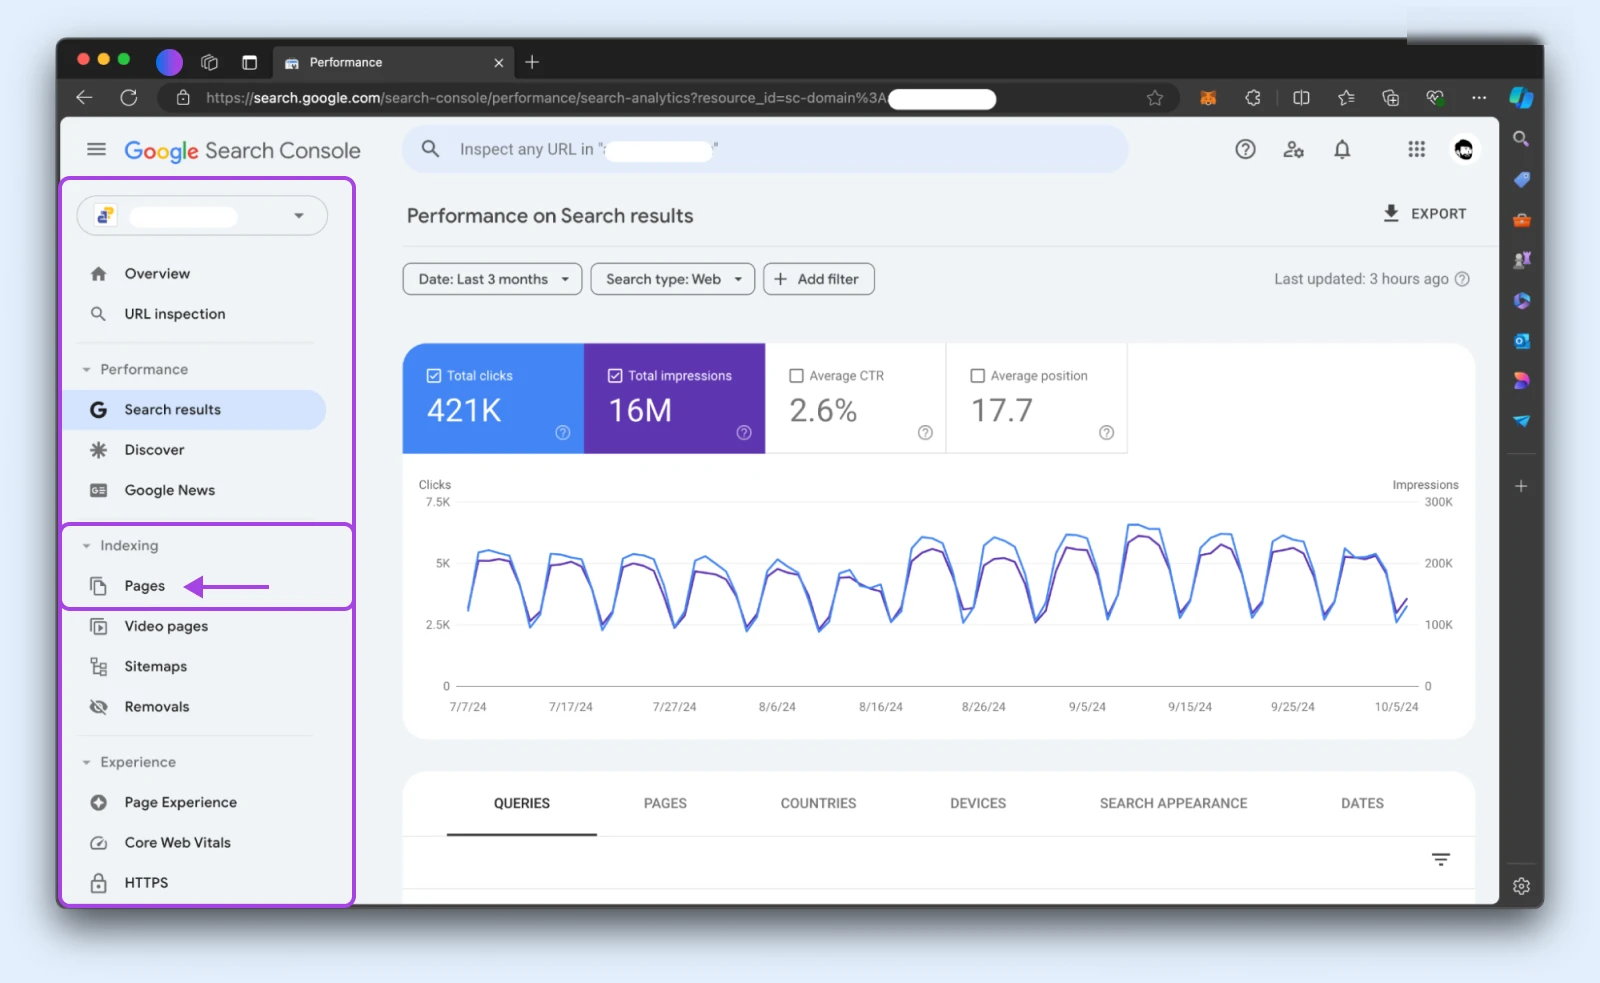
Click the Pages option under it, and you’ll see all the pages that Google has indexed as well as pages that either can’t be indexed, had an error — or, there was something that prevented Google from indexing them.
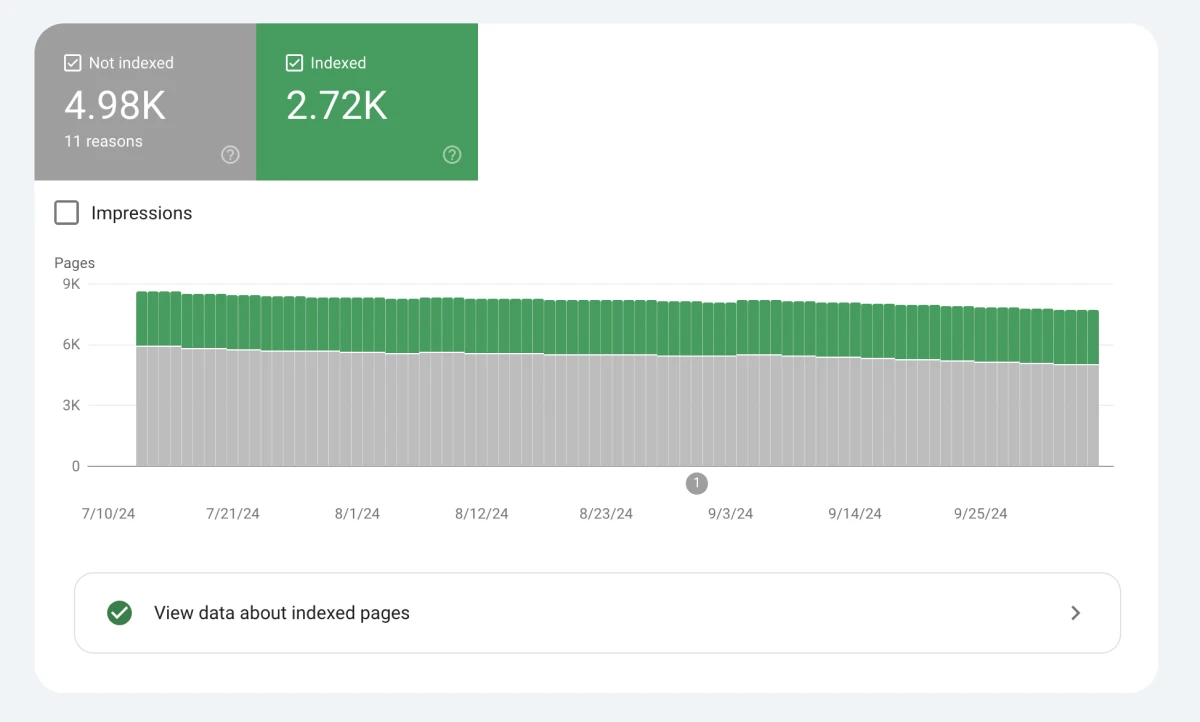
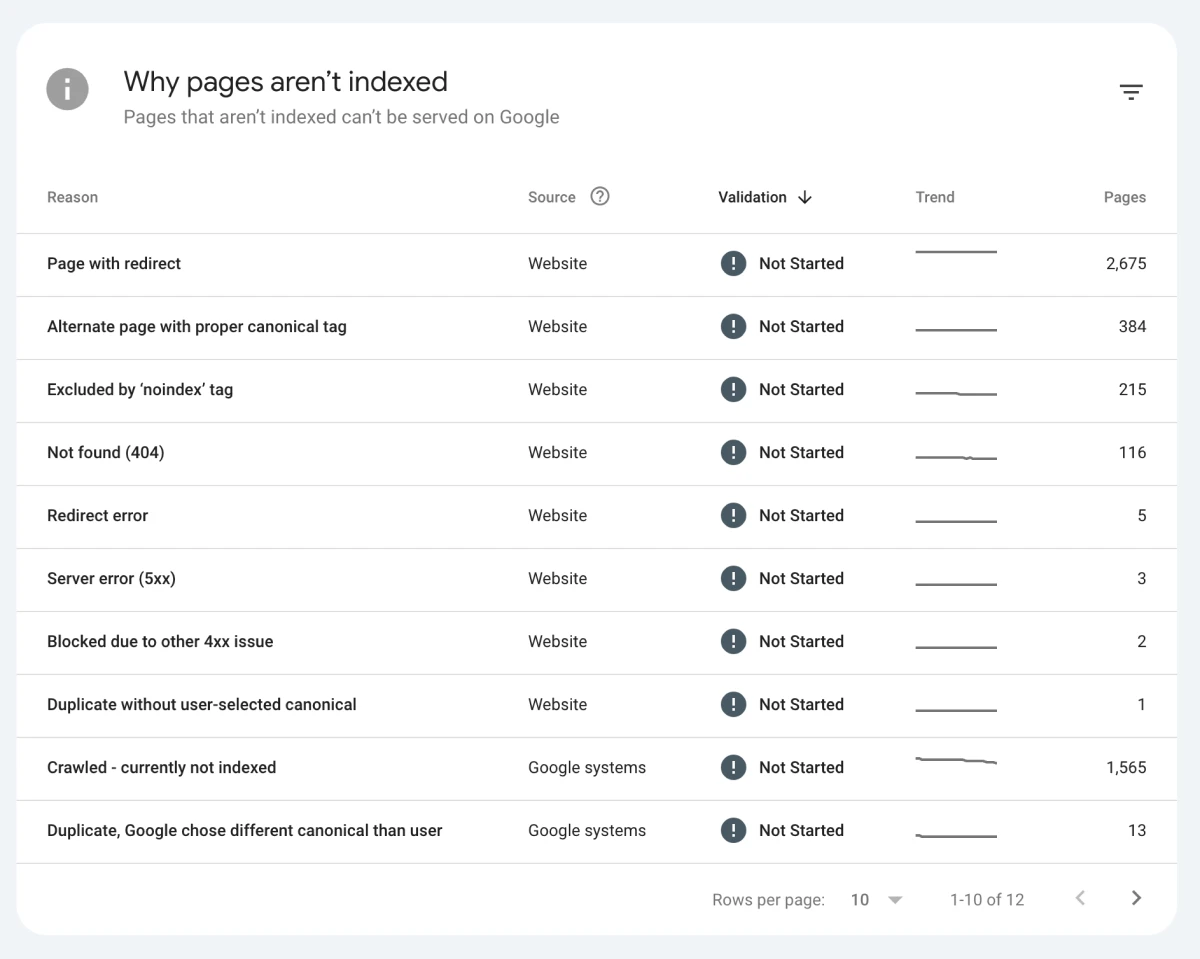
As you’ll note above, the pages that aren’t indexed by Google have specific reasons, and they’re listed in this report. For instance, the “Page with redirect” reason has 2,675 pages in this case.
You can click through the reasons on your GSC to explore what the pages are, and what you can do to fix them.
The thing is, these 2,675 pages aren’t something to worry about. They’re simply a list of pages redirected to a new URL during site updates.
However, pay close attention to the errors. You want to fix any pages that are not indexed due to:
These are the pages Google crawlers haven’t been able to access or have some error that prevents them from being read by these crawlers.
Using the URL Inspection Tool
If you don’t want to go through so many errors and the pages in them, you can also check individual URLs by simply entering the specific URL in the search bar at the top.

You’ll then be taken to the individual page indexing report page. Here, if your page is indexed, it’ll show a page like the one below.
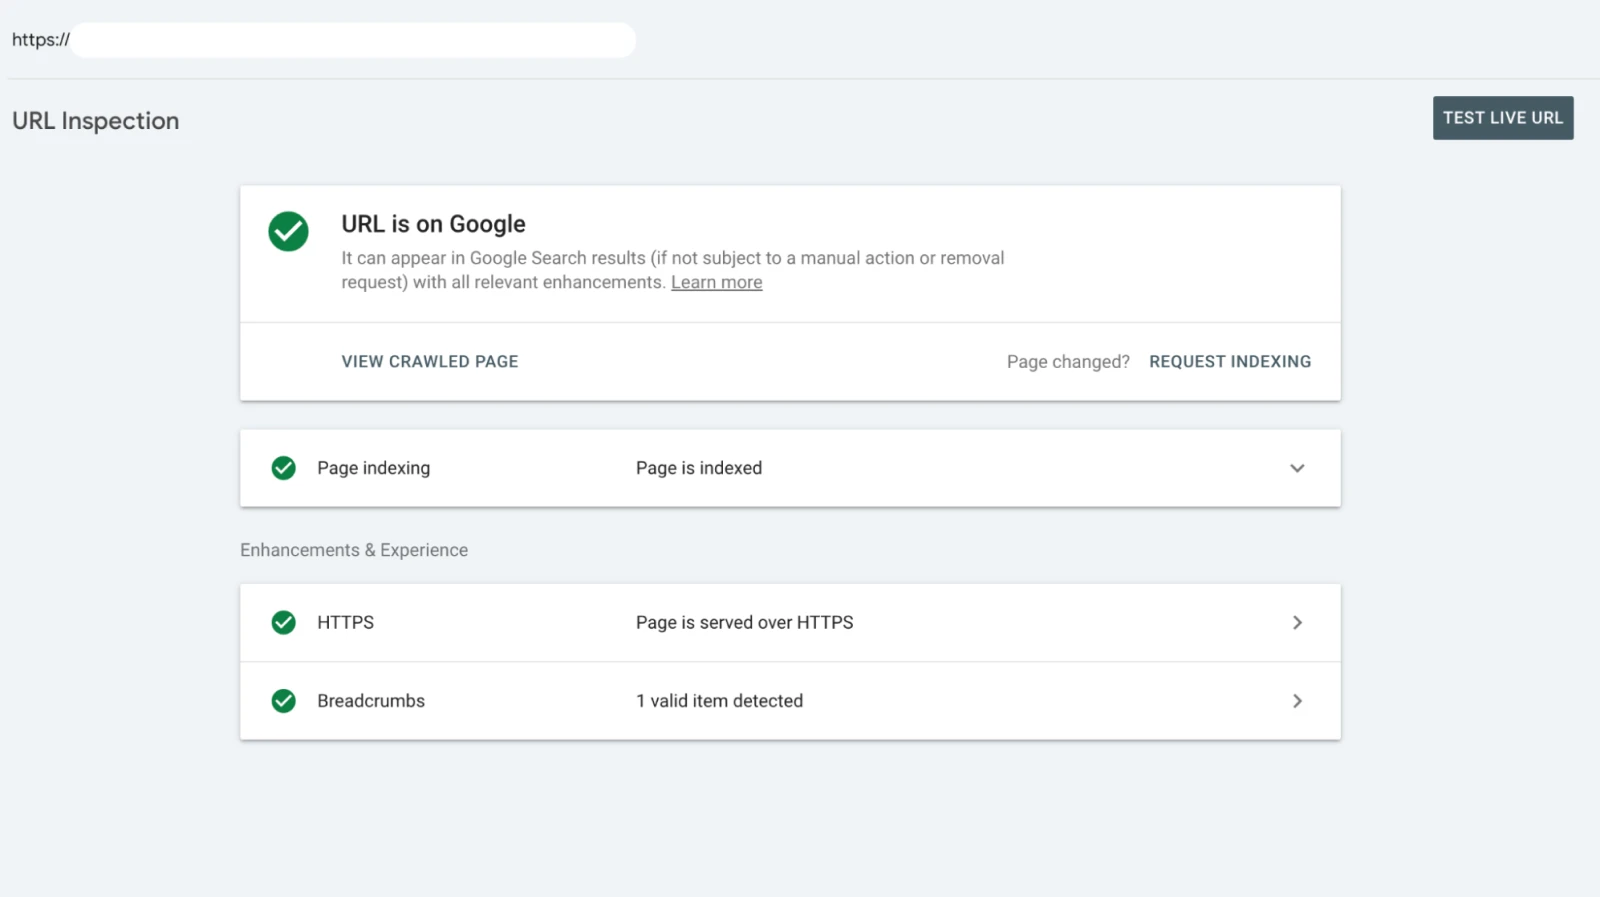
However, if you come across an important URL that isn’t indexed, you’ll see a page like the one below. Hit REQUEST INDEXING to ask Google Bots to crawl your website.
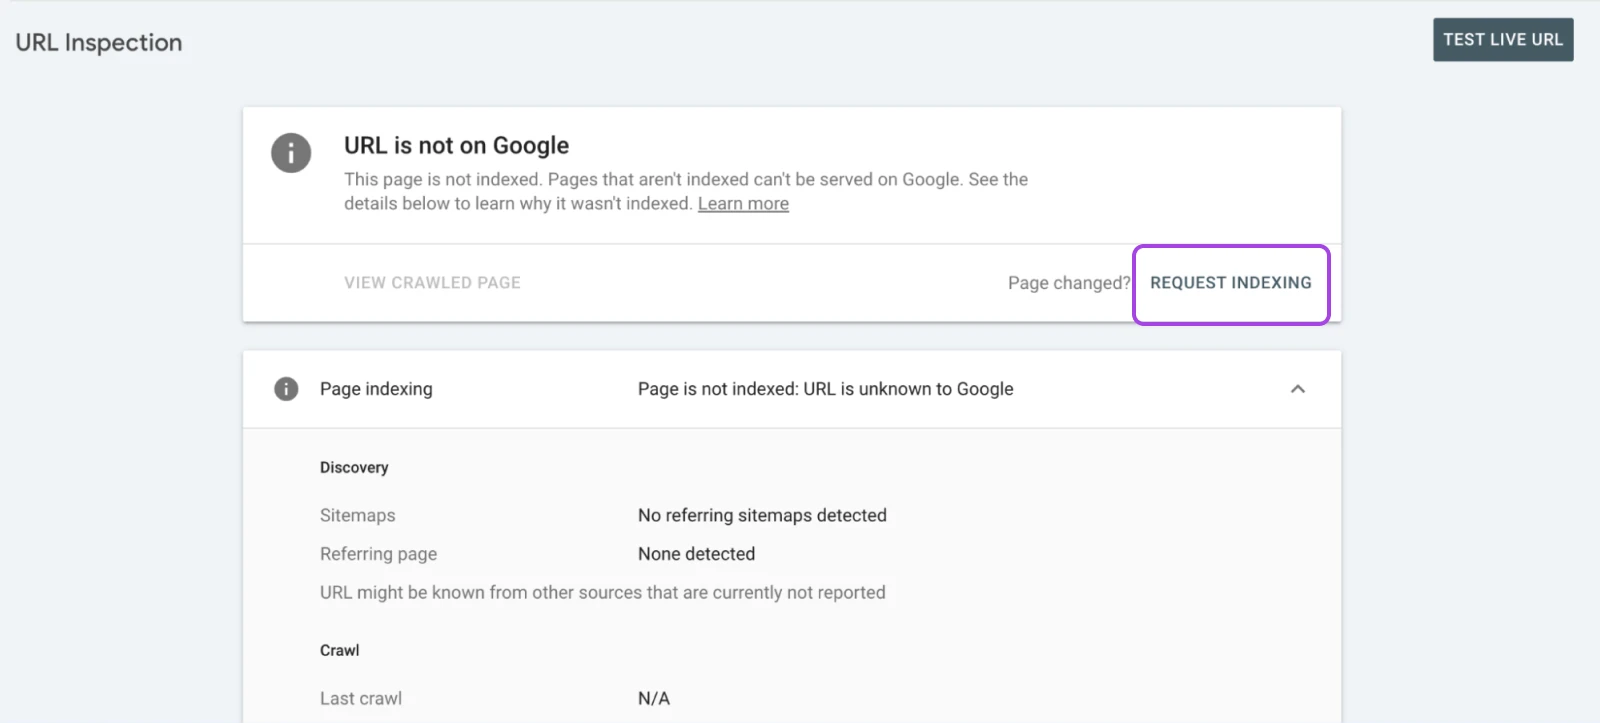
The REQUEST INDEXING option can also be used if you did some major update to a page and want those updates to be pulled by Google as quickly as possible.
Add an XML Sitemap
To put it simply, an XML sitemap is a file that tells Google which web pages are the most important.
When you create one for your website, it can help search engines determine which content to crawl. With that, you not only simplify indexing and prioritize certain pages but also prevent Google from crawling unnecessary pages.
For a new site, submitting the XML sitemap to GSC can help Google find all the required pages on your site and start indexing them.
If you’re using WordPress, plugins like Yoast SEO and XML Sitemap Generator let you build your first sitemap with just a few clicks. Additionally, outside of WordPress, you can also use a site like Slickplan or the aptly named XML-Sitemaps.com.
Luckily, Google Search Console makes it simple to submit a sitemap. It can even check your added sitemap for any errors.
So, let’s create one with Yoast SEO and submit it, shall we?
First, install and activate the plugin. Then, go to Yoast SEO > General > Features:
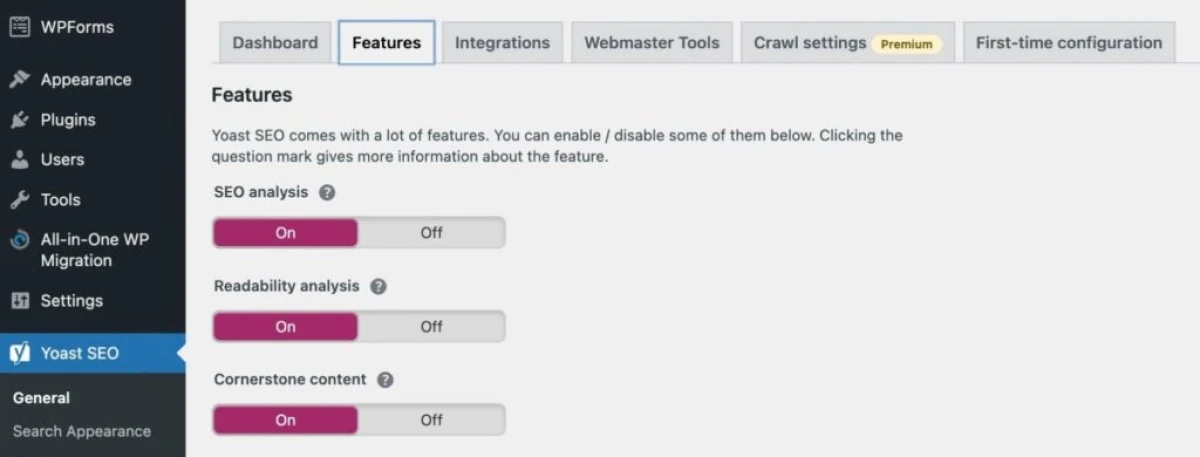
Scroll down to the XML sitemaps setting. Make sure that it’s turned on, then save your changes like so:

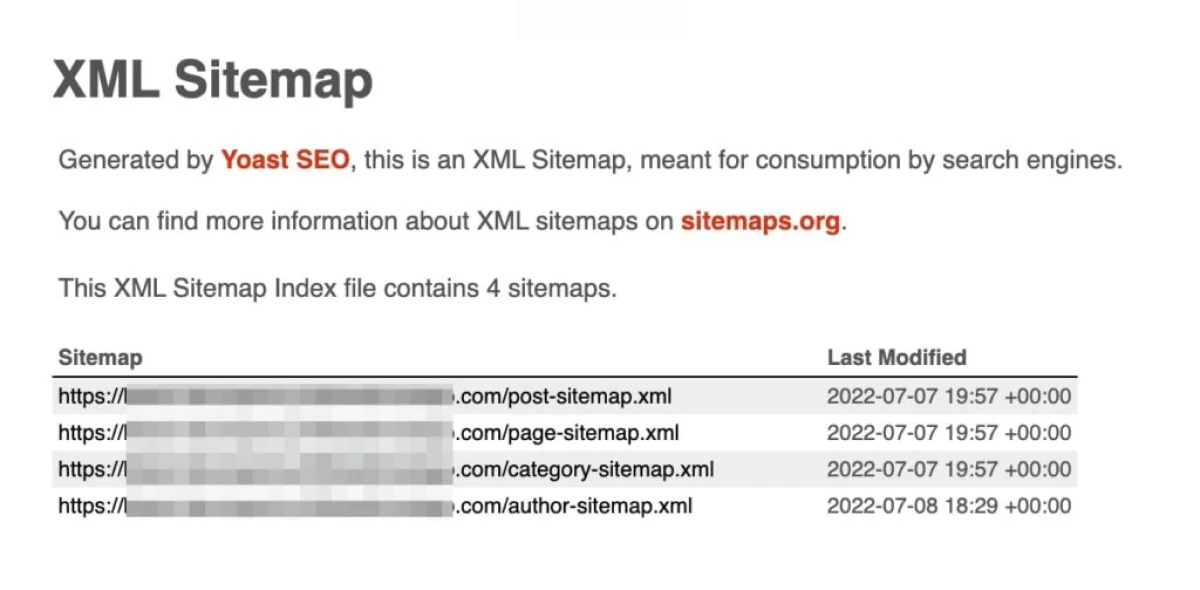
This will automatically generate an XML sitemap for your website. To view this, click on the question mark icon > See the XML sitemap:

This will generate your XML sitemap on a new page. You can review this information, then copy its link:
Now you can go back to Google Search Console and find the Sitemaps tab. Under Add a new sitemap, enter the URL.
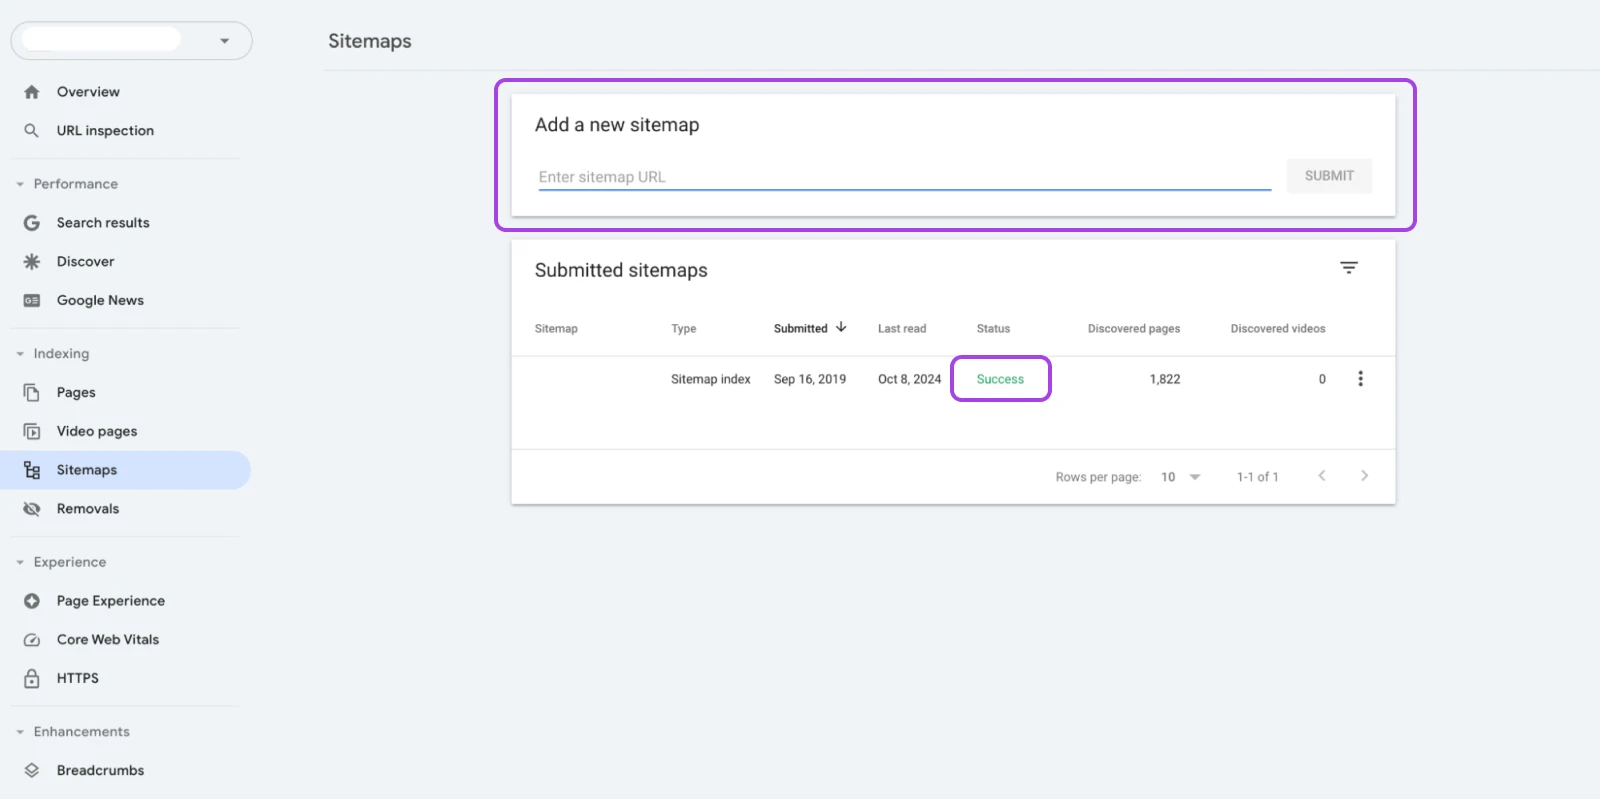
After you add the sitemap, it’ll appear under Submitted sitemaps, as you can see in the above screenshot. You’ll be able to see the status of the latest read date and the status.
Possible status values include: “Success,” “Has errors,” and “Couldn’t fetch.”
Additionally, Google Search Console will tell you the number of URLs that were found in the sitemap.
Requesting Pages To Be Removed From Google
Sometimes, Google may index unnecessary pages or ones that we don’t want others to see — even if you’ve followed the best practices.
For instance, suppose you have a media file that’s locked behind the login page. But Google ends up finding the URL and indexing it on search. Now, anyone can search for the media file name + your website URL, and find it.
You can prevent it from happening with no-index attributes or using the robots.txt file.
However, there’s always a chance that some page gets left out during updates. That’s when you need to remove the page from the search results.
To create a new removal request, under the same Indexing section on the left panel, click Removals, and you’ll be taken to this page:
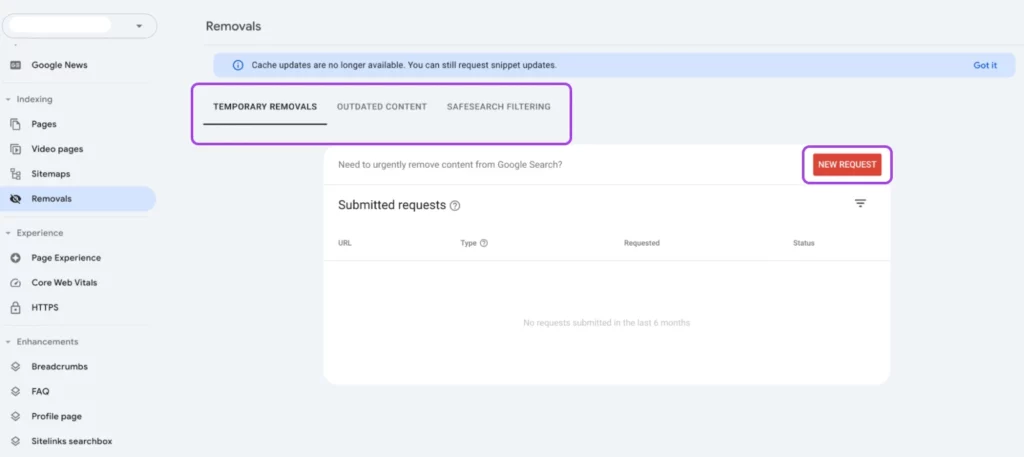
Now create a new request for removing content under the TEMPORARILY REMOVE URL tab and click on New Request.
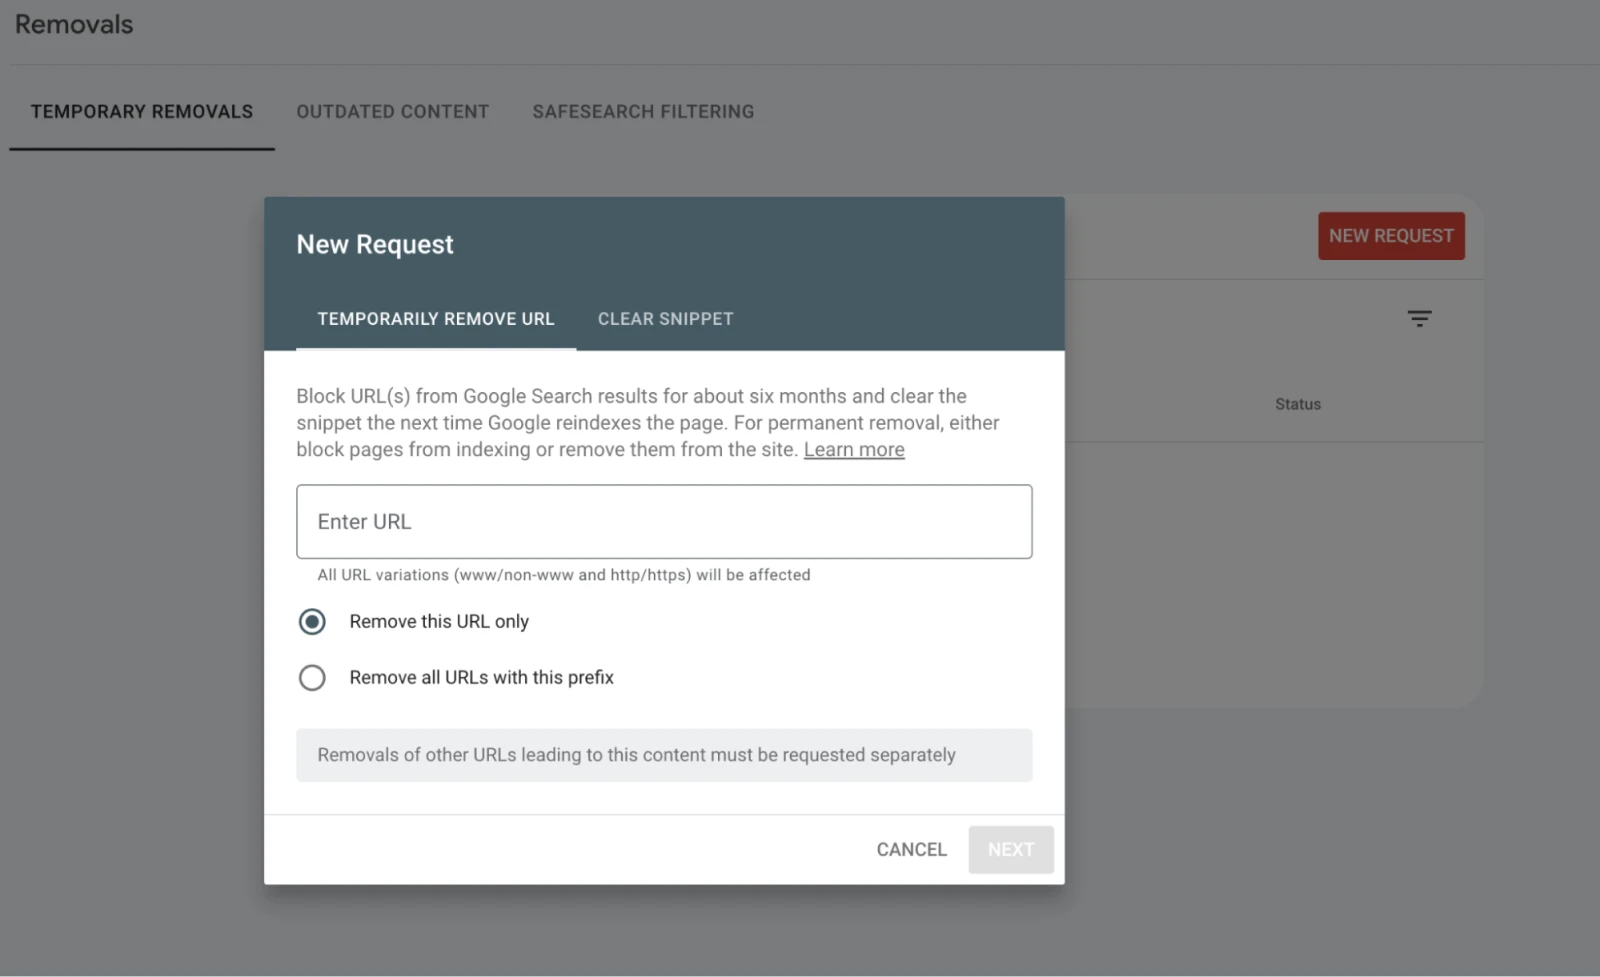
Google doesn’t allow permanent removals because it’s likely the bot will find the URL again and index it.
Temporary removals give you time to no-index the page and block it using robots — thus fixing the root of this issue instead of relying on Google’s URL removal.
Page Experience Scores
Okay, we’ve done a fair bit of technical stuff till now. Let’s get back to your website and how GSC scores it for the users.
First, we’ll look at the Page experience page. Under the Experience section on the left sidebar, click Page Experience, and you’ll be redirected to a page that looks like the one below.
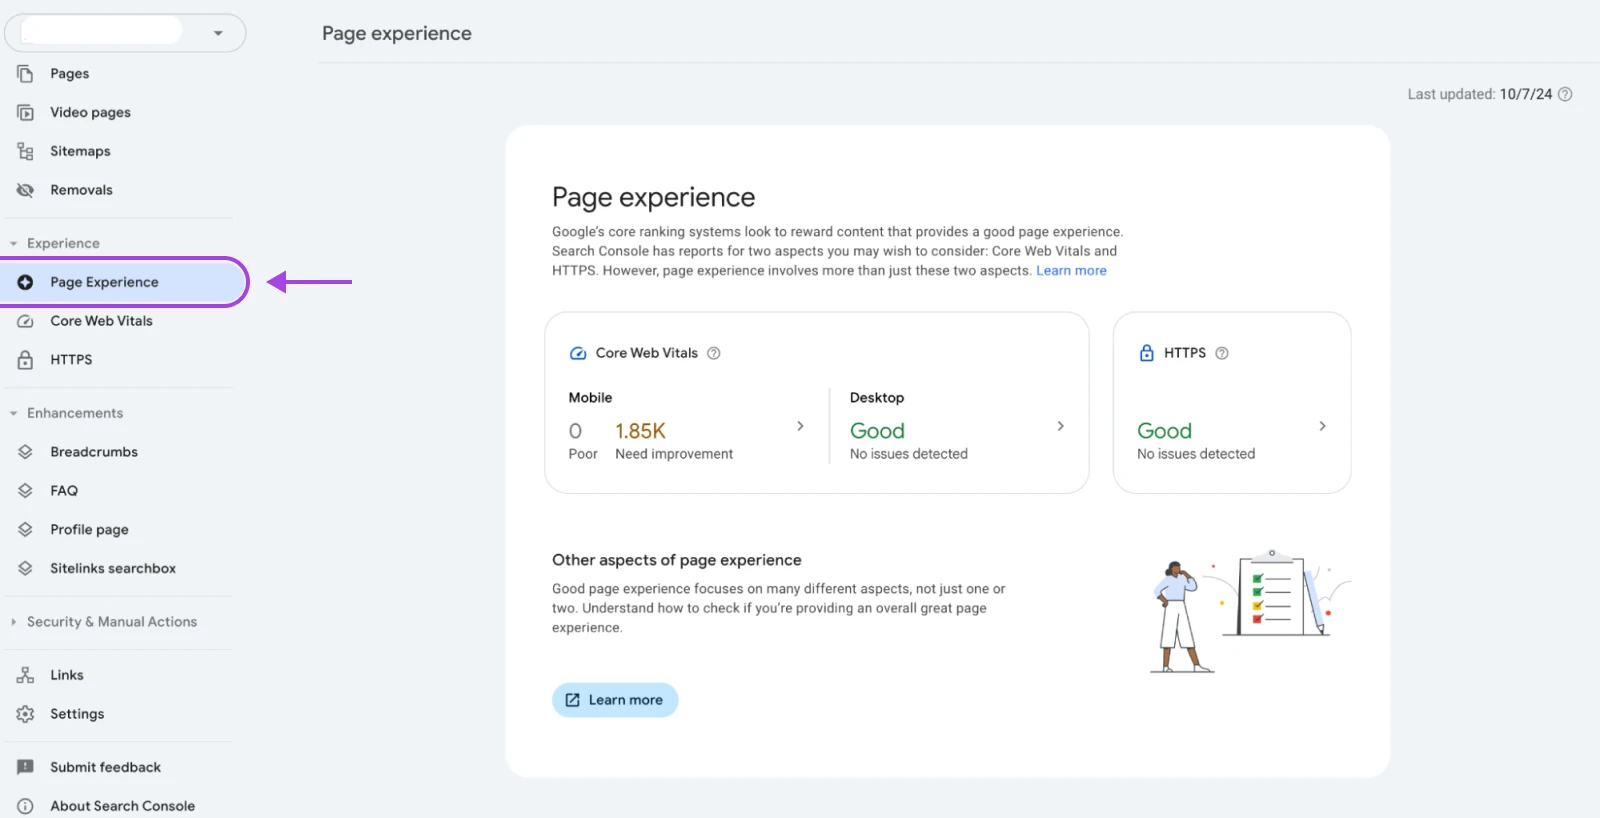
Page experience requires that your website have a fair amount of traffic before Google can assess the experience across the user base.
It also takes quite some time to generate since it’s based on real-world user experiences. So, if you don’t already see this, you can move on and simply work towards creating a mobile-friendly website, and following other user experience best practices.
Since the Core Web Vitals (CWV) framework was released, the Page Experience report is just a simplified summary of that report.
If you click on any of the scores, you’ll be redirected to the Core Web Vitals page — so let’s move on to that.
Core Web Vitals: The User Experience Trifecta
Since 2020, Google has moved away from other metrics like page speed, DOM content loaded, Time to First Byte (TTFB), etc., and now focuses on user experience as a ranking factor.
This culminated in the introduction of Core Web Vitals — a set of metrics that measure key aspects of user experience. These metrics are:
- Largest Contentful Paint (LCP): This measure evaluates loading performance. To provide a good user experience, LCP should occur within 2.5 seconds of the page first starting to load.
- First Input Delay (FID): Measures interactivity. Pages should have an FID of 100 milliseconds or less.
- Cumulative Layout Shift (CLS): Measures visual stability. Pages should maintain a CLS of 0.1 or less.
The Core Web Vitals report in GSC shows you how your pages perform on these metrics, categorizing them as either “Poor,” “Needs Improvement,” or “Good.”
Here’s what you will see once you have enough pages and Google has created the CWV report for your website:
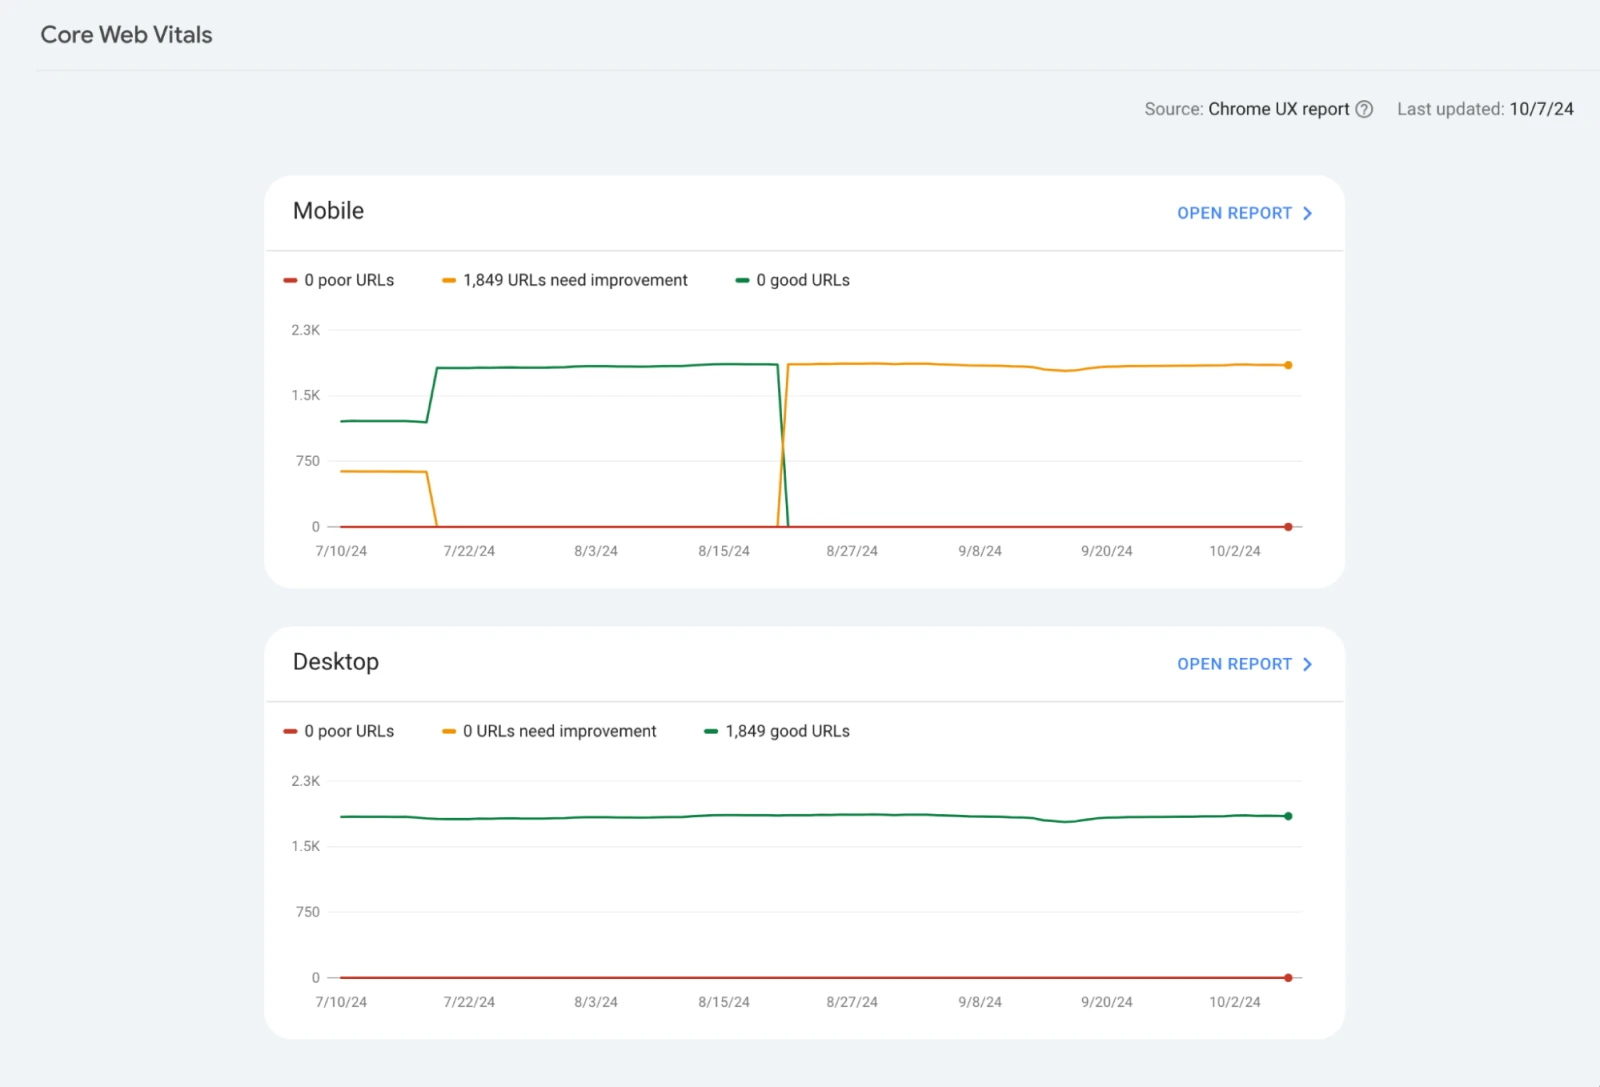
You can click Open Report to see what’s the reason behind the metrics.
For instance, in the case of the above website, the pages have an Interaction to Next Paint (INP) of longer than 200 ms.
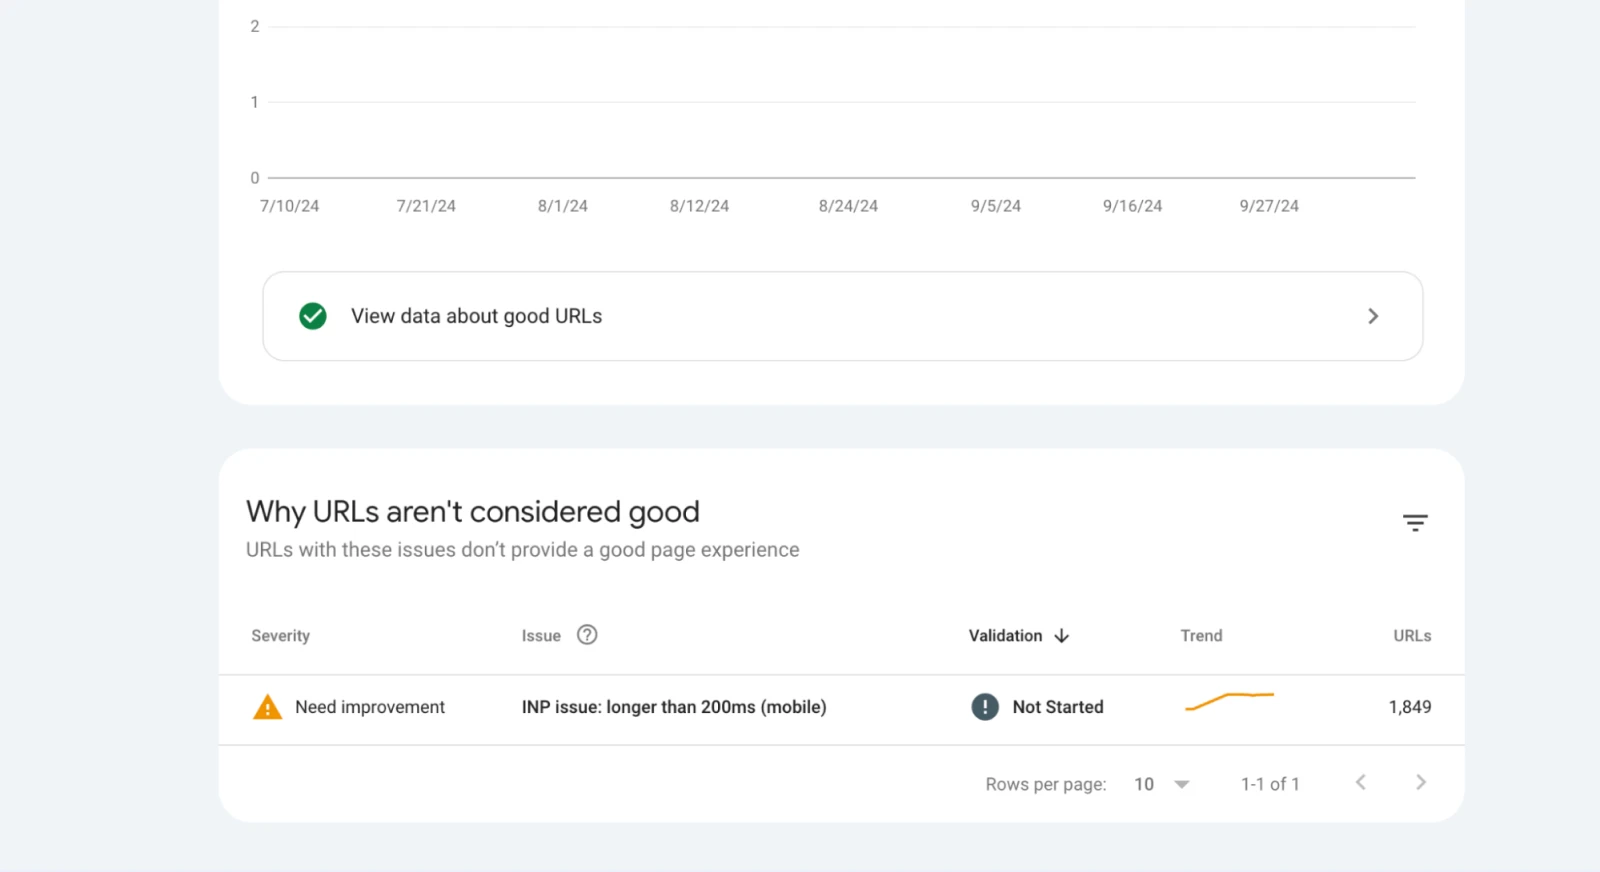
You may see multiple reasons why your URLs have errors, and you can click through further for more details.

If you’ve fixed the issue, you can click Validate Fix and Google will then check if the fix is complete. If all goes well, you will no longer see the error.
How Often Should You Check Core Web Vitals Reports?
It’s best to check CWV reports at least once every month — because that’s how long each CVW review cycle lasts (28 days).
So, if you’ve added new content, changed any pages, updated the theme, etc., Google will take a while to understand the impact and give your website an updated score.
Also, if you’ve validated a fix, you’ll get to know if the error was fixed or if it needs further attention within this timeframe.
Find Who Links to Your Website
Two things have retained their importance in SEO over the years: excellent content and high-quality links.
You want as many good websites to link to your website as possible.
But it’s easy to go overboard here and create random, spammy links. Or maybe your competitor created those spammy links. You can use this section to keep track of all the links pointing to your website that Google knows about.
Find the Links option on the left sidebar. Here are some of the details that the links page shows you:
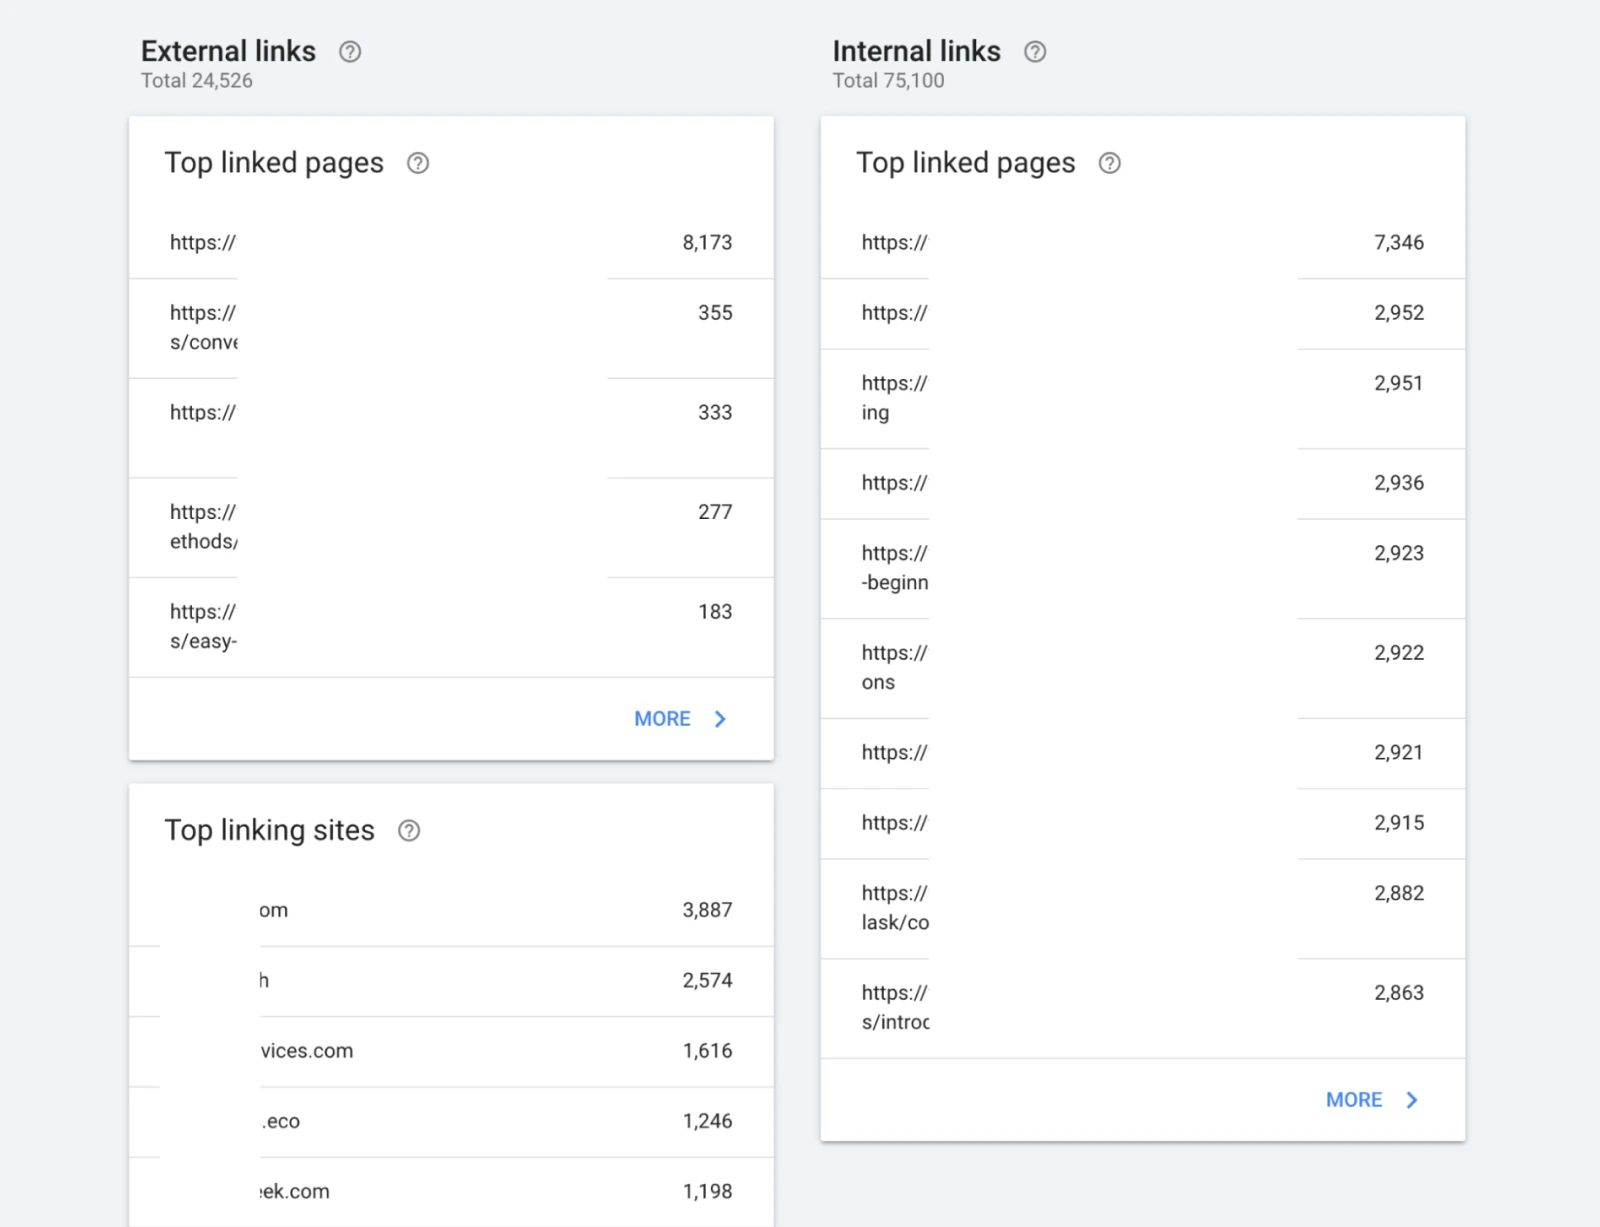
- Which sites link to yours the most?
- What is your most linked content?
- What anchor text do other sites use when linking to you?
- And what are some of the top pages that are internally linked?
This information can help you understand which content resonates with other site owners and identify potential partnership opportunities.
Generally, the homepage will have the most links. So if you notice this pattern with your site, know that it’s quite typical.
With this information on hand, you can do a few important things:
- See if the most important pages of your website are getting a good amount of links or not.
- Understand what pages are liked by other site owners.
- Use it to create more content around those topics
- Reach out to the websites linking out to you the most and find potential partnership opportunities. In addition to improving your website, this may even promote their products on your site.
Links have a flywheel effect. You start by getting links from site owners you know in your niche or by partnering with other websites one at a time.
But soon enough, your website has enough traction that you no longer need to put in as much effort to get the same amount of links.
Security Reports and Timely Notifications
Google takes web security seriously, and for good reason. A compromised website can harm your users and damage your reputation.
On the left sidebar, you’ll see the Security & Manual Actions section, which has the “Security issues” report.
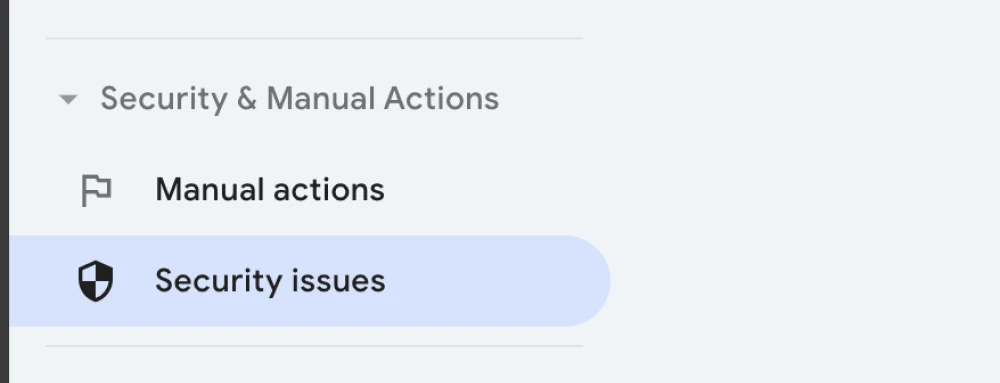
The “Security issues” report in GSC alerts you to any security problems Google detects on your site, such as hacking or malware.

If Google detects a security issue, it may display warnings to users in search results or even remove your site from the search results entirely.
So, you need to keep an eye out for any notifications reporting security issues as well as this page whenever you visit GSC.
This report further provides details about the problem and guidance on how to fix it, so you can address issues quickly and protect your site’s search presence.
Let’s Take Your Website From Invisible to Invincible
That was quite a ride through the Google Search Console! Let’s sum up what we’ve learned:
- Without GSC, your site might end up in the 96.55% of websites that never see traffic from Google.
- GSC helps you identify your site’s strengths and weaknesses and the different ways you can improve your website further.
- It offers some pretty handy tools for individual page indexing reports, submitting sitemaps, and ensuring that your overall SEO efforts are bearing fruit.
- Monitoring GSC is like a health check-up for your website. It helps you catch and fix problems before they become…well, actual problems.
And here’s the deal: if Google can’t see your website, practically nobody else will either. Using GSC is the easiest step you can take to avoid this.
So, what’s next?
If you haven’t set up GSC yet, go for it! It’s easier than you think. And if you’re already using it, why not try one of those reports we talked about?
Now, if this seems complicated — or you want an expert to handle it — let our SEO professionals do it for you!
We handle your website’s SEO from start to finish, so you can focus on your core business activities.

Get More Website Traffic
We take the guesswork (and actual work) out of growing your website traffic with SEO.
Learn More