
With every Google update and release seemingly setting the world on fire for a few weeks (“The Internet will never be the same” one proclaims) afterward — we certainly can’t pretend to know what the leading search engine is thinking or planning.
One thing we can say with certainty is that, for a long time now and probably for a while into the future, Google loves SEO-enhanced content.
SEO
Search Engine Optimization (SEO) is the practice of improving a site’s ranking in search results. Search results are aggregated based on a number of factors, including a site’s relevance and quality.
Read MoreAs a result, it’s thorough and generally lengthy articles (or Reddit posts) that often rank the best on Google’s search engine results pages (SERPs).
That’s all fine, right?
Well, there’s one problem with that — the rise of short-form content, especially video (thanks, TikTok!), is changing consumer preferences.
How do you strike the perfect balance?
You have to make content that’s robust enough for Google (and all search engines) that’s also easy for readers to navigate so they can engage with your website to find the value they’re seeking.
This is where anchor links come in.
With anchor links, you can very quickly send readers straight to a specific part of a page. That way, visitors can find the exact information they’re looking for instead of skimming through hundreds, or more often thousands, of words.
In this article, we’ll cover:
- Exactly what anchor links look like and how they work.
- The pros and cons of using anchor text on your pages or blogs.
- Three ways to create anchor links on your WordPress website.
Let’s get to work!
What Anchor Links Are
Technically, an anchor link (aka anchor text or jump link) is any hyperlink within a page that usually points to another section on that same page.
To create one, you basically build a piece of code — don’t worry, we’ll show you how — around a URL to make it a “bookmark” of sorts. You can then attach that bookmark to any text or image on the same page. When someone clicks the bookmark, they’ll be quickly scrolled to the area of the page you’ve indicated with your code. If that didn’t make a lot of sense, hang tight; it will become clearer the more we talk about it!
In many cases, you’ll encounter anchor links within a table of contents (TOC) at the start of a page or post.
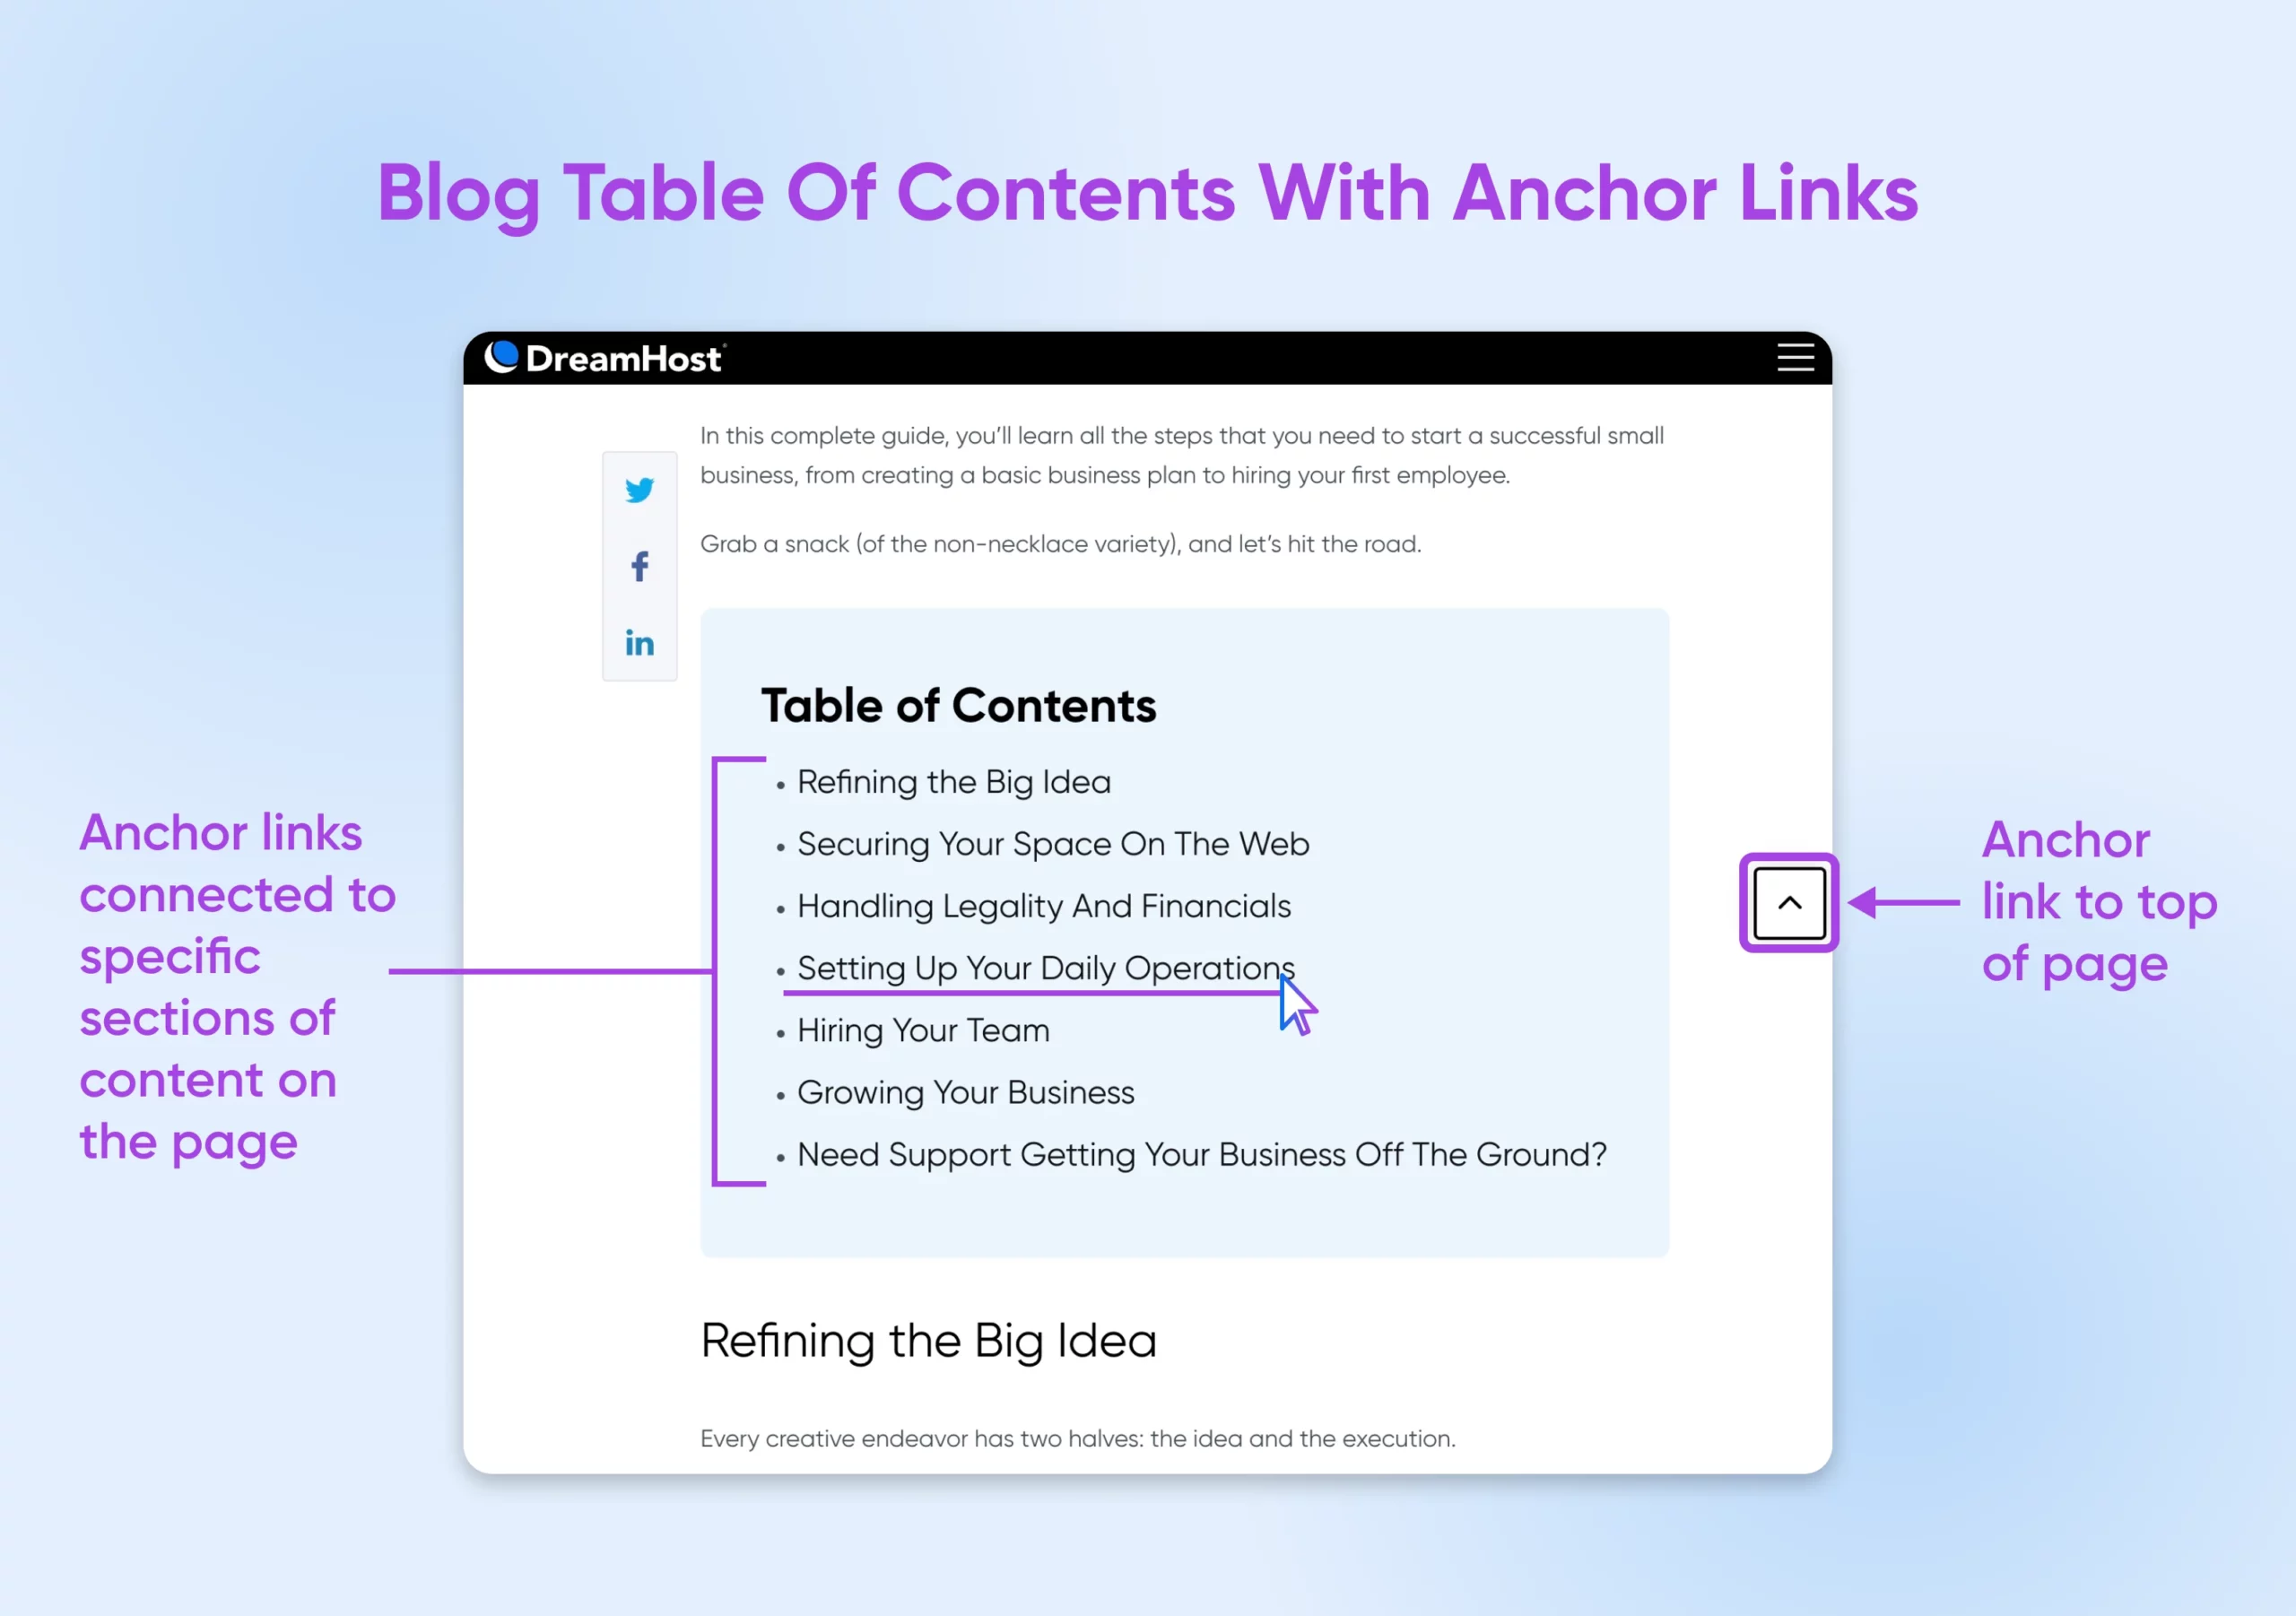
Other common examples of anchor links include buttons that return you to the top of the page when you reach the bottom. You can also use anchor links to help users navigate long landing pages.
Whether there’s a page or post on your website that’s a bit too long for manual scrolling, anchor links can help ensure you’ll capture visitor attention before you get a chance to deliver all the good stuff.
It’s important to note that search engines don’t claim that anchor links improve your search engine rankings directly. However, they do improve the experience for both users and the search engines that rank content.
The Pros And Cons Of Anchor Links In WordPress
Overall, setting up anchor links can help improve content navigation. However, it’s not all sunshine and rainbows — there are a few downsides you may want to consider.
Here, we’ll explore both sides of the story.
Pro: Better Experiences All Around
With anchor text, readers can get a quick overview of your content, making them less likely to bounce and more likely to engage with it. In addition, web crawlers — bots that help search engines understand the content on the internet — can more quickly and clearly process lists.
Let’s dig a bit deeper into this advantage.
When rich snippets appear alongside top-ranking Google search results, they often include part of a page’s table of contents, which is usually created using anchor links. Google may also pull from a table of contents to populate the “People also ask” section at the top of the results page. In some cases, Google may even feature an article’s anchor text below the meta description using clickable links.
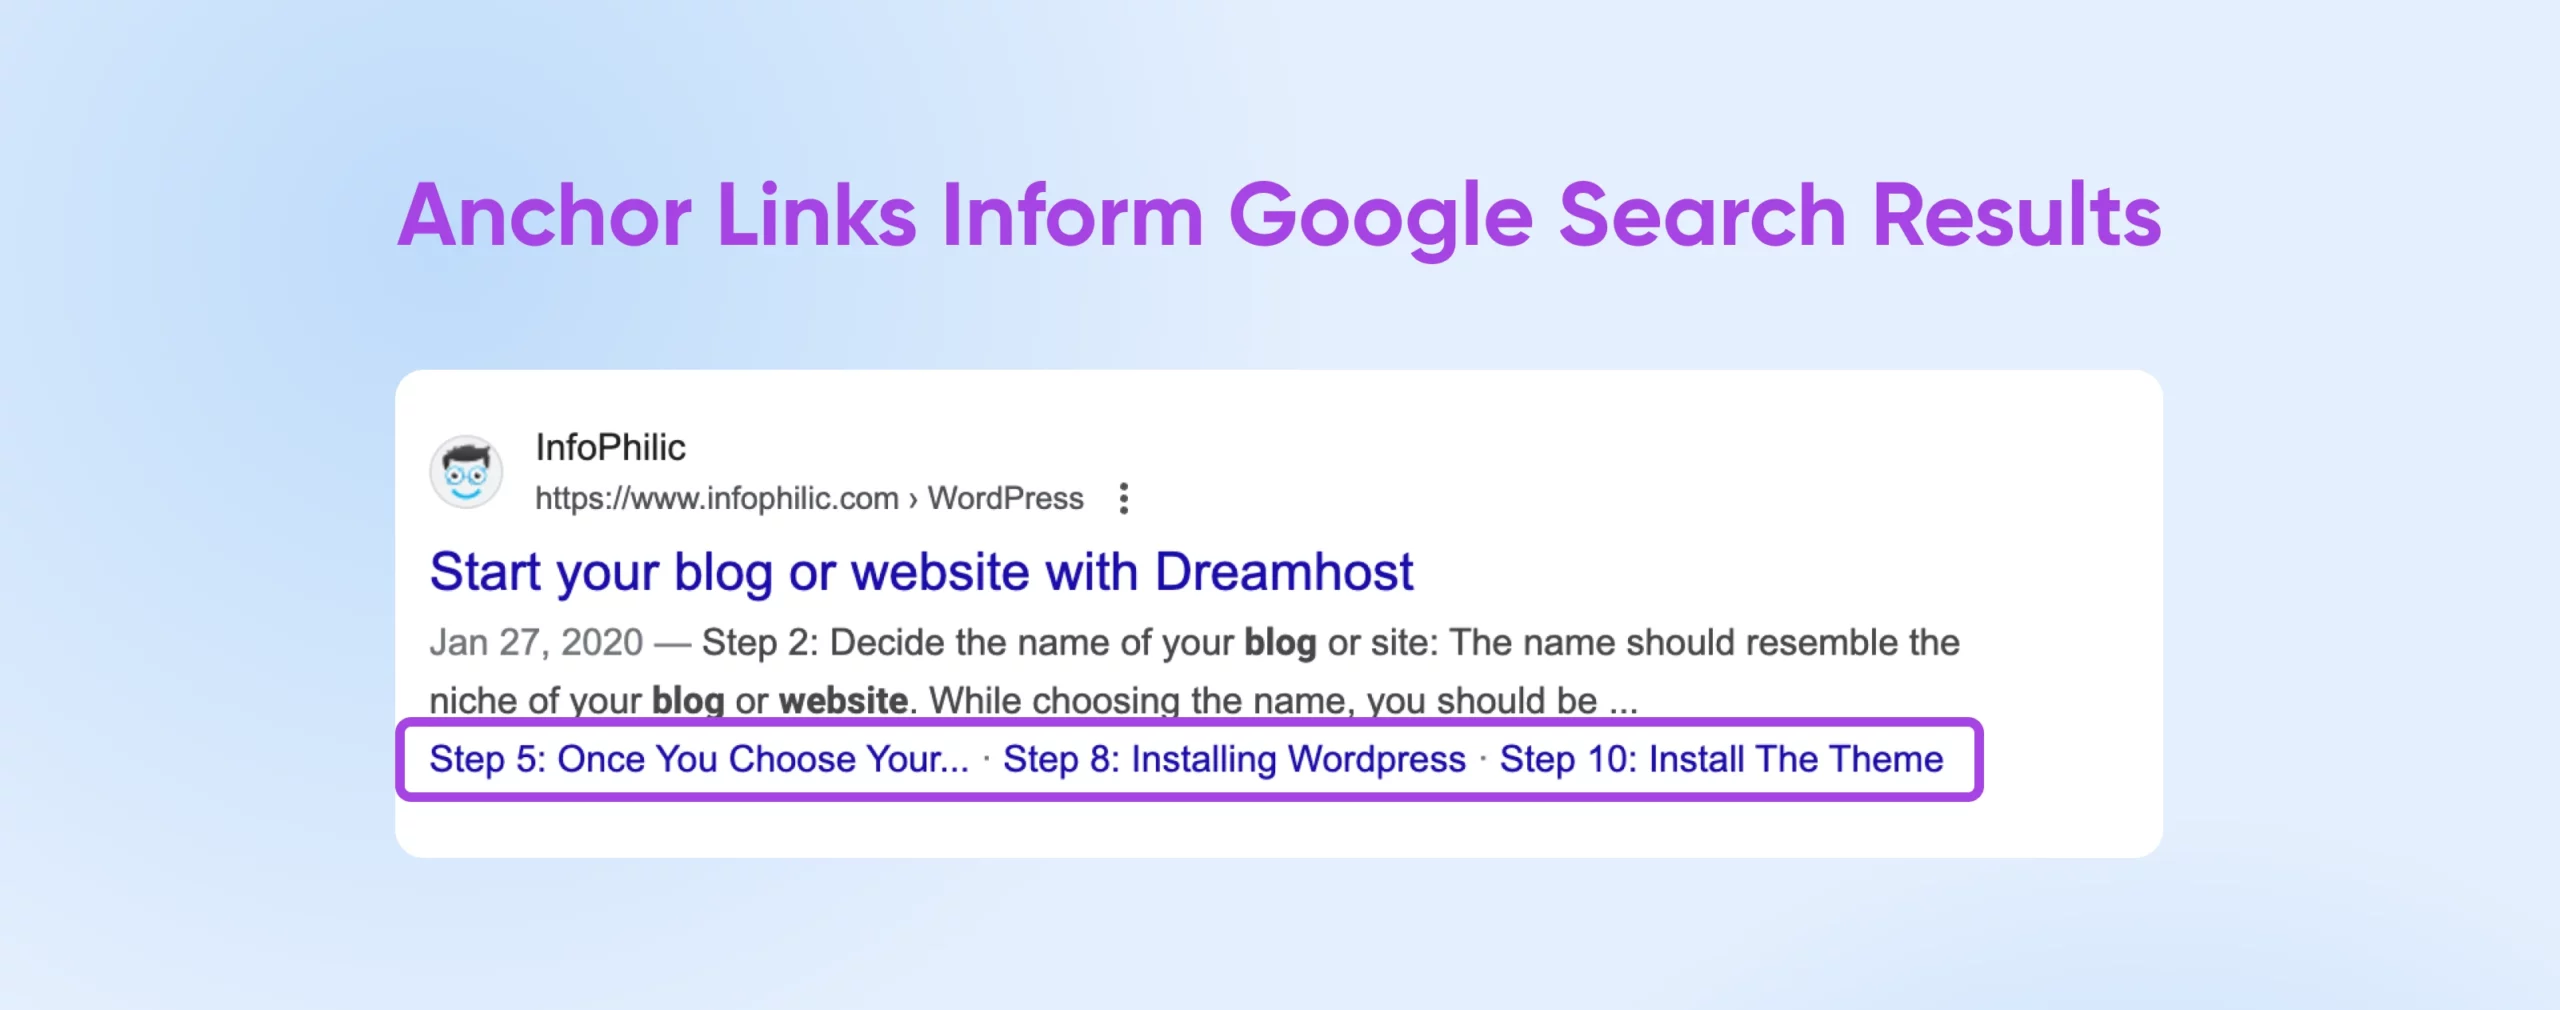
All of these ways that Google uses anchor text and tables of contents help visitors understand what they’re going to find before they even click, which can help reduce your website’s bounce rate. That’s because you’re making life easier for users who might access the page, assume it’s not what they’re looking for because they don’t see what they want right away, and leave. Instead, you can keep them around much longer — more time for conversions! — by telling them exactly what they can find within a post or page and even linking them to it.
Pro: Easier Content Sharing
Anchor text makes it easy to share links that navigate to a specific section within an article. This is particularly useful when it comes to social media managers making posts, and support teams who need to share key parts of help articles with customers.
Con: Reducing Time On Site
If you’re measuring a metric like time on site to measure content and website performance, anchor links might actually reduce the average time visitors spend on your site because they can skip directly to the content they want instead of reading the entire article.
It’s up to you to balance making your visitors happy and your need to hit certain key performance indicators (KPIs).
Con: May Be More Difficult To Update Content Later
Over time, you may need to update your website domain or create 301 redirects, which will likely change links across your site. When changing links around, it can be hard to track down and update all the anchor text you’ve created to ensure every link is still fresh and accurate.
How To Create An Anchor Link In WordPress (3 Options)
Notice the focus on the table of contents here? That’s because a TOC is probably the most impactful way to leverage anchor links on your website. However, it only makes sense to use anchor elements for long pages or blog posts. There’s no hard-and-fast rule, but anything above 1,500 words or so can likely benefit from a table of contents and its corresponding anchor links.
To add an anchor link to a shorter piece of content isn’t necessarily bad, but it can be less useful — making it a poor use of your time and possibly adding visual clutter for readers.
Staring down a long page or post you want to make more valuable for website visitors?
Luckily, creating anchor links is remarkably simple in WordPress!
You can do it either manually or with the help of plugins — both of which we’re going to dive into right now.
1. Add an Anchor Link Using HTML
All of the text you see on WordPress pages and posts is powered by HTML code. HTML, along with CSS and JavaScript, are some of the most-used programming and markup languages. If you can get even a little bit familiar with any of them, you’ll likely be able to do a lot more — with a lot less frustration! — on your WordPress site.
HTML
HTML stands for HyperText Markup Language. It is the most fundamental building block of the web and the standard markup language for creating web pages and applications.
Read MoreSo, we’ll start with showing you how easy it is to decipher and edit HTML!
First, choose the page or post where you want to add anchor links. We’re going to work with a blog post.
To create an anchor link, you first need to set an anchor. To do that, select a subheading that you want to link to, and click the three dots that show up on the right in the floating menu.
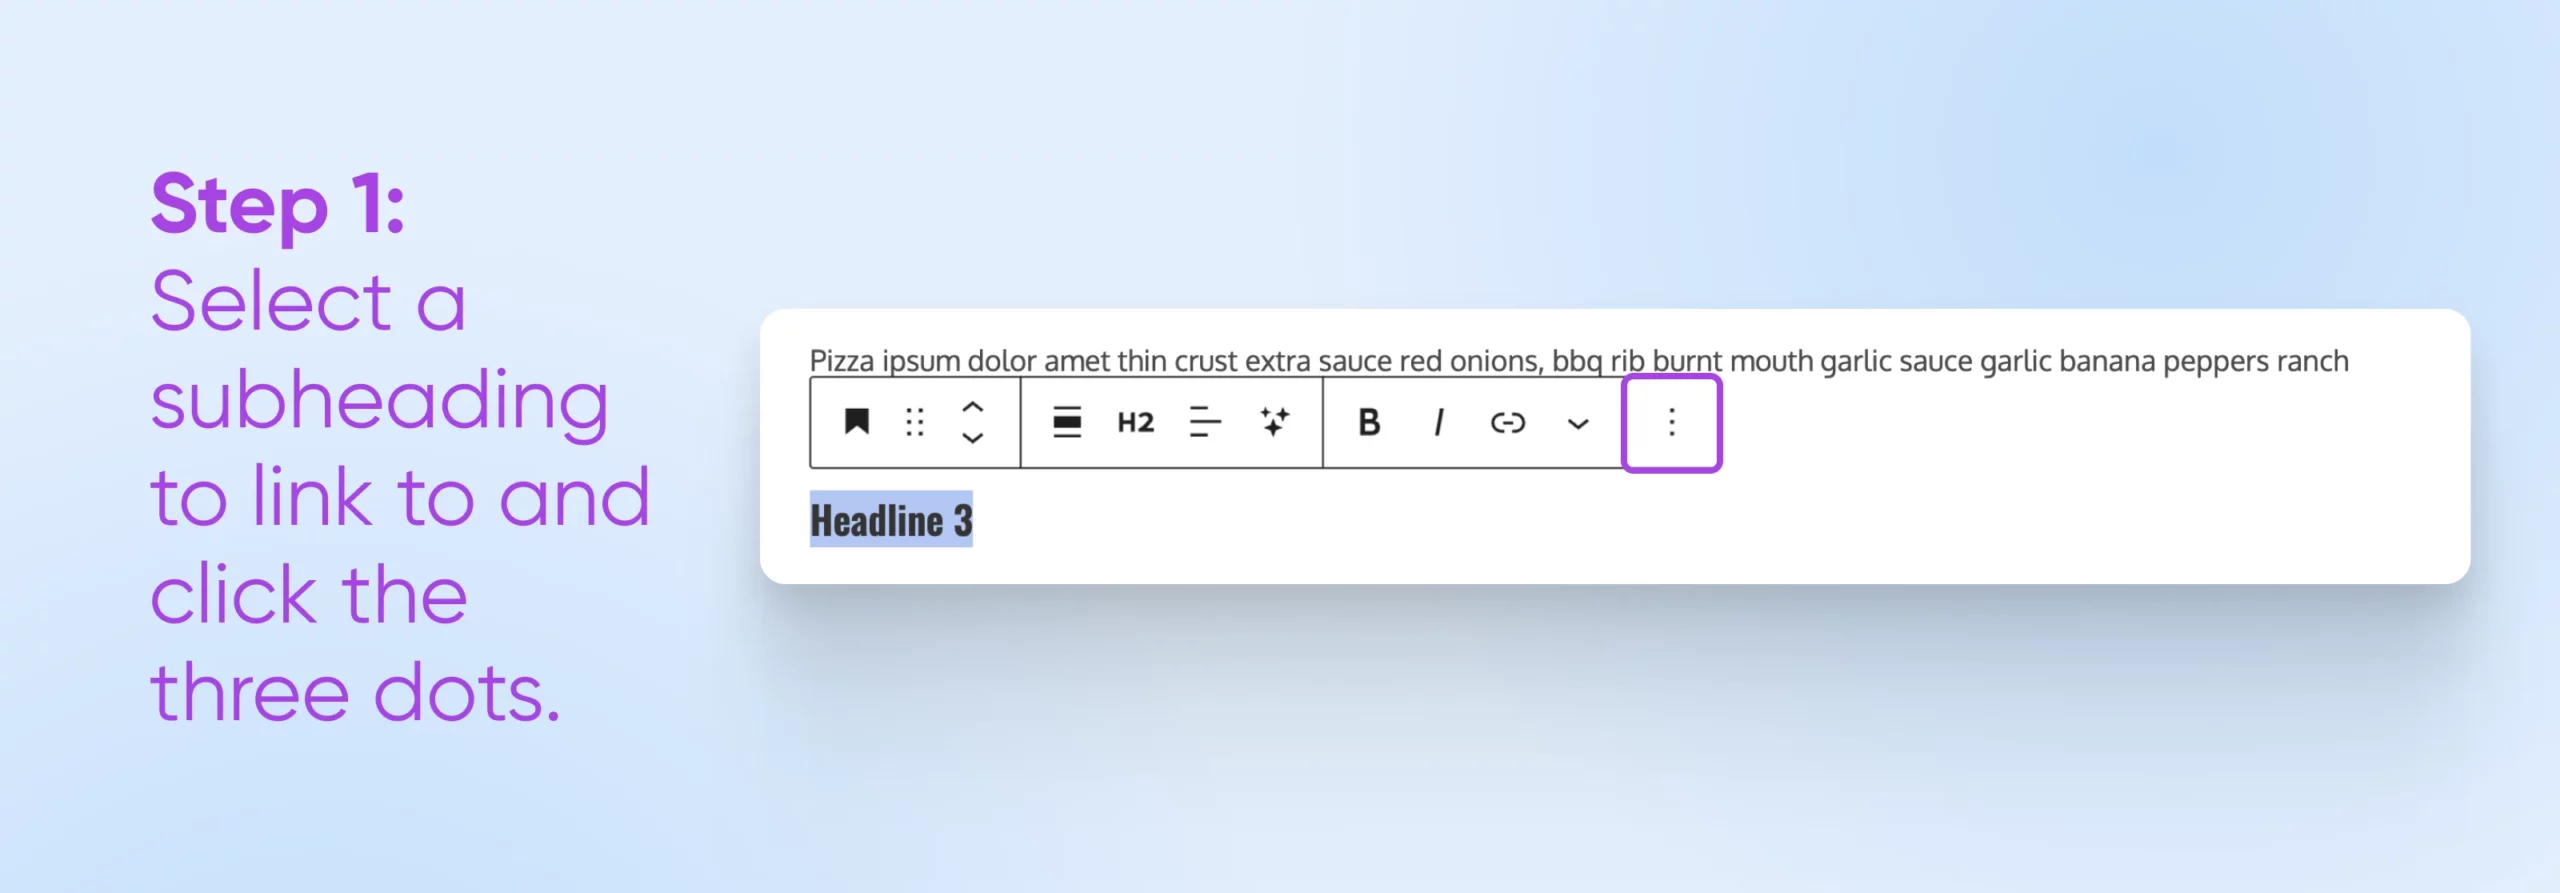
Select Edit as HTML near the bottom.

What we need to do is add an HTML ID. That ID will be the anchor we’re going to link to later on. It will come before the name of the subheader you clicked on, in our case >Headline 3<.
The format is: id=“anchor-name”. Our anchor name will be “headline-3.” Here’s what that code should look like when we’re done: <h2 class="wp-block-heading" id="headline-3">Headline 3</h2>.

Once the ID is in place, you can attach it to text in your table of contents (or wherever else you want to place it) to create an anchor link!
In our example, we’ll scroll up to Headline 3 in the TOC, select it, and click the link icon that shows up in the hovering editing panel.
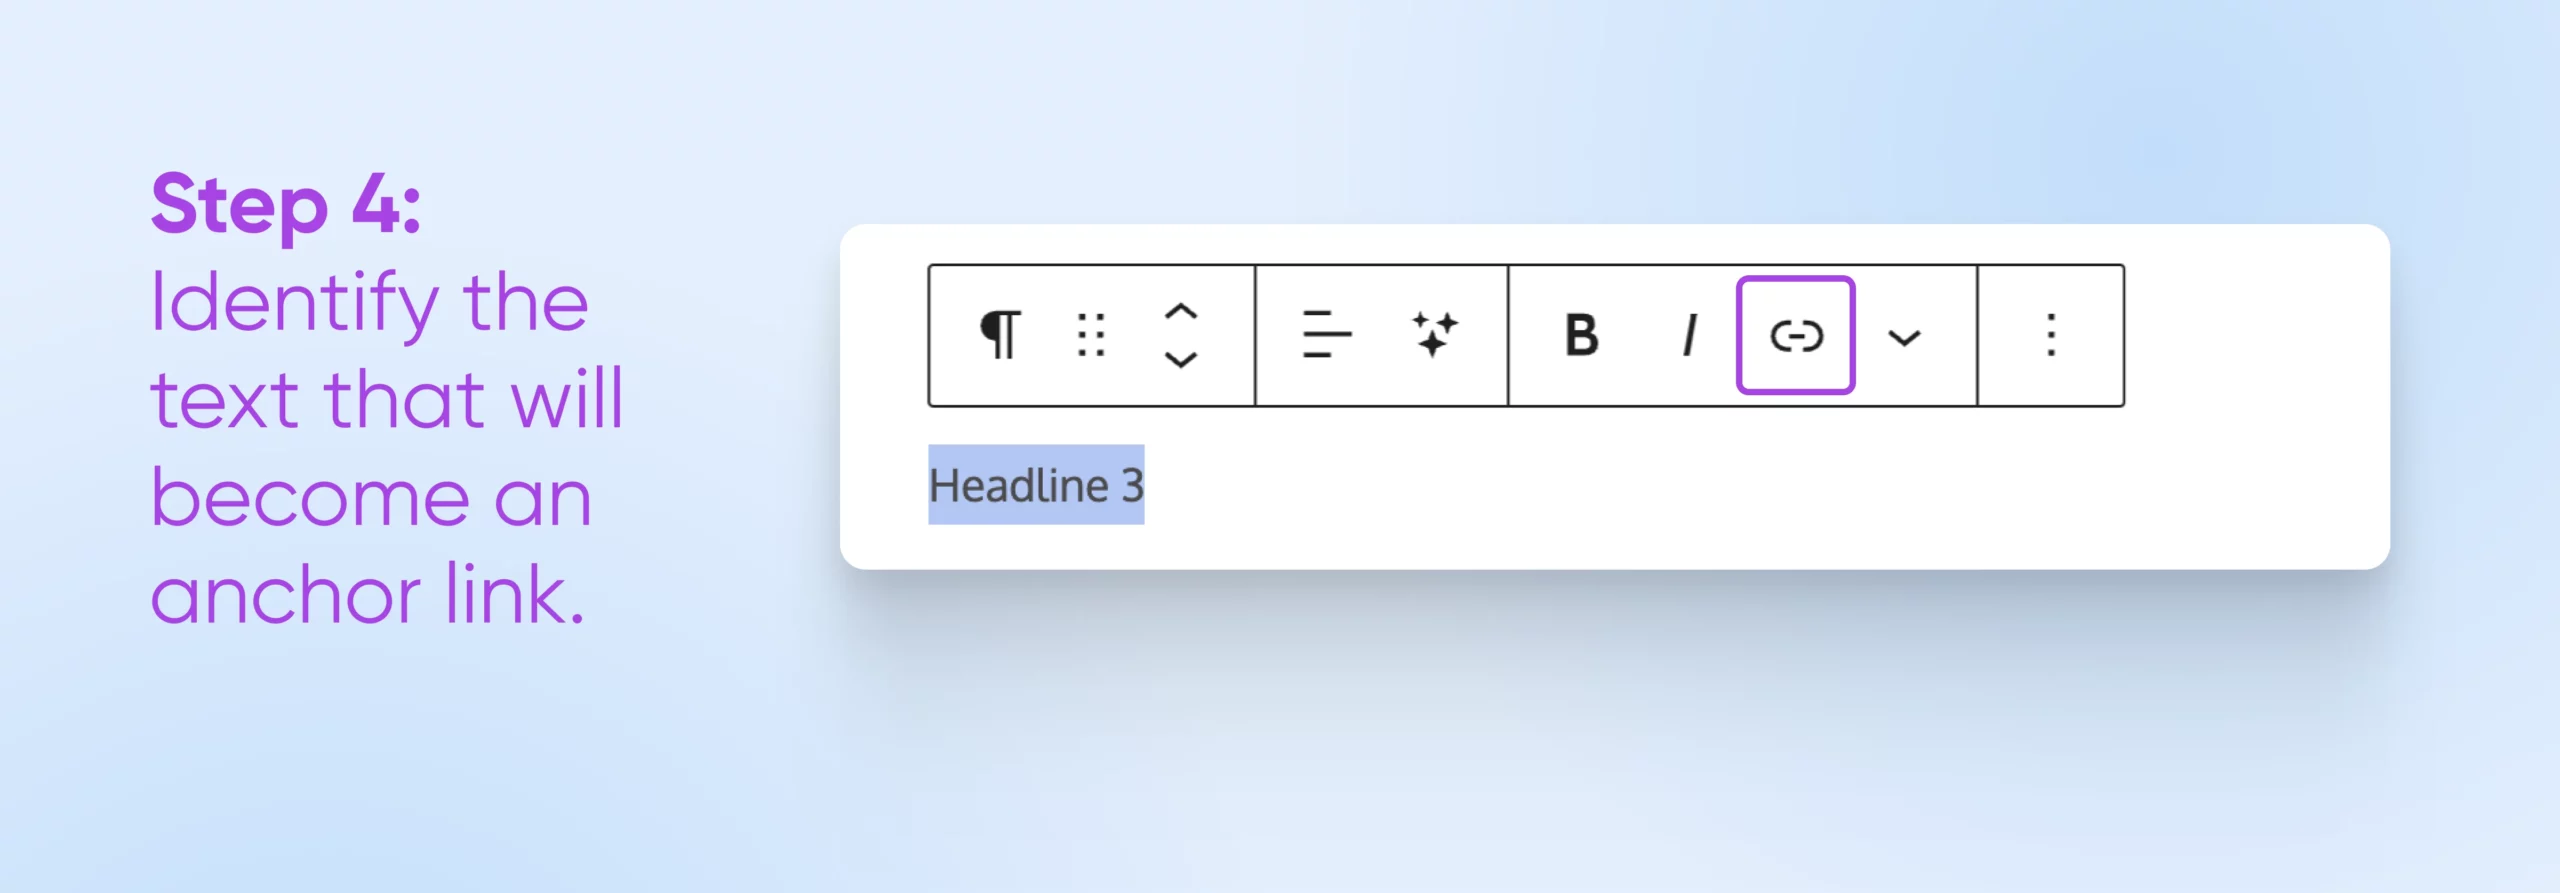
Into the link URL box, we’ll type in the ID we created, preceded by a #.
Hit Enter to make it official, save your work, then publish your changes. You won’t be able to see it in action inside the WordPress editor, so go take a peek at the finished page on your website to make sure it all works.
Manually creating HTML anchor links may seem intimidating if you’re not used to working with code. However, as you can see, adding anchor tags is remarkably simple. Once you know how the process works, adding these links manually should only take seconds.
If you want to create a link toward an anchor ID located on a different page or new tab, make sure to include the absolute URL of it, beginning with https.
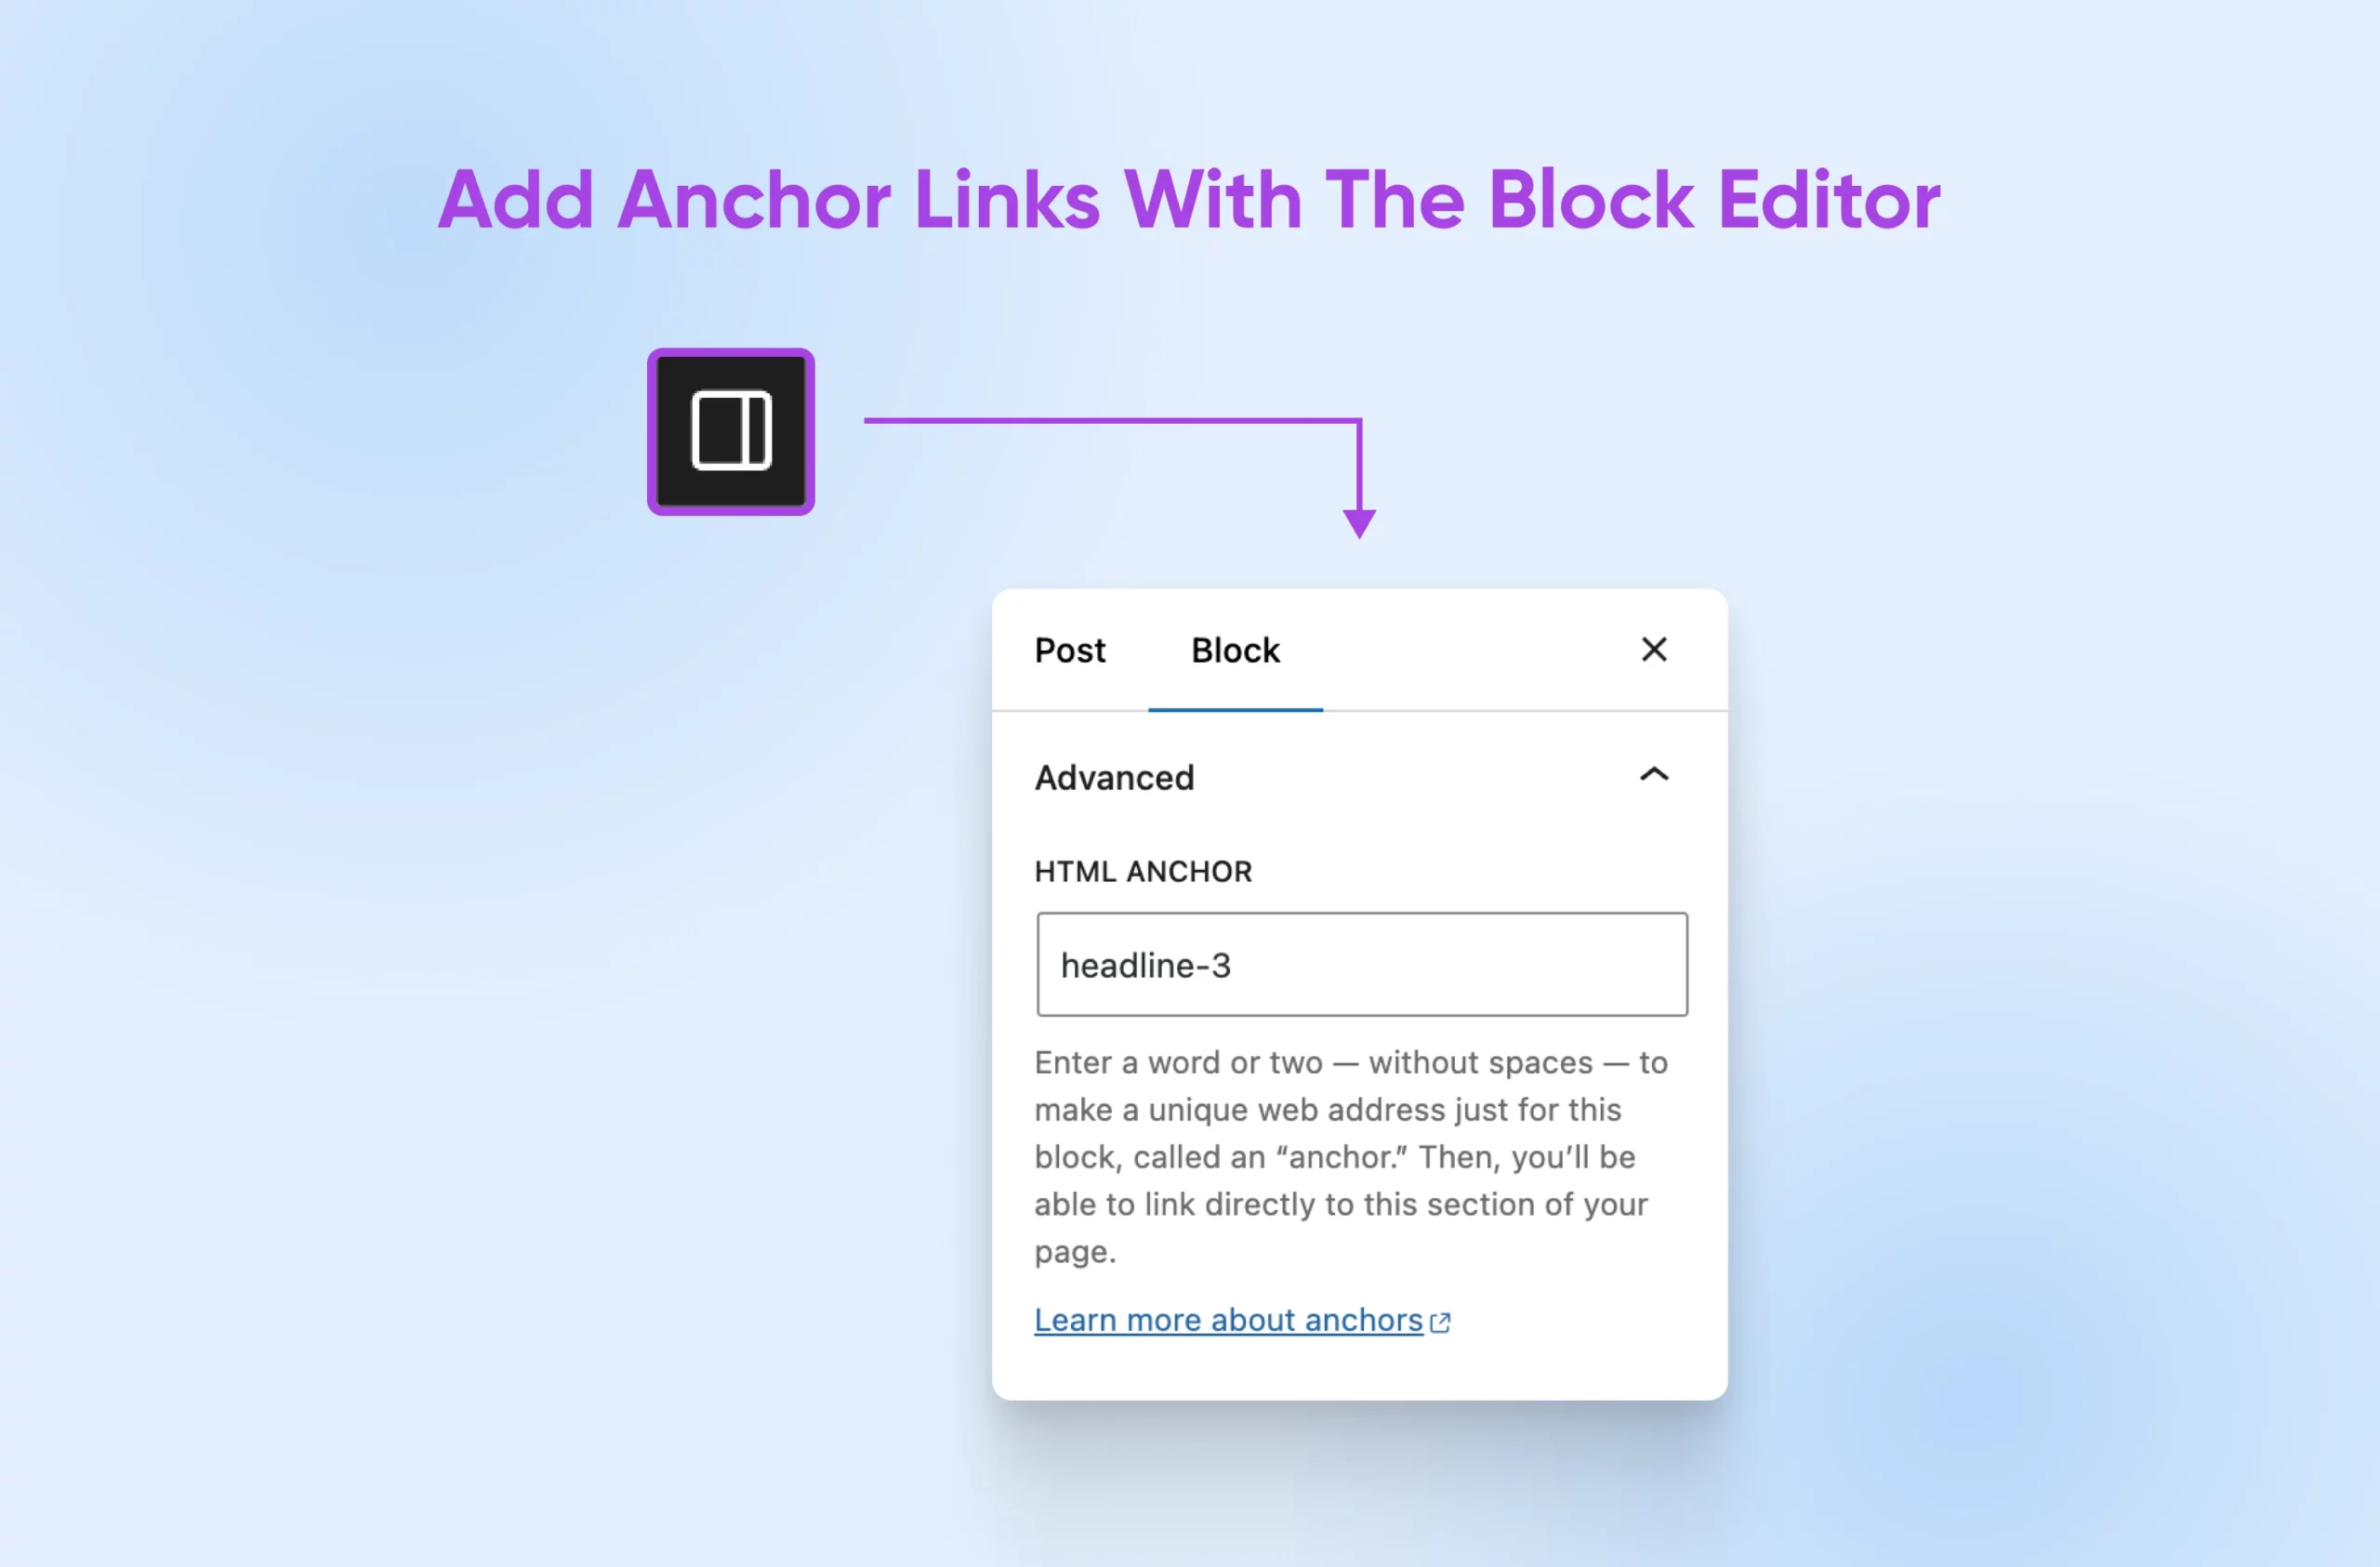
2. Create Anchor Tags Using The Block Editor
Now, we’re going to show you how easy modern block themes make it to add an anchor link — no code required.
That’s because the Block Editor enables you to add HTML anchors or IDs without the need to switch over to the code view.
As with the previous method, the first thing you need to do is add an HTML ID or anchor to the text you want to link to. Select the text and open the settings menu from the square icon in the upper right corner.
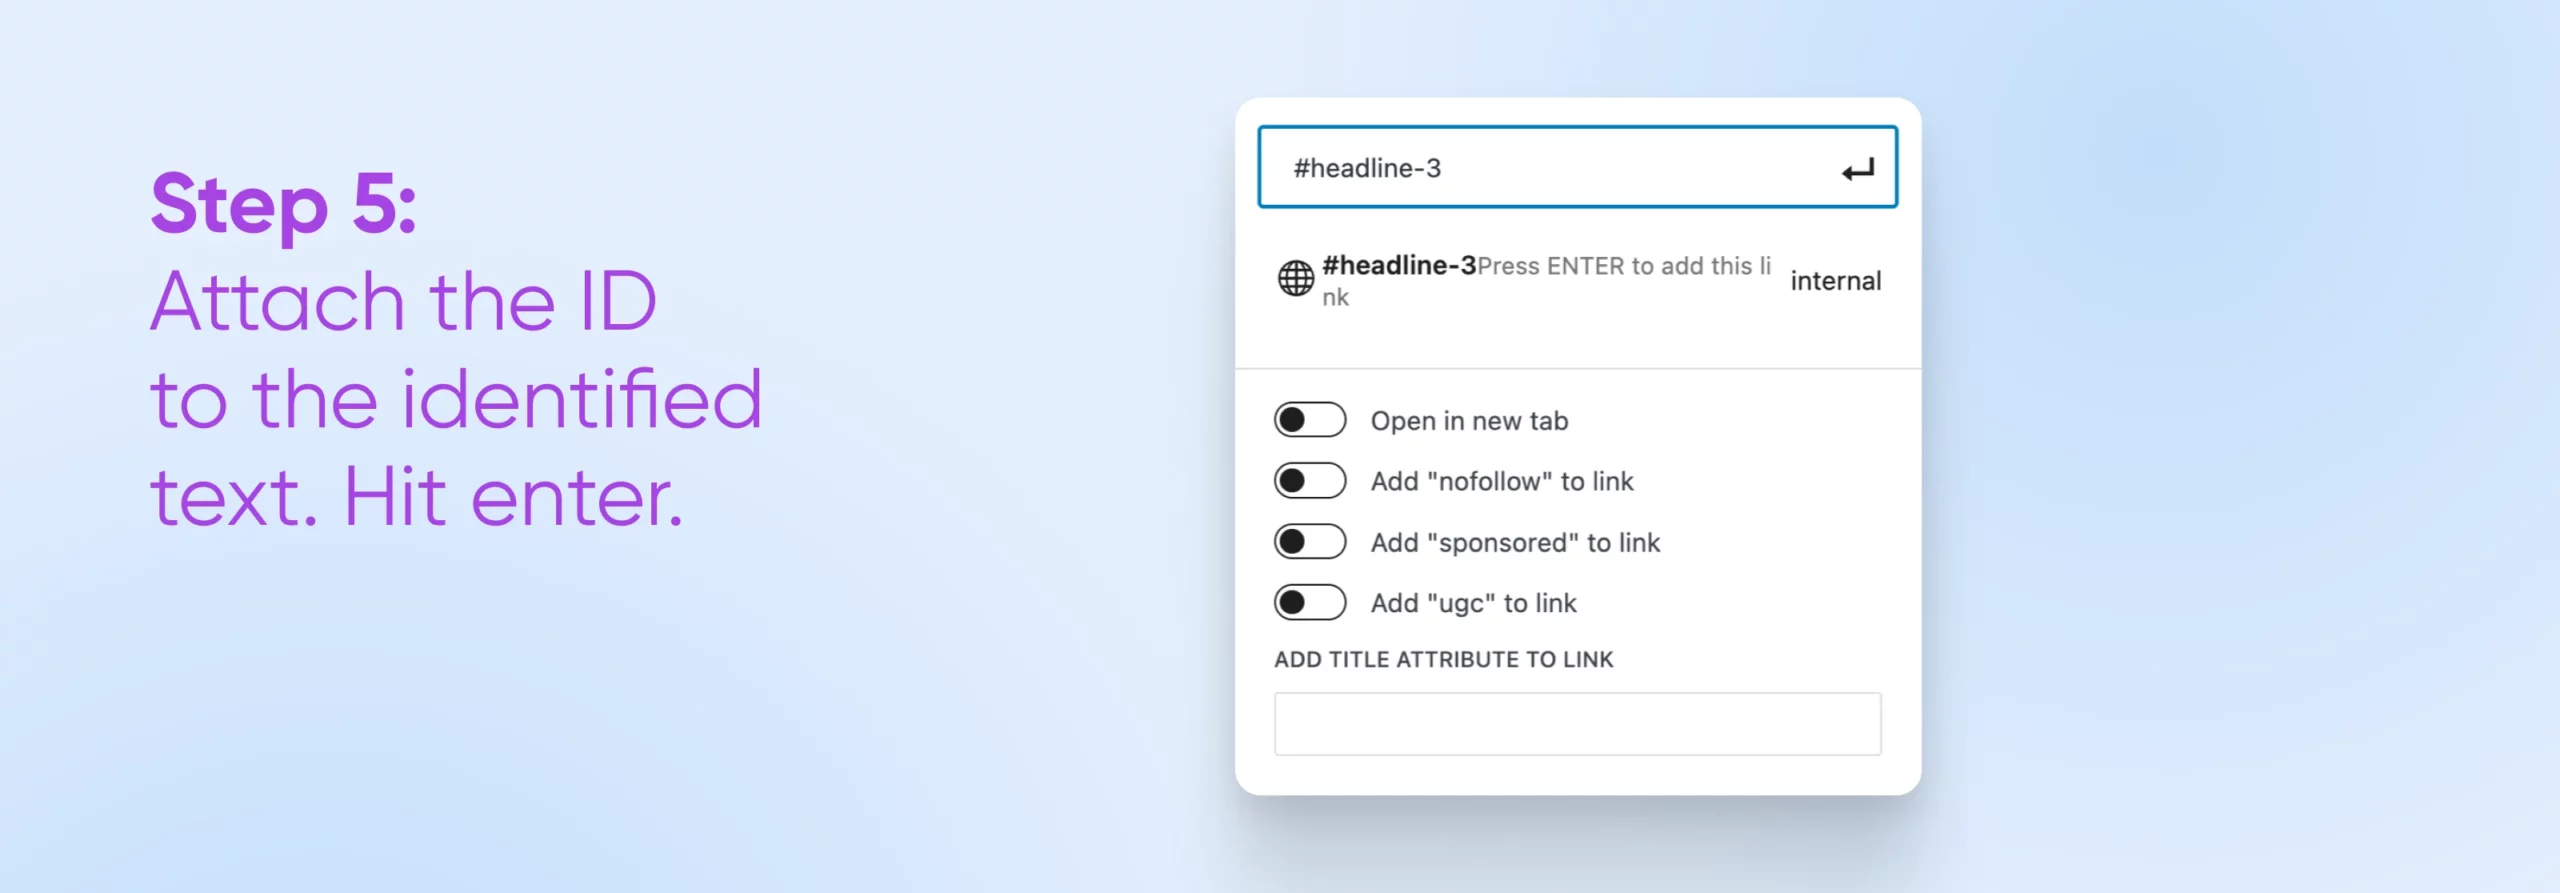
Navigate to Block and open Advanced at the bottom. You’ll see a field called HTML anchor. All you need to do is add your unique anchor text within that field. We’ll go with “headline-3” again.
Now, we’re going to repeat the same steps from above:
- Select the text you want to link your anchor to.
- Click the link icon that shows up in the editing panel.
- Type in # then the ID you just created.
- Enter, save, publish, and check your work!
All that’s left to do now is repeat the process as many times as you need, depending on how many sections you want to add anchor links to. We love how easy the block editor makes this, especially if you deal with long-form content regularly (that’s us!).
Note: Not seeing all the cool block editor features we just covered? You may not be using a block theme! While you can certainly get away with adding anchor text in HTML, we do recommend upgrading to a block theme to take advantage of all the cool new features the WordPress community is adding every day. It’ll make your life easier! Start here to learn how to make the upgrade.
3. Link To An Anchor Quickly Using WordPress Plugins
It shouldn’t come as a surprise that there’s more than one WordPress plugin in the plugin directory you can use to add anchor links in WordPress.
- The All in One SEO (AIOSEO) plugin (paid) has lots of features, one being easy-to-create tables of contents.
- Link Whisper (paid) is a link optimization-focused that enables users to insert anchor links quickly.
- With LuckyWP Table of Contents it’s right in the name — it’s all about creating linked tables of contents with just a few clicks.
Creating a table of contents for each of your posts can be a lot of work. You have to add multiple anchor IDs manually and create links one by one. Let’s zoom in on a solution that makes this task a little more approachable by automatically generating tables of contents for posts and pages within your website.
While the process should look decently similar for any plugin you choose, we’re going to walk you through the specifics of setting up a free, lightweight option — Easy Table of Contents.
To use the plugin, you first must navigate to Plugins > Add New Plugin in your WordPress editor.

Search for Easy Table of Contents, use the Install Now button, wait for that to complete then click Activate to get it up and running on your site.
After you activate the plugin, you’ll need to configure its settings. Go to Settings in your WordPress admin sidebar and find Table of Contents.

In the Enable Support menu, make sure both pages and posts are checked if you want to be able to use TOCs on both.
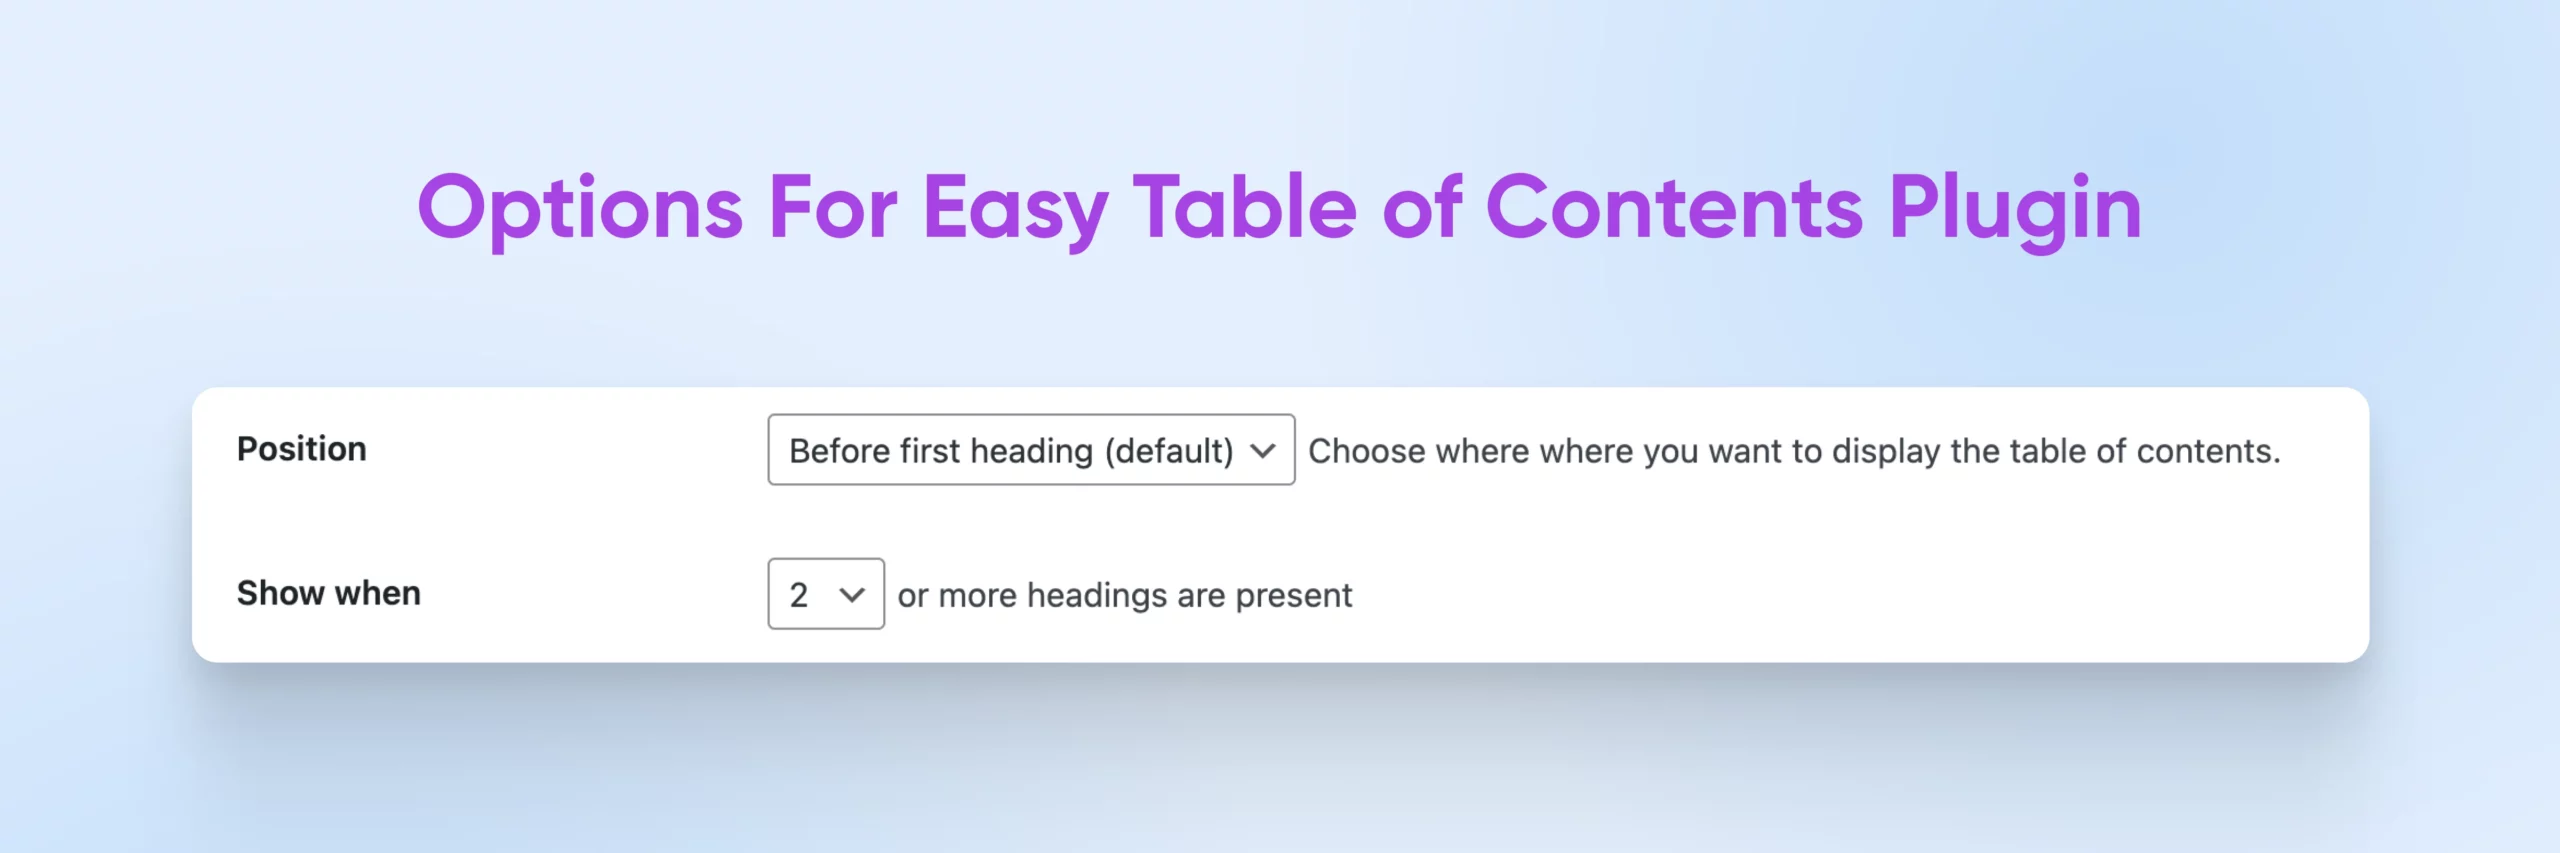
Now scroll down to Position, a setting which will enable you to decide where to display your tables of contents. At the time of this writing, by default, they’ll show up on posts and pages right before the first heading.
Right under it, the Show when setting lets you decide how many headings a post or page needs for the plugin to display a TOC. By default, the plugin will have a set number. Right now, that’s two. You can update either of these settings if you like.
There are a lot more settings on this page. Once you’re happy with everything, save your changes at the bottom of the screen and go to the post or page where you want to add the table of contents. We’ll go back to the blog post we’ve been working in.
At the bottom of the page, you’ll see a new section called Table of Contents. That means the plugin is working and will automatically set anchor IDs and generate a full table of contents leading to them!
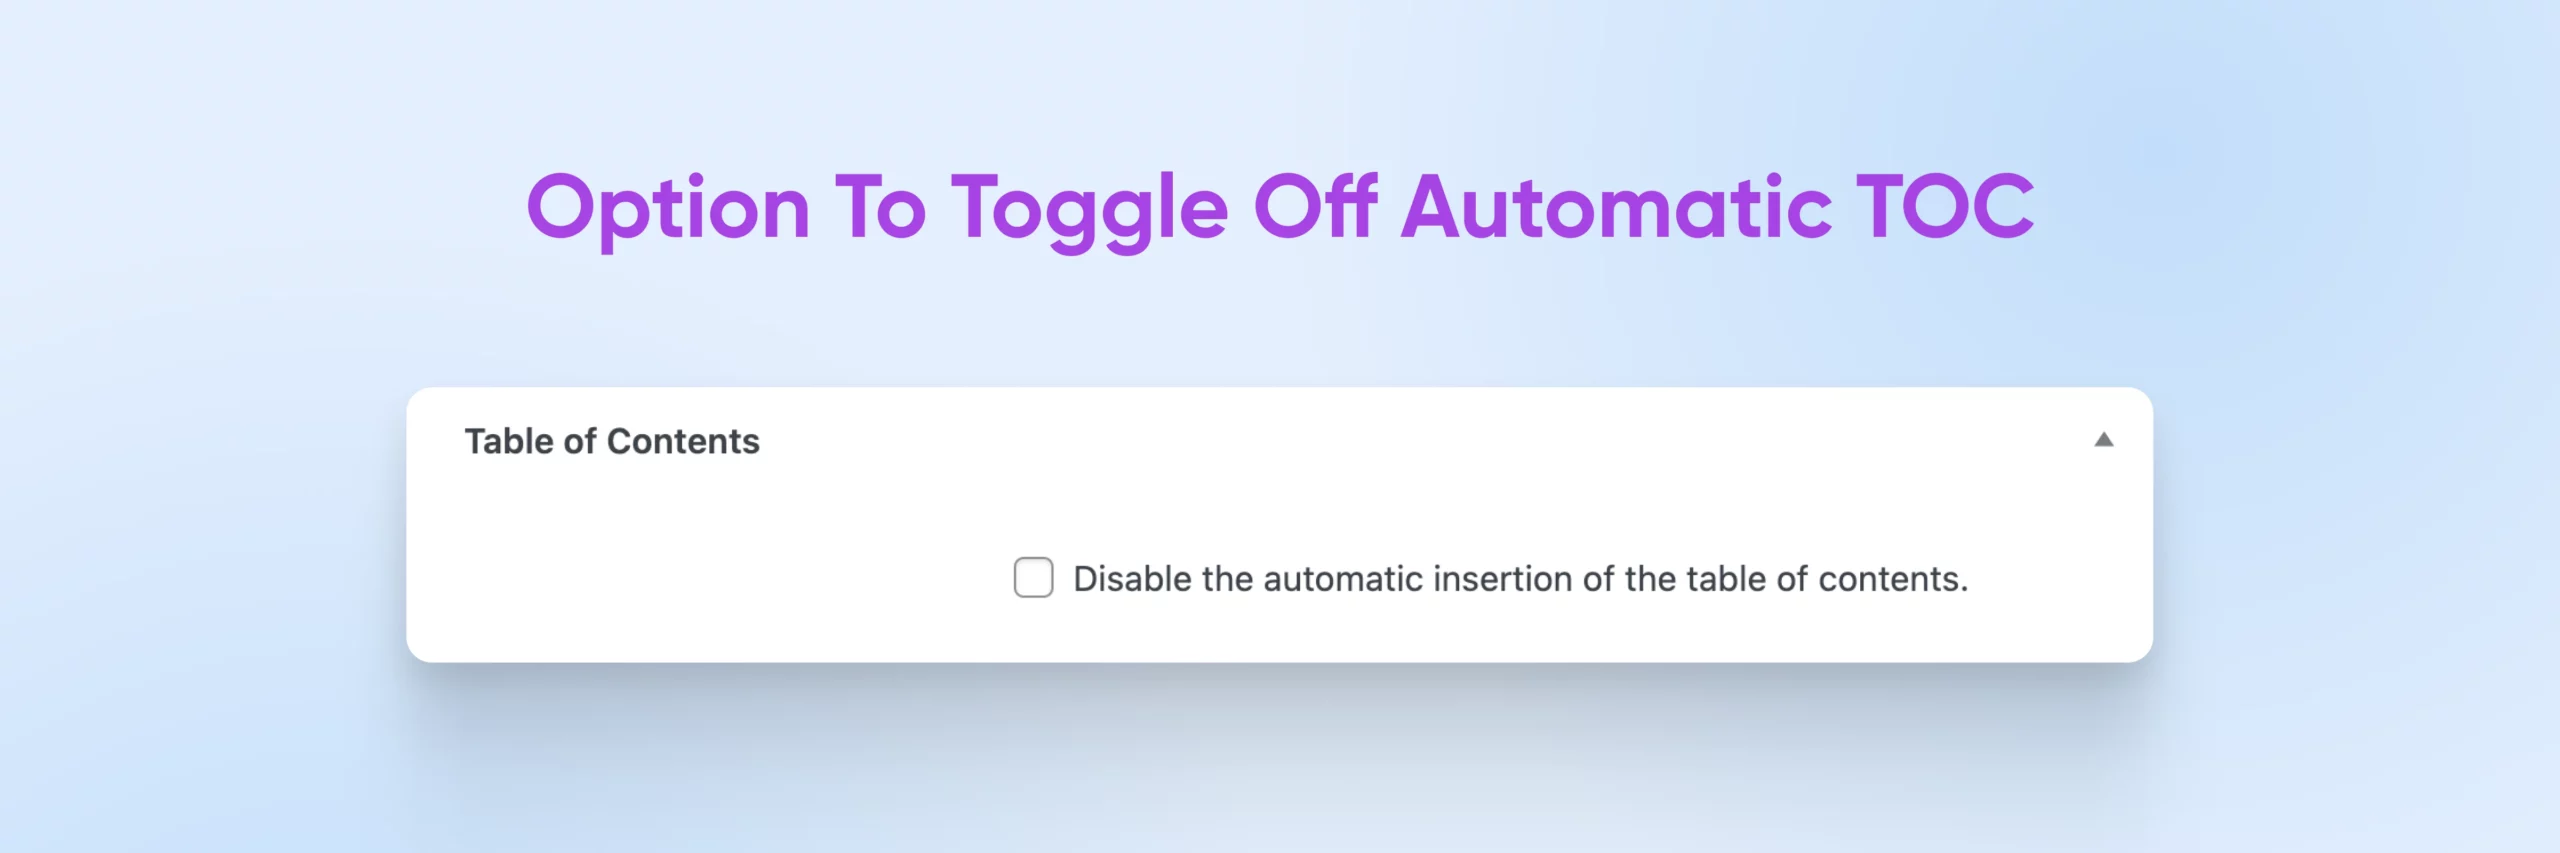
You should see text indicating that a table of contents will instantly be inserted, as long as you leave the box unchecked. We like this feature because it makes it easy to turn off the table of contents for pages where it makes sense. We recommend scrolling and playing around with the settings again here to see if there’s anything unique you want to do with this post. For example, you can create a title for your TOC, move it around, exclude any headings you don’t want to appear, and lots more.
Keep in mind, these changes will only apply to this post and will override any global settings you just made over in the Settings menu.
Save your post, publish it, and go check out the live page to see your quick, easy, and fresh-to-death new TOC in action!

How Else Can You Upgrade Your WordPress Site?
Anchor links are incredibly useful elements for boosting SEO, as well as helping users navigate complex pages and long-form content. You can use anchor links in tables of contents, navigation menus, footnotes, and more. Thankfully, as you’ve seen, WordPress makes it simple to add anchor links to your content!
But using anchor links is just one of the many tricks you can implement to improve your website’s search engine rankings and user experience.
If you want to learn more about improving the WordPress experience as well as your all-important SEO ranking, here are a few additional tutorials you may want to check out:
- 25+ Best Free And Paid SEO Tools Around (Bookmark These!)
- Your Website Redesign Checklist For An Incredible Revamp
- Improve Your Rankings Using These 20 SEO Techniques
- Top 7 Basic Elements Of Web Design
- Mind Those URLs: How To Create An SEO-Friendly Website Structure
- Wondering How To Make A Website? Here’s A Complete Tutorial
- On-Page Vs. Off-Page SEO: Complete Guide & Essential Tips
Are you looking for a WordPress host that can help you serve long-form content to thousands of visitors without slowing down your site? DreamHost’s WordPress hosting packages are designed to handle large amounts of traffic while keeping your website fast.
How about a little help pulling off all that design, marketing, and more that running a successful business takes in this day and age? We also have plans to support you there. Check out all the offerings our awesome pro services team can deliver and craft your perfect website maintenance strategy today.

Unbeatable WordPress Hosting
Reliable, lightning-fast hosting solutions specifically optimized for WordPress.
See More