In this post, we’ll walk you through each of the six WordPress settings screens. We’ll explain what each panel does and how to customize it to suit your needs.
Once you complete your first successful WordPress installation, you may find yourself wondering what your next steps should be. Even though WordPress is an easy-to-grasp, beginner-friendly platform, the wealth of screens waiting for you in the dashboard could send your head into a spin.
In our opinion, the best place to start is with your Settings panel, and fortunately, it’s a breeze to navigate. There are six different pages that encompass practically everything you’ll need to tweak how your site works and acts with visitors.
What Are WordPress Settings?

The Settings area of your WordPress dashboard acts as a central location for the tools you need to define, customize, and control the various sections of your site. There are six default pages to traverse, although some plugins will often add further options.
Within each page are options to micromanage the way readers interact with posts (such as via commenting), general site-wide time and date settings, and even some essential tweaks related to usability and your search engine ranking. As you can imagine, these settings affect the very fabric of your site, and it’s one good way to provide a unique experience for visitors.
WordPress Settings Overview
Let’s take a look at the six default pages in more depth. It’s worth noting that while the settings you change here are global on the whole, some plugins will offer further customization via WordPress’ other various screens.
With that in mind, let’s begin with your general WordPress settings.
1. General Settings
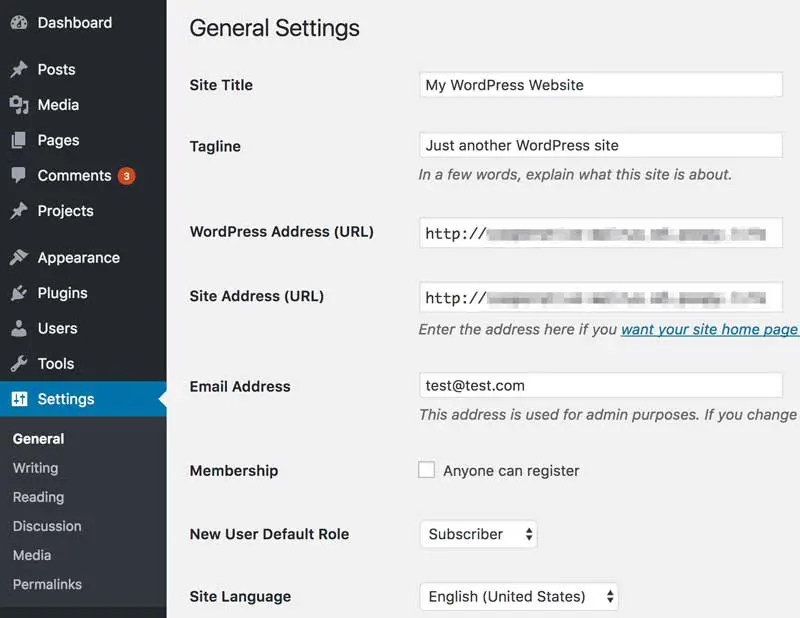
First up is the General screen, which lets you customize the basic, top-level elements of your site. The screen is loosely sectioned according to each setting’s focus.
Site Title & Tagline
For example, at the top, you can set your Site Title and Tagline. The former will obviously show up in the title bar of your browser and search engines once your site is published. The latter is usually displayed underneath your site’s title and is a short explanation of what your site is about. Both elements provide an excellent opportunity for improving your site’s Search Engine Optimization (SEO).
WordPress & Site Address
Moving on, your WordPress Address (URL) and Site Address (URL) are usually the same and are simply your site’s URL. The Email Address field should contain the primary email that you wish to receive admin-specific emails to.
User Options
Next are some basic user registration options. The Membership checkbox toggles whether anyone can register on your site, while the New User Default Role drop-down menu sets a default role for any new site subscribers. We recommend you keep this to Subscriber initially, as this offers the least amount of site access.
Time & Date
The next grouping is centered around times and dates. You can select a timezone, along with a time and date format (all of which should be based on either your business or visitor location). The Week Starts On drop-down enables you to set a specific day as your start of the week.
Site Language
Finally, the Site Language menu lets you set a default language for your WordPress dashboard. Note that this isn’t related to your on-screen, front-end content in any way.
Once you’ve made your updates, click on Save Changes. You should see your changes apply immediately. However, before you go any further, you’ll want to customize the other pages in the Settings section.
2. Writing Settings
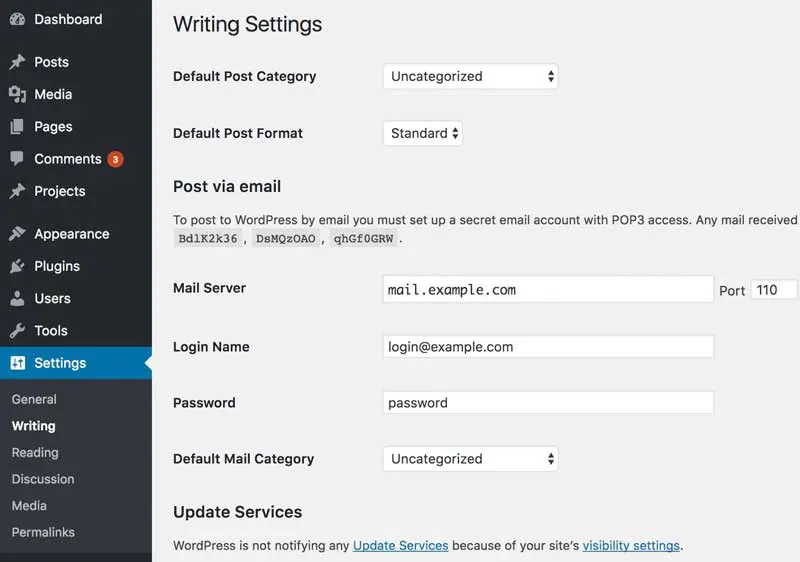
The Writing screen is focused on default formatting options for your posts and pages’ editor screens. This is more strictly apportioned into four sections, unlike the General screen.
Post Settings
The three initial options relate directly to post formatting, with the two checkboxes under Formatting letting you automatically handle emoticons and XHTML. We recommend leaving these at their defaults, especially the second option. The two drop-downs here let you set a default category and format for posts, and in the case of the latter, will update based on any new categories you create.
Moving on, the Press This section is an underused aspect of WordPress that lets you bookmark and edit snippets of web pages before publishing them to your site. It’s a great feature for blogging but may not suit every niche.
Post Via Email
Next, the Post via email section enables you to write and publish blog posts via email. We recommend you use your dashboard whenever possible, although it’s a handy alternative if you lack access and need to get a post out immediately. Finally, the Update Services section lets you decide how to notify people of new content on your blog.
Note that while these options are a good start, you can customize your writing options further within the Posts screen on your dashboard.
3. Reading Settings
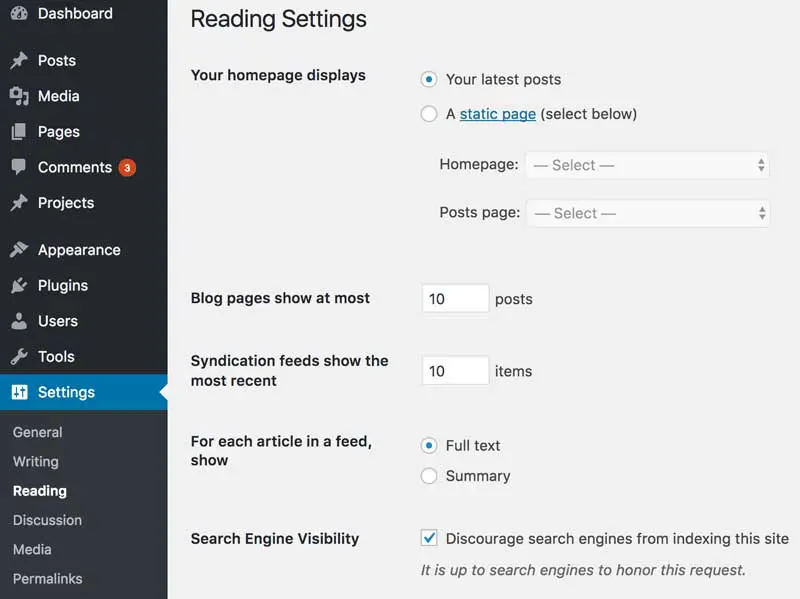
The Reading screen relates to how visitors will initially view your site. By default, your home page will list your latest blog posts, although this can obviously be changed.
Homepage Display Settings
You can tweak this using the homepage displays option. Blogs, for example, will likely want the latest posts to be front and center. If you’d like users to land on a specific home page, select the Static Page option, then choose both a Front and Posts page from the drop-downs.
Blog Settings
The next two options let you set how many of your most recent posts are shown at any one time on your blog and within any RSS feeds, and below those, the For each article in a feed show box lets you show either the full text of your post or a simple summary.
Search Engine Visibility
Finally, Search Engine Visibility simply requests that search engines don’t index your site in its rankings. They don’t have to comply, but they usually do. Our recommendation here is to leave this checked until you’re ready to publish your site.
4. Discussion Settings
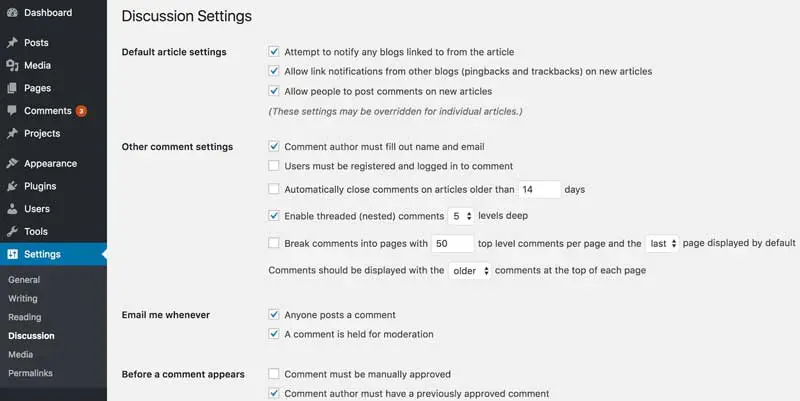
A primary benefit of WordPress is how it enables your readers to interact with your content. This section lets you manage engagement on your site. Let’s discuss the customizations you can make:
Default Article Settings
You have three settings to choose from here, and we’d recommend disabling the first two because, while sending and receiving notifications from other blogs sounds good, trackbacks are a controversial subject.
Other Comment Settings
This enables you to control site-wide, comment-specific actions. The options you choose here are totally subjective, although displaying newer comments first makes sense, in our opinion.
Email Me Whenever
If you want a notification email when someone makes a comment, or if a comment is in your moderation queue, make that selection here.
Before a Comment Appears
While you could simply let all comments through without moderation, we recommend you apply some form of filtering, in order to keep your comments sections free from online trolls.
Comment Moderation
Because spam is so ubiquitous across the internet, you can use this area to set criteria for holding spammy comments based on the number of links it contains. The default is fine for most cases.
Comment Blacklist
Since it is nearly impossible to allow comments without being hit by spammers, you can use this section to blacklist them. You can add known IP addresses, URLs, names, or email addresses here to prevent them from showing up on your site or in your notifications.
Avatars
Finally, the Avatars section relates to a comment author’s displayed image. This is another subjective section, although enabling avatars may create a more personable comments section.
5. Media Settings
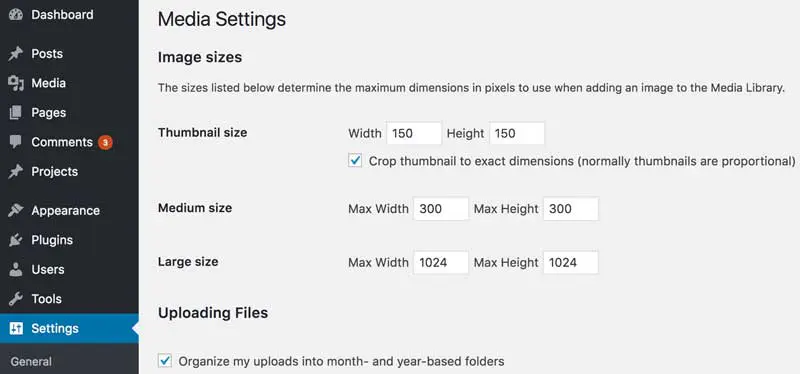
Image Sizes
This section is much simpler compared to the others. In short, here you’ll define the sizes of your images once you upload them to your site. You’ll notice these are selectable when uploading images, and you can also create your own custom sizes, although you’ll need a bit of coding experience.
The default sizes are Thumbnail, Medium, and Large. Alternatively, you’ll be able to type in a custom size by editing an image on a post or page.
Upload Settings
The final setting for this screen is a checkbox for uploading files. By selecting it, you can tell WordPress to organize your media based on the month and year.
6. Permalinks Settings
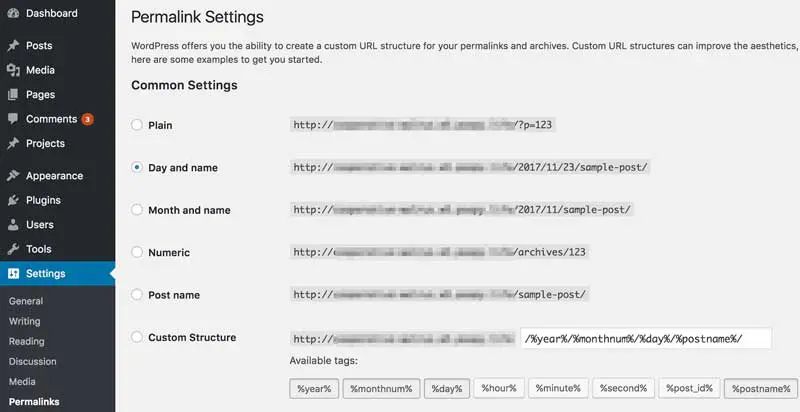
This final screen is one of the most powerful ones in your Settings pages. Permalinks are essentially the format of your individual pages’ URLs. While that may not seem like a big deal, it can be detrimental to your site’s SEO if you get the format wrong.
The default option when installing WordPress is Plain. This appends a string of numbers to your URL, relating to its database ID. In our opinion (and many others), it looks ugly. What’s more, it’s not good for SEO.
As for the other options, you can set multiple permutations of the date and post name, a slightly prettier-looking numeric permalink, or simply use Post name. Our advice here is to stick to the Post name format for all but incredibly content-heavy and time-specific (such as news) websites.
In those cases, a date-based format will potentially be more appropriate. Even so, you’ll want to optimize the permalink further on a post-by-post basis.
Although you could set a custom permalink structure, there’s no need to unless you’ve got a very specific reason for doing so. The options provided by WordPress should cover the needs of most sites.
Confidently Configure Your WordPress Settings
Even as a first-time user of WordPress, there is no need to feel overwhelmed when it comes to configuring and customizing its settings. In fact, understanding how the six different pages impact your site can help you take control of the platform. With this WordPress settings tutorial, you should now be able to optimize your WordPress website to best meet your needs.

Do More with DreamPress
DreamPress Plus and Pro users get access to Jetpack Professional (and 200+ premium themes) at no added cost!
Check Out Plans