Scheduling your posts in advance on your WordPress site can be a lifesaver. Writing multiple blog posts and scheduling them out should give you peace of mind knowing they’ll be published on time. However, sometimes this feature doesn’t work as expected, and you might end up with the missed scheduled post error.
Fortunately, there are a few ways to troubleshoot this common issue. Whether you prefer to use a plugin or get under the hood yourself, you should be able to fix the missed scheduled post error and get back to business in no time.
In this article, we’ll explain what the missed scheduled post error is and look at a few possible causes. Then we’ll share three easy ways to troubleshoot the error and two simple methods for fixing it. Let’s get started!
What the Missed Scheduled Post Error Is (And What Causes It)
When you schedule a post in advance, WordPress uses a “cron job” to publish it. “Cron” is a software utility that schedules tasks, while a cron job is the task itself. Typically, you’ll see cron used to handle repetitive tasks.
Since WordPress is expected to run in a variety of environments, it can’t rely on traditional cron, which is intended to work in Unix-like operating systems. Instead, WordPress has WP-cron, which can simulate a system cron. When something goes wrong with the cron job publishing your scheduled posts, you’ll see the missed schedule error.
There are a few potential causes of this error. One possible scenario is that your server or a plugin could be affecting your cron jobs. Common culprits include caching plugins. While these plugins are valuable for improving your site’s performance, they can also interfere with WP-cron.
Another cause stems from the fact that WordPress uses simulated cron jobs. These simulations require someone to visit your website at the same time that the task is supposed to be run. If no one lands on your website at the right time, your post won’t be published.
Obviously, if your site has experienced some downtime, then no one can visit it. This could prevent a cron job from running as expected.

Skip the Stress
Avoid troubleshooting when you sign up for DreamPress. Our friendly WordPress experts are available 24/7 to help solve website problems — big or small.
Check Out PlansHow to Troubleshoot the Missed Scheduled Post Error (3 Ways)
If you’ve encountered the missed scheduled post error, there are a few simple ways to go about troubleshooting it. Let’s take a closer look at them.
1. Check Your Timezone Settings
If the timezone you’ve set in WordPress doesn’t match the timezone you use for publishing posts, it’s unlikely that these posts will go live as expected. Fortunately, there is a simple fix for this timezone issue, so it’s a good place to start.
To check your timezone settings, go to your admin dashboard and navigate to Settings > General. Scroll down, and you should see a dropdown menu where you can select your timezone.
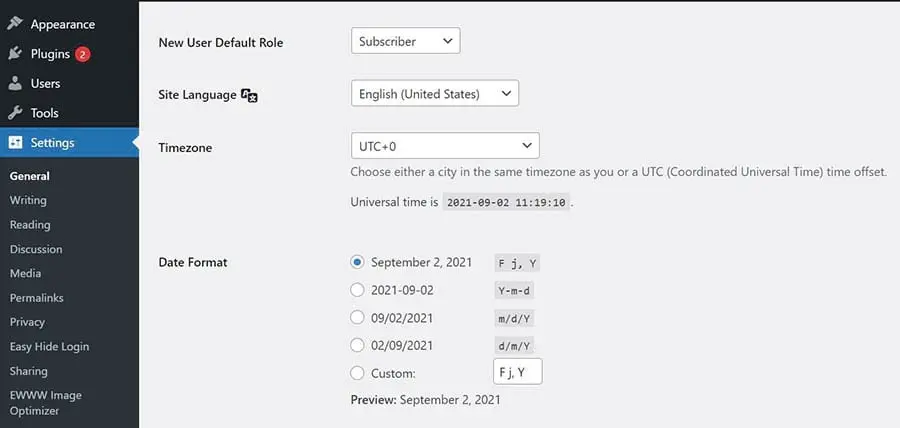
Using the dropdown, select the timezone you want to use for your WordPress website. Then, click on the Save Changes button, and you’re all set!
2. Clear the WordPress Cache
As we mentioned earlier, occasionally a WordPress plugin can interfere with the cache being cleared. So while caching can help to speed up your website, sometimes it can make it difficult for changes to take effect the way they should. Fortunately, clearing the WordPress cache manually is a simple process.
The first step is to clear your browser’s cache. The steps you’ll need to follow will differ depending on which browser you use. If you’re still not seeing your scheduled posts, try clearing the WordPress cache as well.
If you’re using a caching plugin, you’ll need to clear your cache through it. For example, if you’re using the WP Super Cache, go to Settings > WP Super Cache and select the Easy tab. Next, click on the Delete Cache button.
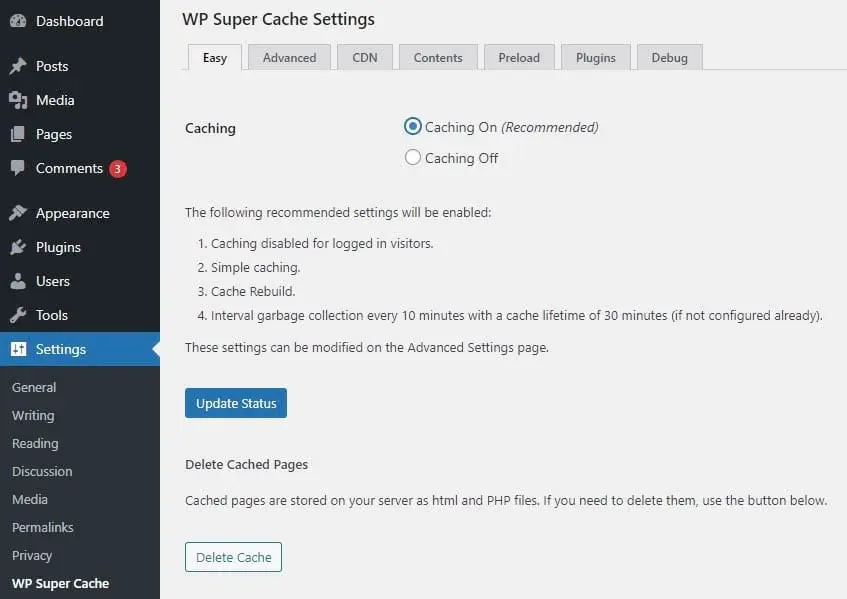
Even if you use a different caching plugin, chances are the steps will be similar. Most of these plugins feature one-click cache deletion.
Managed hosting plans tend to work a little differently. If you’re a DreamPress customer, you should already have the Proxy Cache Purge plugin installed to handle this for you. However, you can also purge the cache manually.
To clear the entire cache, you just need to hover over the Cache icon in your dashboard menu and select Purge Cache (All Pages).

You can also purge the cache for an individual post or page. To do this, you’ll need to navigate to the desired post either by entering the URL or by locating it in your dashboard and clicking on the View option.
Once again, you’ll need to hover over the Cache icon in your dashboard menu, but this time you’ll have the option to Purge Cache (This Page).

Don’t worry if your scheduled posts still aren’t showing up. There is one more troubleshooting method to try.
3. Increase the WordPress Memory Limit
Finally, it’s possible that your WordPress site needs more memory than what is currently allocated. An easy way to increase the memory limit is by editing the wp-config.php file.
To access this file, you’ll need to use a Secure File Transfer Protocol (SFTP) client, such as FileZilla. Alternatively, you can use the file manager in your hosting account.
If you have a DreamHost account, start by navigating to Websites > Files in the sidebar. Next, locate your domain and click on the Manage Files button.
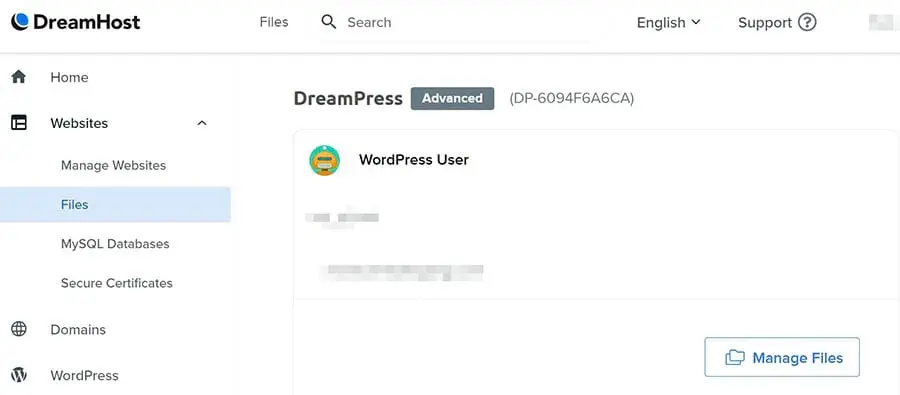
This will take you to the file manager. To access your site’s directory, you’ll need to open the folder labeled with your domain name. Inside it, you should find the wp-config.php file.
If you’re using FileZilla, the first step is to connect to your website. You may need to obtain your credentials from your web host if this is your first time using it. Once connected, locate the wp-config.php file.
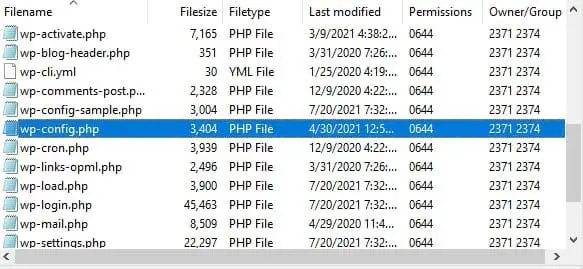
Next, right-click on this file to download it. Now you can use a text editor to open and edit the file. Add the following line of code anywhere before the line that reads /* That’s all, stop editing! Happy blogging. */:
define( 'WP_MEMORY_LIMIT', 'XXXM' );
You’ll want to replace the “XXX” with the amount of memory you’d like allocated to PHP, such as “96MB”. Remember to save your file before closing it. You can then use FileZilla to re-upload your updated wp-config.php file.
How to Fix the WordPress Missed Scheduled Post Error in WordPress (2 Methods)
If none of the above troubleshooting methods worked or if the error keeps happening, you might want to try a more advanced fix. Let’s look at two effective ways to resolve the missed scheduled post issue.
1. Use a Plugin
Scheduled Post Trigger is a free plugin that you can use to ensure that your cron job runs properly. It works by checking if any scheduled posts have been missed each time a visitor lands on your website.

When it comes to plugins, setup doesn’t get much easier than this. Simply install and activate the plugin, and you’re ready to go.
However, it’s best not to rely on this plugin for a permanent solution. Like with WP-cron, caching plugins can interfere with the Scheduled Post Trigger. If you experience any compatibility issues with this plugin, you might want to troubleshoot by disabling your other plugins one at a time to find the culprit.
2. Manage Cron Jobs Directly Through Your Server
Another option is to manage cron jobs directly through your server. This takes a couple of steps, but we’ll walk you through them.
Step 1: Disable WordPress’ Crons
The first step is to disable WordPress’ default crons. Otherwise, any new cron jobs you create may not function properly.
To do this, you’ll once again need to access your wp-config.php file via SFTP or the file manager in your hosting account. This time, you can add this line of code to stop WordPress’ crons. You can add it anywhere above the /* That’s all, stop editing! Happy blogging. */ comment:
define(‘DISABLE_WP_CRON’,true);
Finally, save your changes. You can then re-upload your wp-config.php file and move on to adding your own cron job.
Step 2: Add a New Cron Job
Start at the DreamHost panel. Log in to your hosting account, then go to More > Cron Jobs. Click on the Add New Cron Job button.
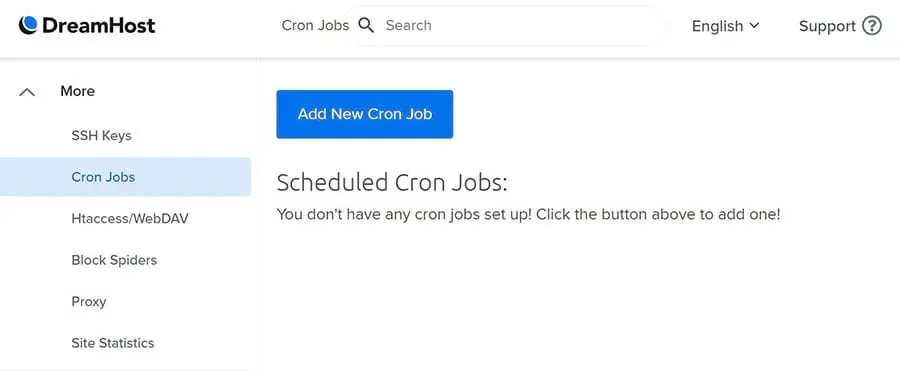
From here, you can fill in the required fields to set up your custom cron job. Having some knowledge of UNIX commands will be helpful to do this, but we’ll show you the basics that should get the job done.
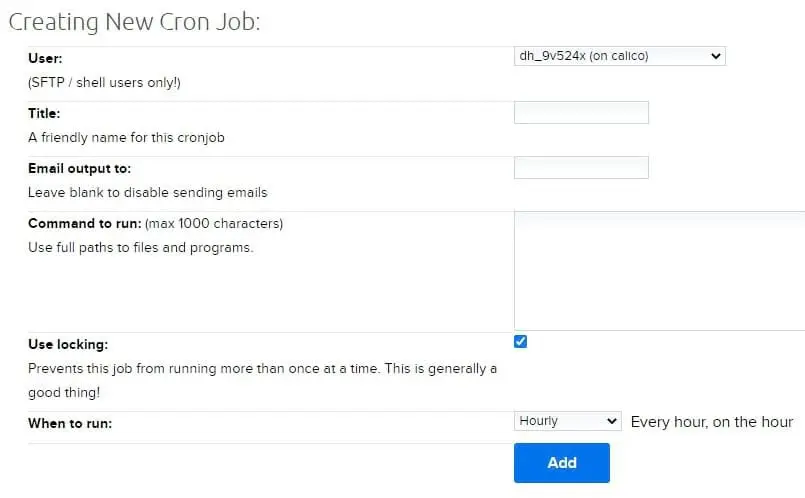
First, choose a User. It’ll need to be a shell user since they’re the only ones that can run cron jobs. You can also add a title to help you remember this job, such as Scheduled Post Trigger.
Next, you can add an email to send the output to. If you don’t need an alert every time your site checks for scheduled posts – which you probably don’t – simply leave it blank.
Now you’ll need to enter the command. First, take a look at this sample command from Zero Point Development:
/usr/bin/php -q /home/zpd/public_html/wp-cron.php
You can copy and paste the first part (/usr/bin/php -q) as is. However, the second part will take some customizing. You’ll need to write your own unique path to the wp-cron.php file. For example, the following code represents DreamHost’s server standard:
/usr/bin/php -q /home/username/domainname/wp-cron.php
If you’re not sure what that looks like, check out our support article on creating cron jobs. You can also reach out to our support team if you need further assistance.
Once you’ve set up your cron job, you can schedule when it’ll run. We recommend somewhere around five minutes. Then, click on the Add button. That’s it! You can always return to the Crontab if you need to troubleshoot your cron job in the future.
Have Another Error? We’ve Got a WordPress Tutorial for That
Do you want to learn how to resolve other technical problems on your site? We’ve put together a number of guides to help you troubleshoot every common WordPress error:
- How to Troubleshoot the WordPress White Screen of Death
- How to Fix the 500 Internal Server Error in WordPress
- How to Fix Syntax Errors in WordPress
- How to Fix the WordPress Not Sending Email Issue
- How to Fix the Error Establishing a Database Connection
- How to Fix WordPress Error 404 Not Found
- How to Fix White Text and Missing Buttons in WordPress Visual Editor
- How to Fix the Sidebar Below Content Error in WordPress
- What to Do When You’re Locked Out of the WordPress Admin Area
- How to Fix “Upload: Failed to Write File to Disk” WordPress Error
And if you’re looking for more information and best practices for running a WordPress site, check out our WordPress Tutorials section. This is a collection of expert-written guides designed to help you navigate the WordPress dashboard like a pro.

Take Your WordPress Website to the Next Level
Whether you need help navigating the WordPress dashboard, fixing incorrect database credentials, or finding the plugins folder, we can help! Subscribe to our monthly digest so you never miss an article.
Sign Me UpWP Scheduled Post Made Easy
The WordPress missed scheduled post error typically occurs when something goes wrong with the cron job that publishes your content. Starting out with a few basic troubleshooting methods, such as checking timezone settings or clearing the WordPress cache, may be enough to get your posts published reliably.
In this post, we’ve also looked at two ways to resolve the WordPress missed schedule error:
- Use a plugin such as Scheduled Post Trigger to ensure that your cron jobs run properly.
- Manage cron jobs directly through your server.
Thanks to DreamHost’s intuitive, user-friendly panel, managing your cron jobs and other maintenance tasks is a straightforward process. Check out our WordPress-optimized hosting plans to get started!
